File Prep Tips: Canva and Procreate

We love hearing about all the new and popular creative programs & apps out there. From Canva to Procreate…  we’ve got you covered in terms of how to set-up a digital file. Our hope is that by sharing some tips & tricks, the process is as headache-free as possible.

Boxcar’s Note: All of the above programs are pretty good, however, they do not get you all the way to what we need for a plate ready file. 

You’ll need to email us your pdf so that we can fix them up for the “last mile” leg. 

Reach out to us at info@boxcarpress.com.  We’re here to help!

The Short & Sweet:

  • All artwork should be 100% the size you need.
  • Send your art exactly as how you want your pulled print to look. 
  • Avoid wispy / fragile text or art.   If you think it may be too thin….then it probably is. You’ll it need to beef it up or scale-up the artwork (to be on the safe side).
  • Crop marks – include them inside and on the artboard if you need them for your own printing needs.
  • Artwork should be pure black or pure white (to the best of your ability).
  • Save out as a PDF.

File formats we do not accept: 

  • PNG
  • JPG
  • GIF
  • PSD

(If this is the only file format you have, reach out and we will assist or advise how to proceed to a plate-ready file.)

Canva tips:

How to Make a New Custom-sized Document

  • Log into or Launch the Canva program.
  • On the upper right hand corner, click the “Create a Design” button 
  • A fly-out menu will appear.
  • At the very bottom of the menu, click the text option “Custom Size”.
  • A new fly-out menu will appear
  • Change the measurements to inches
  • Enter in your Width and Height dimension in the correct fields. (e.g 5 x 7 inches)
  • Click OK.

Saving Out A Digital File

  • In the upper right corner, click the “Share” Button.
  • Next, click the “Download” button.
  • A new menu will appear.
  • Change the File Type to “PDF Print”.
  • Change the Color Profile to CMYK (may need to purchase a subscription for this).
    • DO NOT check the box next to “Flatten”. This will make a low-quality file (no fun).
  • Click the “Download” Button
  • A new pop-up window will appear. Save to your local computer / desktop.

Procreate tips:

Saving Out As a Digital File:

  • Tap “Actions” 
  • A fly-out menu will appear. Under the Share Images section, tap the word “PDF”.
  • Choose “Best” if prompted (this refers to the quality of the file).
  • Save to your local drive on your iPad


Trust Boxcar Press with your files, whatever your program. Send us a PDF file with what you have and we’ll work our prepress magic to aid you.

Boxcar Press Printers’ Tips for 2020

A new year and a fresh new decade signals one thing: a new wave of brilliant letterpress!  We polled our printers here at Boxcar Press to give us their quick, top printing tips to help jumpstart 2020. Perhaps a few of these nuggets of wisdom will make their way into your next printing adventure!

Want to share your top tip? Let us know in the comments section below!

Printers Tips Printing Tips - Boxcar Press
(from left to right: Carrie, Maddie)

CARRIE – Heidelberg Windmill Operator

If you have a thin rule line or the end of a line of type that is getting too blobby, try using an “end cap” of a scrap photopolymer plate (like a small rectangle of it) and put it beyond the trim area. This is so that the rollers use it like an inking roller bearer strip. It helps keep the pressure off that one trouble spot.

MADDIE – Heidelberg Windmill Operator

When beginning a job, do a dry paper test run. There shouldn’t be any impression or ink. This run is so you can adjust the tilt sucker bar to where you want it, make sure it isn’t double-feeding, adjust the tempo of the paper pick-up and more.  Getting this out of the way is one less thing you don’t have to fuss with while in the middle of a job.

(from left to right: Jeff, Leanna, Lou)

JEFF – Kluge Operator (Foil)

For foil on a Kluge, make sure you are using the correct suckers and are maintaining them. Metal suckers work for text weight and envelope liners. Rubber suckers are good for text weight, coaster stock, thinner leather, or textiles.  To keep them in shape, I’ll use a bent paper clip or something small to clean out any fibers or lint that may get up there.

LEANNA – Heidelberg Windmill Operator

If you are doing something double-sided and are trying to avoid show-through on the other side, use glassine board in the packing.

LOU – Heidelberg Windmill Operator

Printing envelopes on the Windmill with a lay pin is a bit labor-intensive but it can work. You’ll need to cut out a shape in the tympan where the lay pin will “nestle” into. This is so that the pin has a place to rest into and not mark the envelope when the press closes.  Or alternatively, use our Boxcar Press swing away lay gauge so you don’t have to worry about marks.

Printers Tips Printing Tips - Boxcar Press
(from left to right: Jake, Phil, Paul)

JAKE – Heidelberg Windmill Operator

When working to print lighter pastel ink colors on the Heidelberg Windmill try the following:

First, use an aggressive cleaner (Putz Pomade comes to mind) to help clean out any remaining ink from a previous run.

Make sure the ink is mixed up correctly and proportionately. Having a ready-to-go pre-mixed stock of ink is very handy (like Cool Grey 1 or other ink colors that contain a lot of Transparent White).

Use a very small bit of ink (small dabs or dots) and slowly add it to the roller. This first ink test run will mostly be checking consistency and to see if there is any ink leftover from a previous run. Run make-ready scrap through the press to see where you stand.

PHIL – Kluge Operator (Foil)

If you are running large solids for foil on a Kluge and are only getting the center to print, adjust the base itself using the screws. Most of the time, the base isn’t hitting flush and making these adjustments will help. Use glass board with soft packing on top. Try using a glue stick to glue the soft packing together as well. The compressed paper and glue makes for an even surface.

PAUL – Heidelberg Windmill Operator (Foil)

When doing foil on the Windmill, getting the right temperature for release can be tricky. Start by keeping good notes at regular intervals on foil release temperatures & times to keep things organized. A journal, jotter, or dedicated scrap of paper will do. When on the press for a job, regularly write down the temperatures so you can go back to it if you need to re-run the job. This helps a lot.

Printers Tips Printing Tips - Boxcar Press
(from left to right: Stan, Pat, Bill)

STAN – Heidelberg Windmill Operator (Foil)

Wear comfortable shoes and don’t be distracted by smartphones as you’ll need to be listening to the sounds your press is making. For example, there is a subtle difference in the whooshing sound when the suckers are picking up the paper correctly…. and when it’s not.

PAT – Heidelberg Windmill Operator

If you are printing black letterpress on a Heidelberg and want a richer, deeper coverage, try a double-hit of the black ink runs (two regular ink run passes — one on top of the other). This helps reduce over-inking. Take care that you are in perfect registration.

BILL – Heidelberg Windmill Operator

Use transparent tape on the Windmill rails to help even out high and low spots. A piece here or there can make all the difference in the laying down of ink along the rails.


File Prep Tip: Pricing Previews for TIF files

Today’s tip is for designers and printers who set up and create their files in Photoshop for platemaking orders.

Our online ordering system can calculate your square inches and pricing for files that are .pdf, .ai, and .eps.  This is so helpful for seeing your costs while creating your ticket.  However, the online system doesn’t do that for .tif files.

We love .tif files from Photoshop, but saving to a PDF in Photoshop can change your black and white file to a rasterized RGB (oh, the horror!).   With the .tif, you see a big fat $0 for cost and that can make some nervous.

Here is a quick suggestion to handle that situation.  Save your .tif with one of the below methods with the words – for pricing only – in the file name and upload it to your job ticket with your tif.  We’ll get a working tif file and you’ll get your price.

Pricing TIFF file letterpress plates for Boxcar Press.

Best ways to do this:

From Photoshop:

Select FILE > SAVE AS > PHOTOSHOP EPS (under Format drop down).

Using Adobe Acrobat Pro:

Select FILE > OPEN. When the window opens, at the bottom the default is Show > Adobe PDF Files. Change to All Files to find your tif.  Choose Open.  Now select FILE > SAVE AS > the Save as PDF window will open > save with pricing only file name.

If you have other programs for saving as a PDF that you’d like to use, contact us and we can help you, if needed.

How to Shorten Crop Marks In Adobe Illustrator

When you are creating crop marks in Adobe Illustrator using the Effect>Crop Marks feature, the next natural question is: “How can I shorten them to save on custom-made platemaking costs and paper?”

We’ve put together a helpful quick tutorial of steps to demystify this task.

Making Crop Marks Editable So You Can Shorten Them

First, Open your file in Adobe Illustrator that contains crop marks (ones that were created using the Effect > Crop Mark feature. If you need a refresher on how to do this, our wonderful tutorial is here!).

Select everything on your artboard. You can do this by manually selecting everything with your black arrow (default tool) or via Object > Select All. You’ll notice that the marks themselves are not selected. This is normal and fine.

How to Create Crop Marks in Adobe Illustrator.

Next, click Object > Expand Appearances (or Object > Expand). This will now make the marks editable.

How to Create Crop Marks in Adobe Illustrator.

Then, use the black arrow (default tool) to shorten your crop marks down from the default of 0.5″ to 0.25”. You can also thicken up your marks with extra strokes to bring them up to your plate type’s minimum line thickness minimum at this point, too.

How to Create Crop Marks in Adobe Illustrator.

Feel free to contact our prepress team if you have any questions as we’d be happy to help out. Stay tuned for more wonderful file prep tips and tutorials!

Free same-day rush service on letterpress plates

Need letterpress plates fast? Like, really fast? We are excited to announce that same-day rush plate orders are free. If you submit the order before 1pm Eastern, Monday through Friday, we can ship the plates the same day for no additional charge. Just select Rush Service on the “Choose Your Shipping Method” step:

Orders over 120 square inches can also receive free 2-day shipping within the US.

Free same-day rush service now available from Boxcar Press. letterpress plates.

And one other improvement for 2017: we’ve added PayPal as a payment option for supply orders.

Papers, Papers, Papers

Modern letterpress is all about the feel of those tactile, luxurious papers and the bite into the paper. With these attributes in mind, how do you make the decision of cotton or bamboo or 1-ply versus 2-ply?

main-opt2

While we do not sell letterpress paper here at Boxcar Press, we do have some nifty tips to help navigate your way through the sea of paper possibilities for your next letterpress printing project.

The Basics

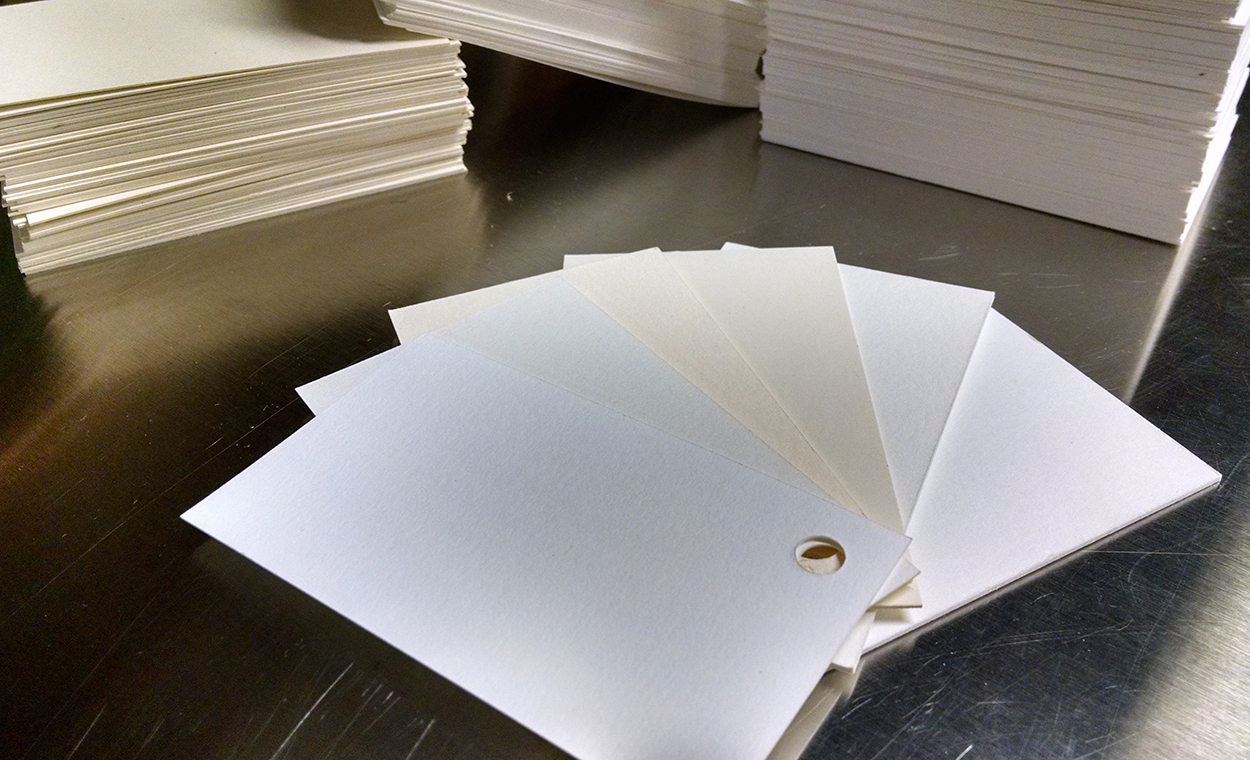
Most letterpress papers are uncoated paper stock (a paper with no gloss or shininess to it). Most papers come in ivory or a shade or two of white from a bright white to a natural white. A paper with a nice texture that aligns with your overall project’s aesthetic is a good choice.

Papers sold are categorized by the overall weight of a ream of paper (or 500 sheets of paper) -“lbs“ refers to standard American English pounds and “gsm“ refers to metric grams/square meters.

A traditional 1-ply paper is usually 110lb or 300 gsm. A traditional 2-ply paper is usually 220lb or 600gsm. In comparison, printer copy paper for a copier or at-home inkjet printer is usually 20lb or 54gsm.

Where to start?

Whether you are a newcomer to the letterpress printing & paper world or a seasoned printer who is looking for a new paper, we heartily recommend (if possible) that you purchase or obtain paper samples.  If you have a keen affection or interest in a certain paper company’s stock of papers, you will find most companies either sell paper swatch books for a reasonable price or, in certain cases, have free paper samples. We have compiled a list of papers for your musing and contemplation. (Note that these prices do not include shipping costs and are current pricing for the items themselves at the time of this post).

General directory of sample packs: visit the following sites for a wide variety of papers and envelopes.

  • LetterpressPapers.com – samples range from $2 — $8
  • Takach Paper Co – sample ring with most stocked papers $12
  • Legion Paper – samples range from $2 — $20
  • Staff Pick: Legion Paper’s Letterpress Selections is $8, and includes 22 different types of 3.5” x 5” paper samples, including Arturo, Colorplan, Rising Museum Board, Stardream, and Legion Bamboo, to name a few.

crane-lettra

What letterpress papers to use?

There are major factors that influence what paper to use for a certain project. Factors may include: budget, thickness of paper for impression depth ability, impression aesthetic, and overall aesthetic. Determine what your projects needs are and research your paper to fit those needs. If you can shop around for pricing… we heartily support it to banish away those barren budget blues.

If you are aiming for a softer impression, try a cotton rag paper like Crane’s Lettra. For a soft but tighter fiber paper, try a bamboo paper or something with less than 100% cotton content  (example: Cardenon papers have 20%-35% cotton content). Some might like the natural recycled content of a chipboard or kraftboard.

Don’t avoid handmade papers thinking they are out of the budget.  There are paper vendors who make beautiful papers in many colors that are favorably priced and will add a “wow” to your project. Handmade papers, which are a unique style of paper all on its own, will usually have a distinct, pronounced texture or feel to the paper where there are minute differences from sheet to sheet. Think of each sheet as “sisters” – similar look but unique all on its own. Deckled edges (or the feathery edges you see on the edge of the paper) are common with handmade papers, although there are papers that do not have the deckled edge. You can cut off the feathered edge if you wish. This uniqueness is often sought after for custom projects.

Embrace and explore all the options and special papers available to you.

Paper Types

Crane’s Lettra: “soft and luxurious to the touch, yet strong and stable on press, the distinct, extra bulky “letterpress” finish of 100% cotton is rare in machine-made paper.” Crane’s Lettra is a staple for our commercially printed projects here at Boxcar Press as well.

canaletto

Cordenon’s Canaletto and Wild: “Italian paper-making art dating back four centuries with a touch of cotton, creating strength and beauty, durability and class.”

  • Neenah Paper offers your first swatchbook for free, each additional copy is $14.95. 

fabriano-artistico

Fabiano Colored Paper and Fabiano Artistico White Rag: An Italian paper mill creates this luxurious soft, cotton-based paper that has a modified cold-pressed surface texture that provides an intriguing paper feel.

  • Available through the “Watercolor Paper Sampler” pack from Legion Paper for $12.

holyoke paper sample book

(photo courtesy of Holyokedirect.com)

Holyoke cotton papers: A soft paper cotton-based paper with a smooth feel and a good alternative to consider for wedding invitations and similar pieces.

Legion’s bamboo paper: This bamboo paper has a tighter fiber weave and is great for business cards.

  • Samples of Legion’s bamboo can be found through Legion Paper (pick up a swatchbook with paper and envelope samples for $5) and LetterpressPaper.com – paper and envelope samples start at $5.

Moab Entrada: A 100% cotton smooth fine art paper that is acid- and lignin-free paper.

  • Two sheets of 8.5″ x 11″ Entrada are included in Moab Paper’s sample box, which sells for $26.48 and includes a variety of other fine art papers. Legion Paper also sells a sampling of thirty 8.5″ x 11″ sheets of various Moab papers for $25.98.

mohawk-superfine

Mohawk Paper: Superfine is a beautiful paper with lush tactility, smooth texture surface and great for all-around projects. The Strathmore Pure Cotton line provides a crisp texture and beautiful wove finish.

  • Mohawk offers swatchbooks for all of their papers, and prices range from $4.99 – $12.99.

reichsavoy

Reich Savoy: “blends old world elegance with new world sophistication making it the perfect choice for a wide range of projects from greeting cards and invitations to hang tags and luxury packaging.”

revere-2

Revere: A luxe and super soft paper that is meant to be held and is perfect for wedding invitations or a card that begs to be touched.

  • A 2″ x 6″ matchbook sample of Revere paper is available through Legion Paper for $0.99.

Rives BFK: “100% cotton and no optical brightening agents, it is a bright white, smooth, soft and pliable sheet.”  

  • Samples of Rives BFK paper is included in Legion Paper’s Letterpress Selections pack for $12. 

Somerset: A soft-handling paper with a supple surface texture. Good for wedding invitations or business cards calling for a softer impression or feel.

  • A mill book containing thirty 5” x 5” sheets is available for $7.50 from Legion Paper.

Arturo papers: A mouldmade soft, luxurious paper that comes in a variety of colors with matched envelopes available.

Chipboard and Kraftboard: A thick, heavy weight of paper board that is great for hangtags and coasters.

  • French Paper offers a $5 sample pack that includes every color and weight from their Kraft-Tone line.

Where do I purchase letterpress paper?

Brick-and-mortar stores

  • A local fine arts supply store – you may have to special order papers if the store does not carry the papers on the shelf.
  • Michael’s – may carry small quantity packs or specific papers may be special-order items.
  • Utrecht – carries a variety of fine papers, including Rives BFK, Moab Entrada, and Lenox 100%.

Online stores

  • LetterpressPaper.com – a great variety of paper selected for letterpress printing with many different varieties in a multitude of colors.
  • Paper-Papers – another great online paper source with many papers in various sizes. We recommend their “Cotton Papers” for letterpress projects. 
  • Paperworks – offers letterpress paper options with matching envelopes, including several FSC-certified papers.
  • Hiromi Paper – specializes in Japanese papers, but is also a good source for Arturo and Fabriano papers, postcard weight paper stock, and deckle-edge papers.
  • Porridge Papers – nice papermakers who make a great variety of handmade paper.
  • Legion Paper – use Legion’s ultimate paper selector to help narrow down your many options. 
  • Crane – purchase Crane Lettra papers in a variety of weights and colors, with various envelope options to match.
  • Twin Rocker – offers handmade papers (check out their swatch set for samples). 
  • Botanical Paper Works – specializes in handmade papers that are embedded with wildflower, vegetable, or herb seeds that can be planted later on (they offer a seed paper swatchbook for $10). 
  • French Paper – produces over 100 stock colors in multiple weights and textures, including kraft papers.
  • Paper Mart – also offers chipboard or kraft papers. 

Looking for a new luxurious cotton stock paper to try out for your next project? We carry Flurry Paper in our online store here! Available in three colors, three weights as well as envelopes and cards!

We hope that this essentials list of paper energizes you to search out and try something new for your next project. As always, let us know in the comments section below how you fared and any suggestions to our list that helped you out. We’d love to hear from you!

L Letterpress Startup Costs

We’re in love with the fact that at-home do-it-yourself letterpress machines are giving access to the beautiful world of letterpress to those who are hands-on and are looking to stay budget-friendly for printing projects (hand-made wedding invites or business cards, anyone?). But what about the initial setup costs and the essential items needed to make the printing journey a fun and fruitful one?

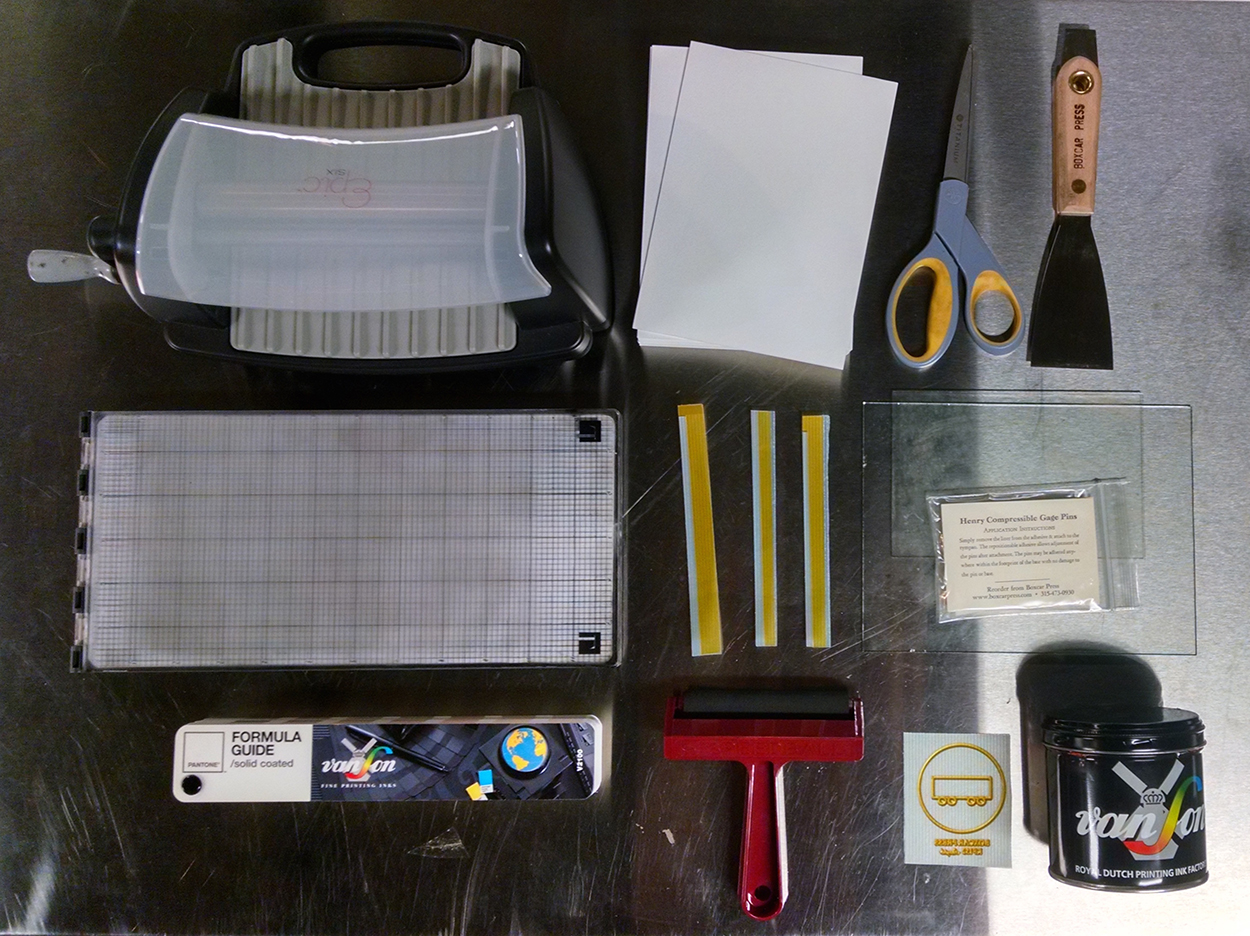
L Letterpress startup materials including L Letterpress machine, paper, ink knife, ink strips, ink plates, speedball rubber brayer, ink can, and pantone formula guide.

Below is a list of the essentials (as well as general pricing) to help get you started. We’ve included options for a few select items where you can curb spending or splurge for luxe goods. (Note that these prices do not include shipping costs and are general estimates for the items themselves at the time of this blog post).

Keep in mind how big (or small) your budget will be for your printing projects as this will be a great way to reduce wallet woes and will help make sure you aren’t making multiple trips out to the store or online for more paper (or worse…. finding out you don’t have all your supplies at-the-ready. Eek!).

L Letterpress Machine with hinged platform.

The letterpress kit:

L Letterpress ($75 – $100) – highly recommended.

Die Cutting / Embossing Machine that is the platform used for the L Letterpress kit.

The Evolution Machine (from We Are Memory Keepers). Prices range from $70 – $150.

Other at-home machines that can be substituted – Fiskars Fuse KitSizzix Big Shot, and Cuttlebug. Prices range from $50 – $120. 

L Letterpress DIY letterpress printing photopolymer printing plate with inking roller bearer strips.L Letterpress DIY letterpress printing photopolymer printing plate with inking roller bearer strips.

Photopolymer printing plates Boxcar Press platemaking costs: up to 50 square inches of printed-area-only custom made printing plates (KF152 plate type): $35.50.

Inking roller bearer plate strips Inking roller bearer strips (from Boxcar Press): Free! Just request inking roller bearer strips in your custom-made plate-making order.

L Letterpress DIY invitations letterpress papers.

Paper:

Practice paper: uncoated papers, preferably in 80# cover or thicker. This is the paper you will experiment on as you learn to use your brayer and ink correctly. Suggestions are sketchbook paper, uncoated card stock, and bristol stock. Don’t use your more expensive project paper until you are confident in your inking.

Project paper: fine quality letterpress paper pricing will vary on what brand or type you purchase and the sheet size / quantity you need. Letterpress papers are uncoated and mostly or all tree-free (cotton, bamboo, and combinations).

We recommend the following paper mill brands: Crane’s Lettra, Mohawk Strathmore, Holyoke Cotton, Rives BFK Cotton, Reich Savoy Cotton, Legion Bamboo, Revere Cotton and Somerset Cotton. Find a paper that will fit within your paper budget allotment to satiate your printing project’s needs and always remember that ordering a little extra paper is a good suggestion for the inevitable “I goofed” moments.

Additional paper suggestions:  don’t overlook chipboard, kraft board or home-made paper options for a different look. 

Examples of pricing:

  • Cotton paper (example: Crane’s Lettra or Strathmore Pure Cotton):
  • Bamboo Paper (example: Legion Bamboo):
    • 8.5” x 11” 110lb paper
    • Prices range from $0.36 per sheet *+
    • (*letterpresspapers.com sells Legion Bamboo at $3.24 per sheet in packs of 25 sheets. You can cut down (9) nine 8.5” x 11” sheets from their 27.5 x 39.3 big sheet size)

Speedball Soft 6" Rubber Brayer.

Soft rubber inking brayer 6” Speedball Soft Rubber Brayer: $15.95

Ink:

Save: Caligo Safe Wash Oil-based ink tubes: 150ml tube ($14.30 – $23.99)

Save:  5 oz or 8 oz ink from Southern Inks:  $10 – $20

Splurge: Van Son Rubber-based inks via Boxcar Press ($34.65-$78.10)

Twp ink plates for L Letterpress DIY printing.

Ink knife Boxcar Press Ink Knife: $14.00

Inking plates use the glass from two Dollar Store picture frames for your inking plates: $2.00

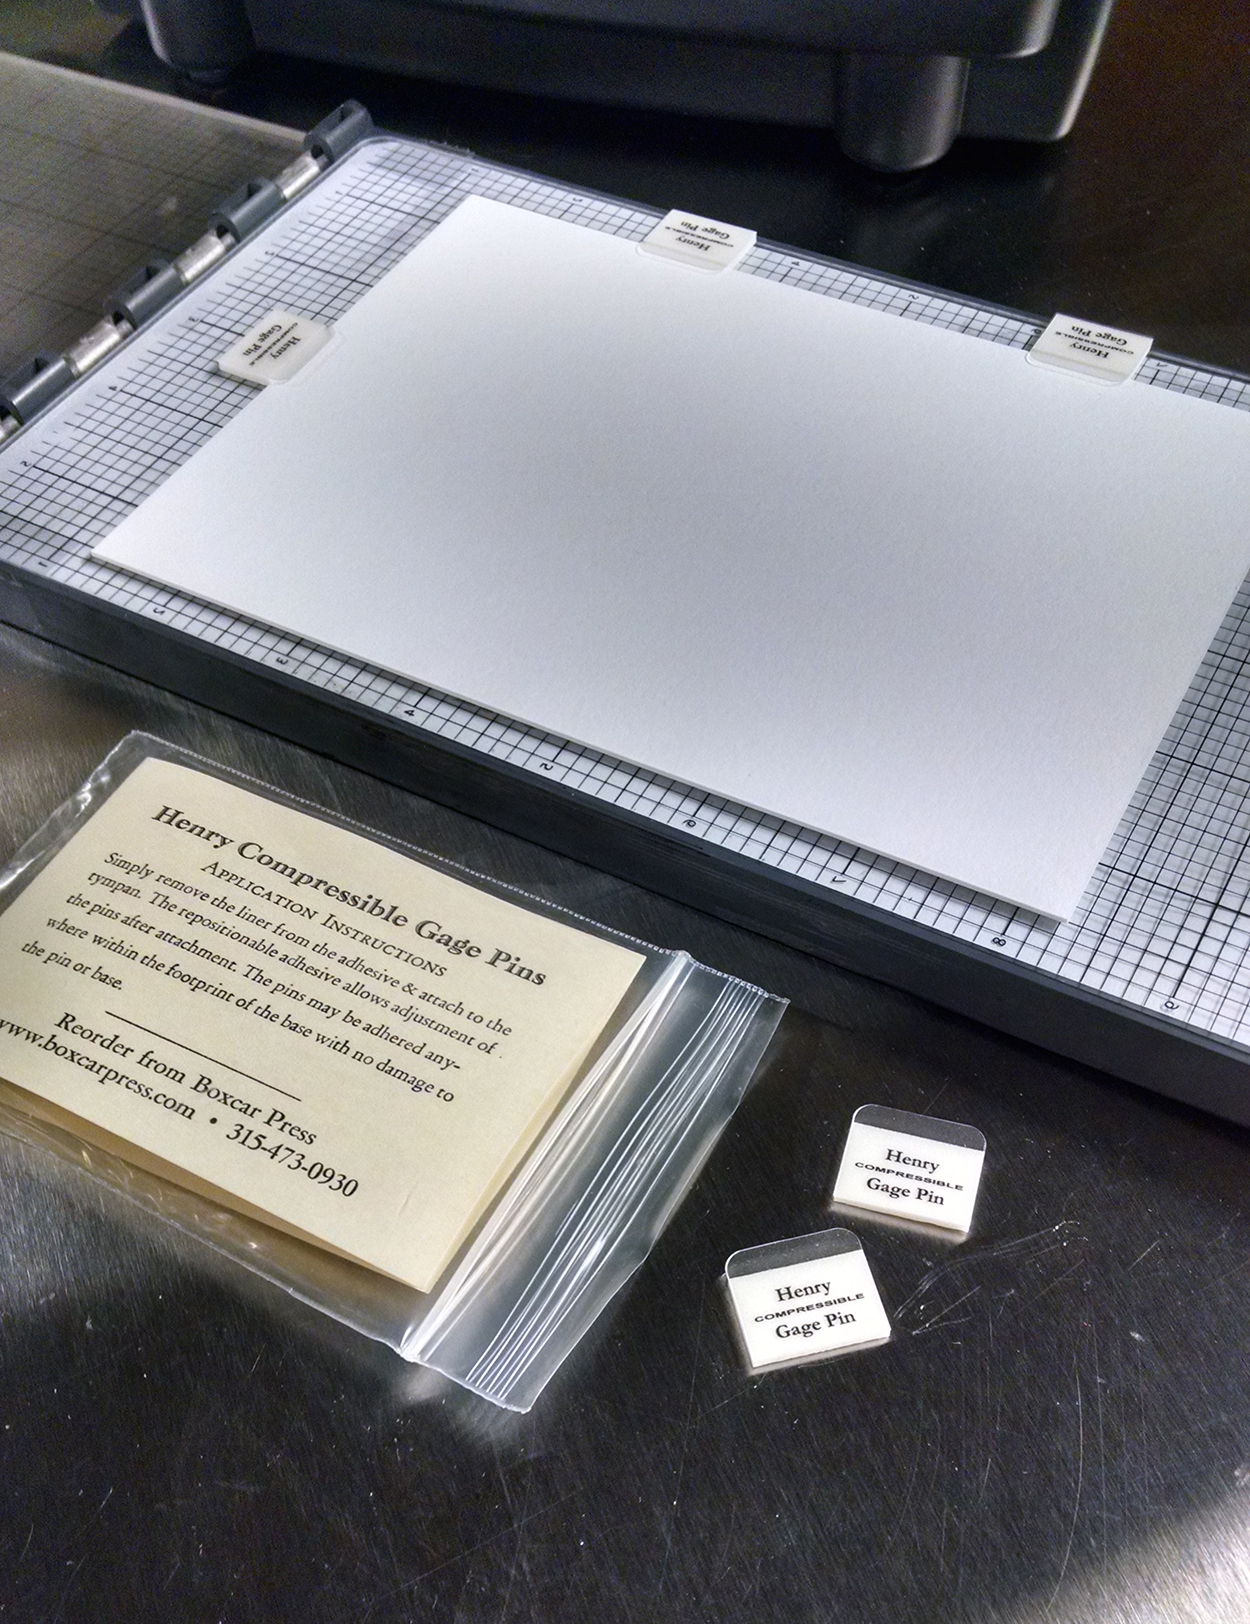
Henry Gage Pins in use on L Letterpress machine.

Gage pins Henry Gage Pins: $12.00

Soft shop rags (for cleaning up your printing plates) Cut-up old soft t-shirts: Free!

Press wash or cleaning solvent:

Super Save:  Vegetable oil followed by baby wipes followed by a very thorough drying with a clean shop rag – $5 (not for your plates)

For cleaning everything:

Save: Odorless Mineral Spirits: $8 (1 quart container) (okay for cleaning everything including plates)

Splurge: California Press Wash: $38.75 (1 gallon container) (okay for cleaning everything including plates)

pantone-1

Pantone Formula Guide:

Save:  Coated Formula Guide – $65 (limited quantities from Boxcar Press)

Splurge: Pantone Solid Coated and Uncoated Formula Guide: $155.00

Backing/Packing board: use cereal boxes, which are made from a soft chipboard. Placing this behind your paper can increase your impression or bite into the paper. Free after breakfast.

Scissors Utility-style scissors: $1.00 – $3.00

Printing apron Boxcar Press Apron: $19.50

Budget-Friendly: ~$266.25

Splurge: ~$758.125

We hope that this essentials list has you energized for your next project and if you are looking for the handy tips and tricks to use your DIY letterpress machine, we heartily recommend checking out these “tell-all” blog posts from our archives:

As always, let us know in the comments section below how you fared and any suggestions to our list that helped you out. We’d love to hear from you!

The Stouffer Gauge: A Platemaking Pal

Whether you are processing photopolymer plates by hand in a DIY set-up or creating photopolymer plates with an industrial platemaking unit, the Stouffer 21-step Gauge is a commonly referred-to item and an invaluable tool to have in your platemaking arsenal.  The gauge will help you figure out the exposure times needed for your processing set-up and allow you to make calibrated, quality plates time and time again.

What is a Stouffer Gauge?

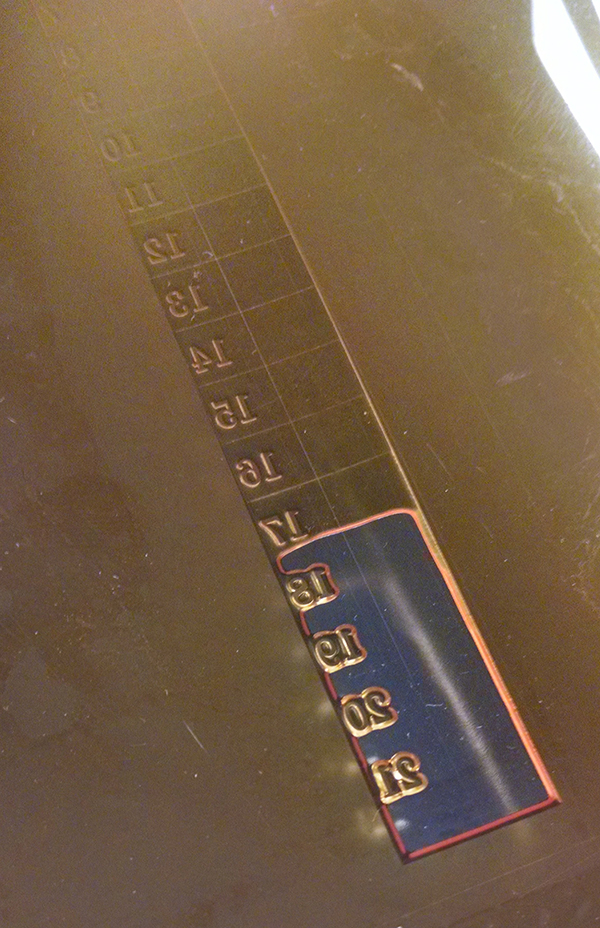
The Gauge itself is a small strip of reusable film negative that has numbers ranging from 1 to 21 corresponding to small blocks (or wedges) of tones ranging from light grey to a deep dark grey/black. The numbers are clear on the film allowing full light to pass through the film.

Like a normal piece of film, the Gauge had a dull side (emulsion) and shiny side (non-emulsion). For the gauge that we sell, the dull side (emulsion) shows the numbers in a wrong-reading orientation. The shiny side (non-emulsion) shows the number in a right-reading orientation.

When making plates, the dull side (emulsion) should face down and touch the plate.

How to Use The Stouffer Gauge

You’ll treat the gauge as a normal positive or negative film and process a small test plate. We recommend that you have a pad of paper & pen handy to record your test results and settings so that you can keep track of what times worked and which ones didn’t. If changing variables, change them one at at time and record your findings. This will keep your test (and results) organized and you can go back to previous tests if you have to backtrack.

recording-results

Before starting, make sure that your bulbs are at 100% and the correct type (UVA bulbs in the 360nm-400nm range – if using black light bulbs – confirm the range). If using the sun as a light source, you’ll need to choose a sunny day, preferably with no cloud coverage. Recommended timeframes are between 11 am – 3pm when the sun’s rays are at their strongest and highest in the sky.

Your goal is to achieve the manufacturer’s recommended Stouffer Scale range for that particular plate.

Place the Stouffer Gauge (emulsion side down) on a small square or rectangle scrap of unexposed photopolymer.

applygaugetounexposedsheet

If available, use the manufacturer’s recommended processing times as your starting point. If you need help with determining a good start time, contact us as we’d be more than happy to help out!

Expose per instructions for Main Exposure. You should see a faint outline of the stouffer scale when you hold the plate up and at an angle. Follow with Wash-out for the instructed time. If you are uncertain of the time for washout – check the plate at intervals to see if the edges of the exposure are clean and the plate doesn’t feel slippery or slimy. After rinsing the plate and sponging off extra moisture, you can check your Stouffer reading.

How to Read the Stouffer Gauge

To determine your exposure reading, read the lowest number of solid relief visible next to the clear exposed section of the Stouffer Gauge.

For example, the plate sample seen below has a recommended 16 on the gauge. The photo illustrates a good representation of the 16 wedge. The number (and corresponding wedge) is completely visible (e.g. not fattened, blotchy and not thinned out).

KF95 correctly exposed Stouffer Gauge test strip

Use the Correction Table (as marked on the back of the envelope that the Stouffer Gauge comes in) to increase or decrease your exposure if you need to.

exposure-correction-table-chart

Example: Using 40 watt UVA bulbs and aiming for a 16 on the Stouffer Gauge:

First trial’s main exposure time: 100 seconds resulted in a solid 15 (with the additional observed results of a blobby 16). A 15 is considered “underexposed” and too low.

Since we’re aiming for a solid 16, we’ll need to go up a step. Using the Exposure Correction Table, to go up a step (increase step guide by…) we need to take our original exposure (100 seconds) and multiply this by 1.4. The next recommended exposure time is then 140 seconds.

Example: Using a single Nu-Arc UVA bulb and aiming for a 16 on the Stouffer Gauge:

First trial’s main exposure time: 600 seconds resulted in a solid 17 (with blobby edges around the top of the 17). A 17 is considered “overexposed” and the exposure time is too high/much.

As we’re aiming for a solid 16, we’ll need to go down a step. Using the Exposure Correction Table, to down a step (decrease step guide by…) we need to take our original exposure (600 seconds) and multiply this by 0.7. The next recommended exposure time is then 420 seconds.

Troubleshooting

Why are my numbers wrong reading when I’m looking at the fully processed plate?

The film strip was incorrectly applied (it was flipped) when placed on the unexposed plate. For the 21-Step Stouffer Gauge, the emulsion side should be face down and be touch the emulsion side of the unexposed photopolymer. If looking down at your set-up, you should be able to see the number and text in a right-reading format.

My target number is blobby or washed out What’s happening?

If your wash-out and dry times are correct, then you are underexposing your film. But you are almost there to your ideal exposure time. This means that the photopolymer hasn’t been hardened up enough to be able to hold on the plate when your plate is being washed and dried. Try boosting up your exposure time by 1/2 a step. This is where keeping track of your test times will be important. You are narrowing in on the time.

underexposed

All of my number and tones are completely hardened up and I can’t see anything at all. What gives?

If your wash-out and dry times are correct, then you are overexposing your film by a bit. This means that all of the photopolymer has hardened up beyond what you need and is running into the risk of being over-exposed and flaking off. Try shortening your exposure time.
overexposed

I’m recording a really, really long exposure time ( about 10 minutes + ). What’s going on?

A likely suspect is that something that is affecting your light source. Common issues are:

  • Bulbs are low wattage (e.g. 15watt): A low bulb emitting a low wattage of light will take much longer to harden the plate as compared to a higher wattage bulb (e.g. 40watt). Some platemaking units were not designed to hold higher wattage bulbs. Also consult your platemakers recommended bulb specifications to avoid malfunctions.
  • Bulbs are not outputting at full capacity: Bulbs should be changed if they fall below 70% output.  Longer and increased exposure times from your optimal time are a sign of diminishing output.  We suggest changing them out for new bulbs as this will give you the most accurate results (Boxcar Press can provide you with new light bulbs). You will need to run a new stouffer test every time you replace your light bulbs.
  • Bulbs are too far from your plates or there are not enough of them or close enough together. Bulbs work best at 1.5” – 3” max away from your plate. Multiple bulbs next to each other give the best results for good plates as the light comes from both the sides and top to create strong relief on the plate. Your exposure unit may need some re-configuration.
  • Using the sun: the sun’s rays will not be uniform in strength or duration as ozone, potential cloud coverages, and other spatial interferences will make the light emission vary in intensity. As powerful an energy source the sun is… it fluctuates and will take a lot longer to expose a plate properly as compared to an industrial exposure unit with calibrated bulbs. But it’s free and plentiful and a long exposure time may be what it takes.  This is where your Stouffer scale reading will guide you.

I’m using a Nu-Arc. Any tips?

The Nu-Arc unit measures in light units and typically only has one bulb that is farther away from the plate.  Times for exposure will be longer because of this light source.   You will have to rely heavily on your Stouffer Gauge for pinpointing your time.  If you have a large model, you may not be able to make a plate as large as the glass frame.  The exposure times at the edges of the machine may be different than your center.  A stouffer test at the center and corners will help determine that.

For more helpful tips on the DIY platemaking process and set-up, letterpresscommons.com has a plethora of information to check out here.


File Preparation Tips: Deciphering Spot Colors and Your Swatch Palette

Here in the pre-press department at Boxcar Press, we unapologetically love 100% CMYK black. It’s the best way to send your files 95% of the time. However, on occasion, when you are printing in two (or more) colors, you may be interested in setting up your file in spot colors or using Pantone swatches.

CMYK

To first understand spot colors, let’s go back to CMYK process colors. We like your files to be 100% of the black only of the CMYK process.

  • C= Cyan
  • M= Magenta
  • Y=Yellow
  • K = Black

Spot-colors-IMG9

100% CMYK black means black is 100% and C,M, and Y are set to 0%.  There is only one color channel visible/used and the other 3 colors are missing and/or removed. If going this route, we are not looking for 100% of all of the color channels – just black.

If you want to print with spring green, in the process color system it might be made up of Cyan 63.5% and Yellow 100%. The mix of these two colors does not work for letterpress and for this, we turn to a spot color approach.

Spot-colors-IMG12

Spot Colors

In letterpress, for a good film and plate, you want just one color and not percentages of other colors. In this example, you want spring green in a spot color or Pantone Swatch.

In contrast to just using 100% CMYK black, a spot color is a special per-determined color, usually identified by a Pantone PMS number or name.  The PMS number will come from a color-matching library. Illustrator and InDesign both have color-matching libraries. For letterpress, you will want a solid spot color, usually from the color library of the Pantone + Solid Uncoated book. A spot color is a separate channel from your CMYK process colors.

Where do you access these libraries to choose your color?

With Adobe Illustrator:
Select your swatches from the color book library

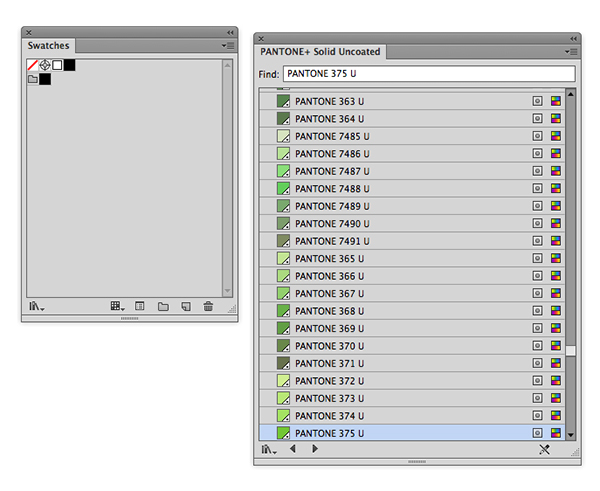
File prep & How to Use Spot Colors for letterpress plates: Adobe Illustrator showing how to access Pantone Swatches (Pantone + Solid Uncoated swatch library book).

(1)  From the navigation bar at the top – Click Window > Swatches. A Swatch palette window will open. In the upper right hand part of that window, there is a set of 4 lines with a small drop down arrow (this icon indicates a fly-out menu). Click on this to open a list.

Spot-colors-IMG7

(2) Scroll to almost the bottom to Select > Open Swatch Library. Click on this for another list of options. Select > Color Books. Another click here to Select > Pantone + Solid Uncoated. A click on this will open this color-matching library with your spot colors.
(3) The top colors are the Pantone colors such as Warm Red and Purple. Next are the Fluorescent colors  followed by Metallics. After that are all the PMS colors by number found in this color library (and your formula guide, if you have one).

illustrator-pantone-color-library-book-1

Use the Find space to type in your PMS color number.  Click on the color to add it to your Swatch palette where you can now apply it to any text or image in your art board.

We now have spring green defined by Pantone 375 U in our swatch palette and our text is 100% of 375 U. Notice that the spot color will also show up on your Separations Preview window also, at the bottom below the CMYK colors.

Spot-colors-IMG13

With Adobe InDesign, load your color library swatches:

(1) From the navigation bar at the top – Click Window > Color > Swatches. A Swatch palette window will open.
(2) In the upper right hand part of that window – there is a set of 4 lines with a small drop down arrow (this icon indicates a fly-out menu). Click on this to open a list.

Spot-colors-IMG6

(3) Select at the top – New Color Swatch – and a window will open. Change the Color Type to Spot. Click on Color Mode for the list of color libraries and change CMYK to Pantone + Solid Uncoated. Choose your PMS color and it will be added to your swatch window so you can apply it to any text or image on your art board. Your spot color will also show up on your Separations Preview window, at the bottom below the CMYK colors.

File prep & How to Use Spot Colors for letterpress plates: Adobe InDesign showing how to access Adobe Pantone + Solid Uncoated swatch library.

When might you want to use spot colors on your files?

You may also be printing in two or more colors that touch each other. Sending a spot color file will help us output and trap correctly for you. If you are setting up a file to show color selections to a client, it is helpful to choose the actual ink colors for printing by their spot colors. (Please note that unless your monitor is calibrated correctly the on screen color may not match exactly the printed color).

Screen shot 2016-07-13 at 12.28.00 PM

When it’s time to submit your files to our pre-press department, we can output with those spot colors and provide a plate for each color. We encourage you to try your color libraries and some spot colors on your own so you can enjoy a little burst of Pantone in your files.

Looking for printers to join the new Etsy Manufacturing Marketplace

Today we’re sharing some big news from Etsy, who recently introduced an exciting new opportunity for letterpress printers. For those of you who don’t know Etsy, it’s a marketplace where people people make, buy, and sell unique goods. Etsy has grown over the last ten years to support over 1.5 million designers selling their products online. As these designers grow, they need production help to scale.

Etsy manufacturing is an exciting new opportunity for letterpress printers

As part of this next step, Etsy has announced Etsy Manufacturing, a new marketplace connecting manufacturers to Etsy designers. Printing is one of the largest categories in need of manufacturing help on Etsy. The great thing about working with Etsy designers is that they appreciate the quality and the craft of the letterpress as much as anyone. 

The goal of Etsy Manufacturing is not to inundate businesses with irrelevant inquiries, but to provide quality leads that will result in long term partnerships. When someone contacts you through Etsy Manufacturing, you can browse their shop and products to make sure it’s a fit on both sides. You can also make a beautiful online profile for your business – accessible to anyone – in just a few minutes. Here’s an example featuring Orlando-based letterpress print shop Mama’s Sauce

Etsy manufacturing is an exciting new opportunity for letterpress printers

Interested? It only takes a few minutes to apply and (in case you were curious) there’s absolutely no cost. You can learn more and apply at www.etsy.com/manufacturing/apply.