File Prep Tips: Canva and Procreate

We love hearing about all the new and popular creative programs & apps out there. From Canva to Procreate…  we’ve got you covered in terms of how to set-up a digital file. Our hope is that by sharing some tips & tricks, the process is as headache-free as possible.

Boxcar’s Note: All of the above programs are pretty good, however, they do not get you all the way to what we need for a plate ready file. 

You’ll need to email us your pdf so that we can fix them up for the “last mile” leg. 

Reach out to us at info@boxcarpress.com.  We’re here to help!

The Short & Sweet:

  • All artwork should be 100% the size you need.
  • Send your art exactly as how you want your pulled print to look. 
  • Avoid wispy / fragile text or art.   If you think it may be too thin….then it probably is. You’ll it need to beef it up or scale-up the artwork (to be on the safe side).
  • Crop marks – include them inside and on the artboard if you need them for your own printing needs.
  • Artwork should be pure black or pure white (to the best of your ability).
  • Save out as a PDF.

File formats we do not accept: 

  • PNG
  • JPG
  • GIF
  • PSD

(If this is the only file format you have, reach out and we will assist or advise how to proceed to a plate-ready file.)

Canva tips:

How to Make a New Custom-sized Document

  • Log into or Launch the Canva program.
  • On the upper right hand corner, click the “Create a Design” button 
  • A fly-out menu will appear.
  • At the very bottom of the menu, click the text option “Custom Size”.
  • A new fly-out menu will appear
  • Change the measurements to inches
  • Enter in your Width and Height dimension in the correct fields. (e.g 5 x 7 inches)
  • Click OK.

Saving Out A Digital File

  • In the upper right corner, click the “Share” Button.
  • Next, click the “Download” button.
  • A new menu will appear.
  • Change the File Type to “PDF Print”.
  • Change the Color Profile to CMYK (may need to purchase a subscription for this).
    • DO NOT check the box next to “Flatten”. This will make a low-quality file (no fun).
  • Click the “Download” Button
  • A new pop-up window will appear. Save to your local computer / desktop.

Procreate tips:

Saving Out As a Digital File:

  • Tap “Actions” 
  • A fly-out menu will appear. Under the Share Images section, tap the word “PDF”.
  • Choose “Best” if prompted (this refers to the quality of the file).
  • Save to your local drive on your iPad


Trust Boxcar Press with your files, whatever your program. Send us a PDF file with what you have and we’ll work our prepress magic to aid you.

Reverse Type File Prep Techniques

An increasingly common question we are asked, here in the Platemaking Department at Boxcar Press, is “will my reverse type/text/design be readable or look good when I letterpress print it?” Reaching the desired results means exploring what exactly “reverse type/design” is and what to check for to guarantee a great printed piece.

When it comes to printing, reverse type or design refers to white or light text or objects positioned against a solid colored (usually dark) background. This is sometimes also referred to as “knocked out” text.

This is an example of reverse type: white text on black background.

There are some important aspects to remember when designing for reverse type, especially with regards to using photopolymer plates:

  • Always take the time to check that your designs meet or exceed the minimum guaranteed line or dot thicknesses. Check out these recommended line and dot thicknesses for your preferred plate type. (We also have a nifty tutorial that offers step-by-step instructions on how to check your dots and line thicknesses – go check it out!). 
  • Next, it’s critical to know the eye will observe your white text as “smaller or thinner” on your printed piece as your eyes are tricked by the optical illusion created by the juxtaposition of a large dark area next to a smaller thinner white area. So, we cheerfully recommend that you add AT LEAST a 0.75pt extra stroke around designs to balance out this optical illusion. This extra stroke is added on top your minimum line/dot thickness.  It’s misleading to judge an onscreen or laser printout against what a final printed piece will look like so we usually suggest erring on the side of slightly larger reverse type.
  • If you are printing in a light ink background, your white text or objects may need to be even larger and thicker because the the contrast between the white text against a light colored background on a white paper can be easily lost. Small text may not have a place in this color situation and needs to be avoided.

Illustration of reversed type on lighter background.

  • Lastly, make note of the dark areas in between your white object. (The highlighted area in cyan shown in the image below illustrates the “dark areas” in between the white objects that should also be checked for line and dot minimums). Are they narrow and thin? Will they meet the line and dot minimums so the plate polymer can support and hold between your white space?

Illustration of the negative space around text and objects that also need to be checked for minimums.

Designs with reverse type can be pretty dramatic, and we hope you’ll consider printing a project like this.  With a little planning and forethought about how the design will translate with a larger solid inked area and  the detail you want, you can have some very satisfying results.  So keep those rollers inked, letterpress lovers, and go reverse!

How to Easily Outline Fonts into Vector Shapes

One of easiest ways to ensure smooth sailing from file to plate is to outline your fonts into vector shapes if you are using either Adobe Illustrator or InDesign. Outlining text into shapes frees you of the troublesome worry of whether you need to send along your fonts or embed them with your file. It also lets you add strokes to thinner fonts with ease – since the text becomes a vector shape, you’ll have more control over how each character looks.

Here’s the scoop in three simple steps:

•    Select the text with your black arrow tool in either Illustrator or InDesign. The black arrow tool is your default selection tool.
•    Select TYPE>Create Outlines.
•    Click anywhere that is blank on your art board and voila! Your text is now converted into fully editable vector shapes!

If the text looks a little thicker than usual, don’t panic! Simply deselect your text or click anywhere on your art board to deselect it and you’ll find that your text looks completely normal.

Did You Know That … Checking Line and Dot Thicknesses Is a Cinch?

One of the most common issues we face here in the Platemaking Department at Boxcar Press is determining a sufficient line thickness. Making that ruling means explaining to customers two things – how do you go about checking to see if lines or text are thick enough to hold on your particular plate? What’s the thinnest line that can hold on the plate?

Surprisingly, there’s just one tool you need to utilize in either Adobe Illustrator or InDesign: The Line Tool. If you are using Adobe Photoshop, the Line Tool unfortunately reverts to a minimum line thickness of 1pt. If you are only using Adobe Photoshop to create your file, we highly recommend placing your final file in InDesign and using the Line Tool to check your work.
LINETHICKNESS_IMG1-1

What do we mean when we talk about our line thickness guarantee? Simply put, if your lines meet or exceed the line thickness as outlined below, we will guarantee they will hold on your plate. If they are under that thickness, it’s hit or miss. Some days you are lucky and other days, you might lose details.

The first thing you need to determine is your line thickness based on your plate type:

– If your plate type is the KF 95, Jet 94FL, or 94SB, you have a line thickness guarantee of 0.25pt or thicker.

– If your plate type is the KF152, 152SB, or 145SHSB, you have a line thickness guarantee of 0.35pt or thicker.

– For all plate types, your dots (like the ones above the letter “i”, periods, or dotted lines) must be 1pt to 1.25 pt or thicker.

THINK FAST! Quick quiz here – what is usually the most common culprit of too thin lines? Crop Marks! More on that later.

Here’s how to use the handy Line Tool to check to see if your lines are thick enough (and plate friendly, too):

You need to first open your file in either Adobe Illustrator or InDesign. We’ll be using a small type sample in Adobe Illustrator to check to see if our lines are plate-friendly for a KF152 plate type. The KF152 plate type has a line thickness minimum of 0.35pt for lines and 1pt to 1.25 pt for dots. We can see that it looks like there are some thin lines in the serif of the Didot typeface… but will they hold?

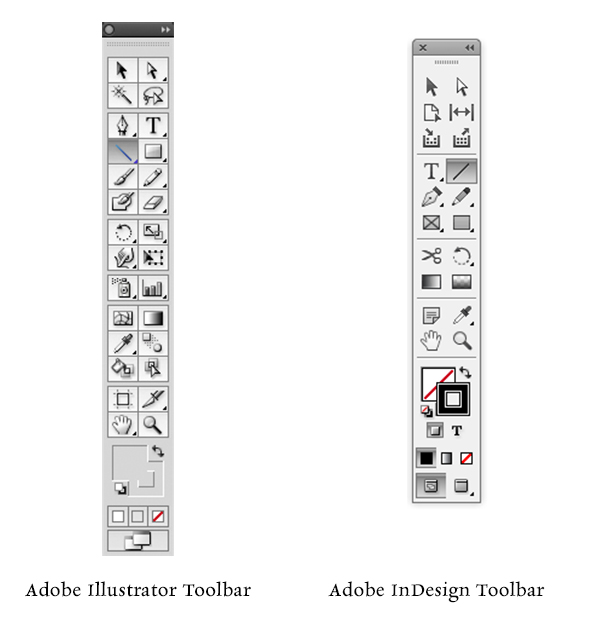
First, click the Line Tool icon in the tool palette on the lefthand side of the screen in Adobe Illustrator to activate it. If you cannot find it, hover your mouse over the icon that looks like a line to see “Line Segment Tool ()” pop up in a yellow box .

Next, in the control panel up at the top, we’ll select the words “1 pt.” in the dropdown area next to the word “STROKE” with our mouse. You’ll be substituting the “1 pt” and replace it with “0.35pt”.

letterpress file prep tips from Boxcar Press

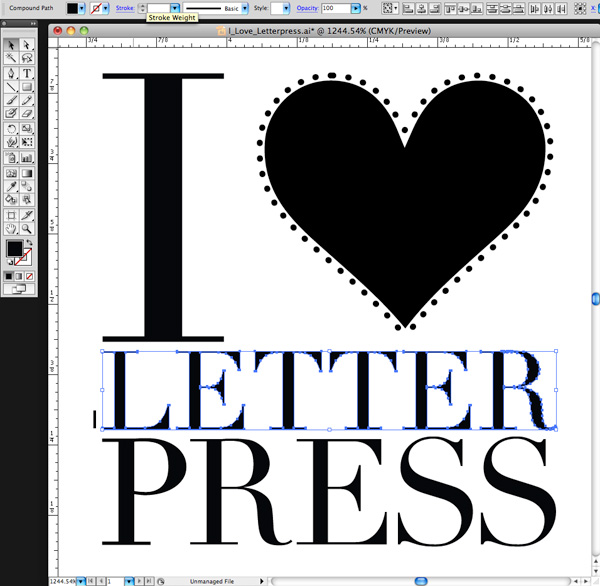
We’ll select the Zoom tool (Z) and move in because we’ll be doing some close up viewing in the area you are inspecting. Select the line segment with your mouse and move it so it is right next to the bottom part of the “L” in “Letter”. Draw a short line so it is parallel with the thin line you are checking on your art board. It doesn’t have to be very long but this little line segment will be our “ruler” to compare thicknesses.

letterpress file prep tips from Boxcar Press

At this close magnification, we see that our line segment set at 0.35pt is much thicker in comparison to the thinnest line in of the serif on the letter “L”. We will need to add a hairline stroke to boost our text’s thickness to correct this.
letterpress file prep tips from Boxcar Press

To add a stroke, using the selection black arrow tool (V), select all the characters in the word “LETTER.” In our Control panel at the top our screen we should see that the letters only have a fill and that we’d like to add a hairline stroke (about 0.15pt). Click the white area next to “STROKE” to activate the area so we can type in “0.15pt”. Immediately single-click the white area anywhere on the board. This will deactivate your selected text and add the hairline (0.15pt) stroke.

letterpress file prep tips from Boxcar Press

Zoom in again using the Zoom Tool around the line segment we created with the Line Tool and the letter “L”. We can now visually see that the serif on the “L” is as thick as the 0.35pt line. Success!

Delete your line segment and zoom back out. Continue around your artboard to visually check to see if other areas look “safe” as well.

For dots, such as the ones around the heart shape, we’ll need to set our Line Tool weight to “1pt” just to be on the safe side. We’ll repeat the same steps mentioned above to create the line, to zoom in, and visually compare the dots’ diameter against the 1pt line segment we just drew on our art board. Like the thinner lines on the “L”, we’ll need to correct this by adding a much thicker stroke of 0.3 pt to boost our dots’ diameter up to 1pt.

Using the Line Tool to check your work should be a “Must Do” test before submitting your files to your platemaking ticket. If anything appears too thin, you will need to correct it.

A few final instructions to help you be aware of potential trouble spots:

-When creating crop marks in your files – the program default setting is often 0.2 pt or 0.25 pt. Keep this in mind so you can make the necessary changes to your crop mark thickness when you place them.

-Thin lines that curve, particularly in wispy script or calligraphic fonts, are always suspect for being too thin. Give them the support they need to hold on the plate with hairline stroke (if needed).

Stay tuned, letterpress lovers — next we’ll solve the mystery of how to create multiple color files!

Related Blog Posts

Learn to Love Color Separations – A Boxcar Press Checklist
Did You Know That … 100% CMYK Black Is a Breeze?

Did You Know That … 100% CMYK Black Is a Breeze?

One of the more common questions we receive here in the Platemaking Department at Boxcar Press is: how do you check to see if your file is set up properly for color separations? Or in 100% CMYK Black (100%K where CMY are at 0%)?

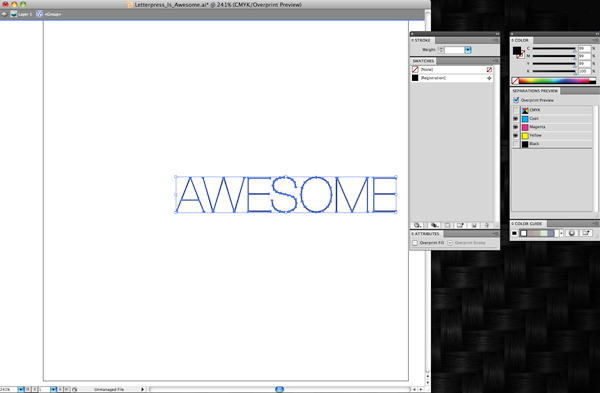
One of the easiest ways is utilizing the Separations Preview palette that Adobe InDesign and Illustrator programs offer. To view the palette, simply select the following:

-In Illustrator (CS4 or above) WINDOW>SEPARATIONS PREVIEW
-In Indesign (all versions of CS) WINDOW>OUTPUT>SEPARATIONS PREVIEW

If you are using a version of CS3 or earlier, you will need to save your files, then place them into InDesign to check your color separations. In Adobe Illustrator CS3 or earlier, the separations preview window feature is not available.

separations-preview-palette-illustrator-indesign

Let’s examine how a file separates out using Adobe Illustrator.

If you are in CMYK mode, then you should see in the Separations Preview palette CMYK, Cyan, Magenta, Yellow, and Black. If you do not see all these colors, you are most likely in RGB or a different color mode and need to switch to CMYK mode. You can easily do this by clicking on FILE>DOCUMENT COLOR MODE>CMYK. Once you are in CMYK mode, click the box next to “Overprint Preview”, which will allow you to see what objects in your file do or do not have a certain color applied to it.

Let’s start with this nifty type sample in Helvetica Neue Ultra Light of “Letterpress Is Awesome”. We can see that it looks like all of the text is in black. Let’s take a look using the Separations Preview to see what colors we truly have here.

CMYK Separation instructions from Boxcar Press

If we click the eye graphic next to “black”, all objects containing ONLY black will disappear, as we’ve turned off that particular color channel. What we have left is the word AWESOME but it’s now a funny shade of black. This indicates it is not in 100% black, but rather is made up of parts of cyan, yellow and magenta in addition to black. We don’t want this as it will cause errors in your film output. Easy fix, though. But first we need to access another window in our toolbox. If it isn’t already open, you will need your Color Window.
(WINDOW>COLOR)

Select the remaining text by clicking on it. In your Color window you will clearly see it is made up of parts of CMYK.

CMYK Separation instructions from Boxcar Press

Move your cursor to the bottom far right of the color window to where there is a white rectangle over a black rectangle. When you are over the black color, the cursor should change to an ink dropper. Select the black and it will change your text to 100% black. See, the sliders moved to 0 for CMY. This text should disappear. Don’t worry! It’s good. Go back to your Separations Preview and click on the eye next to black. Everything reappears. Click off the eye and all items in 100% black only will disappear. That should be your test before submitting your files. If anything is remaining, it needs to be corrected.

If you are printing in another color and need a second plate for that color, your file should be set up to have those objects assigned to a spot or Pantone swatch color for multiple color printing. Stay tuned for our next blog post where we demystify multiple color files!

Learn to Love Color Separations – A Boxcar Press Checklist

To guarantee a happy, press-ready Boxcar plate, follow our Top 10 checklist before finalizing and clicking UPLOAD to your job ticket. These handy steps will go a long way towards a smooth, quick platemaking turnaround. If you are having files created for you – pass these on to your graphic designer so they too can follow this Boxcar Checklist.

1 ) Are the file dimensions 17″ x 22″ or smaller? Is the file size less than 26 MB? (Our maximum plate size that we can proof at this time is 17″ x 22″ – if you need larger, please call.)

2 ) If my plate type is the KF95, Jet 94FL or 94SB, are my lines 0.25 pt or thicker? Are my dots 1 to 1.25pt thick? Dots (in a dotted line or by themselves) need a greater minimum thickness so they can hold on the plate by themselves.

3 ) If my plate type is KF152, 152SB, 145HSB, or 148SHSB, are my lines 0.35 pt or thicker? Are my dots 1.25pt thick?

4 ) If I created the art in Illustrator or InDesign, is the artwork in 100% CMYK Black (as in 0% Cyan, 0% Magenta, 0% Yellow, and 100% Black)?

5 ) If I’m doing color separations, are they assigned to a spot color or a Pantone Swatch Color?

6 ) Is my text outlined into vector shapes if I’m using InDesign or Illustrator for the text? (You can convert them to shapes by selecting the text and going to Type>Create Outlines in either Illustrator or InDesign.)

7 ) Have I indicated what linescreen (LPI) I’d like in the comments section of my ticket if my image is in greyscale or halftone and I want to keep the tonal qualities of the image? (We like 100 lpi for all plate types)

8 ) Is my image converted into bitmap mode of tif if I’m using only Photoshop (and not choosing a linescreen) ?

How to easily create an image in bitmap mode of tif:

    • Opening your image in Photoshop and selecting Image > Mode > Grayscale*.
    • Select Yes if a window asks about discarding color.
    • Then Select Image > Mode > Bitmap. A window will pop up looking for info – use a resolution of 600-1200 dpi and an output method of 50% threshold.
    • Save your file as a tif (with LZW Compression) and either send us the tif or place your tif into illustrator or indesign.
    *Images in higher resolution (600-1200 dpi) will give better, finer results than images in lower resolutions (72-300 dpi). If your images lose a lot of detail, you can either re-scan or adjust your levels of black (Image> Adjustments> Levels or Brightness Contrast). For info on this, please call 315-579-3366 for instructions.

9 ) If I have added crop marks to my file, do they meet the minimum line thicknesses? Are they in registration black if I have more than one color?

10 ) We don’t need a faxed hard copy of the file, simply a PDF and the original file. Are these both uploaded? (e.g, an .EPS and PDF of the same file.)

Stay tuned for more in-depth blogging on file prep when we amaze you with “Did You Know That…”!