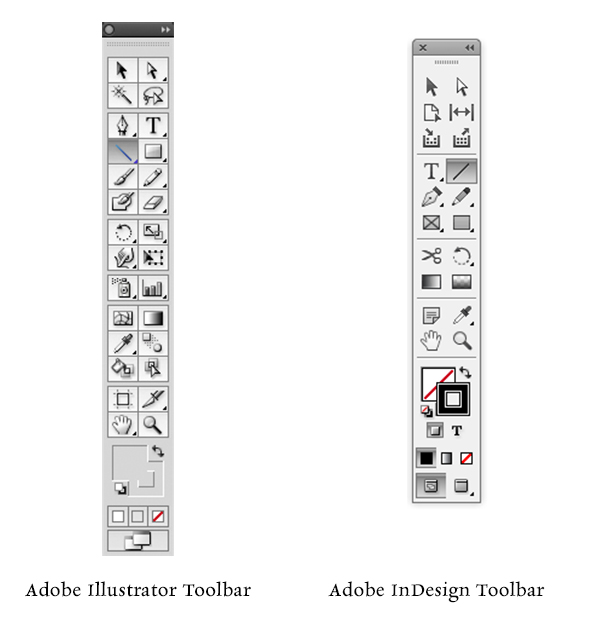
One of the most common issues we face here in the Platemaking Department at Boxcar Press is determining a sufficient line thickness. Making that ruling means explaining to customers two things – how do you go about checking to see if lines or text are thick enough to hold on your particular plate? What’s the thinnest line that can hold on the plate?
Surprisingly, there’s just one tool you need to utilize in either Adobe Illustrator or InDesign: The Line Tool. If you are using Adobe Photoshop, the Line Tool unfortunately reverts to a minimum line thickness of 1pt. If you are only using Adobe Photoshop to create your file, we highly recommend placing your final file in InDesign and using the Line Tool to check your work.

What do we mean when we talk about our line thickness guarantee? Simply put, if your lines meet or exceed the line thickness as outlined below, we will guarantee they will hold on your plate. If they are under that thickness, it’s hit or miss. Some days you are lucky and other days, you might lose details.
The first thing you need to determine is your line thickness based on your plate type:
– If your plate type is the KF 95, Jet 94FL, or 94SB, you have a line thickness guarantee of 0.25pt or thicker.
– If your plate type is the KF152, 152SB, or 145SHSB, you have a line thickness guarantee of 0.35pt or thicker.
– For all plate types, your dots (like the ones above the letter “i”, periods, or dotted lines) must be 1pt to 1.25 pt or thicker.
THINK FAST! Quick quiz here – what is usually the most common culprit of too thin lines? Crop Marks! More on that later.
Here’s how to use the handy Line Tool to check to see if your lines are thick enough (and plate friendly, too):
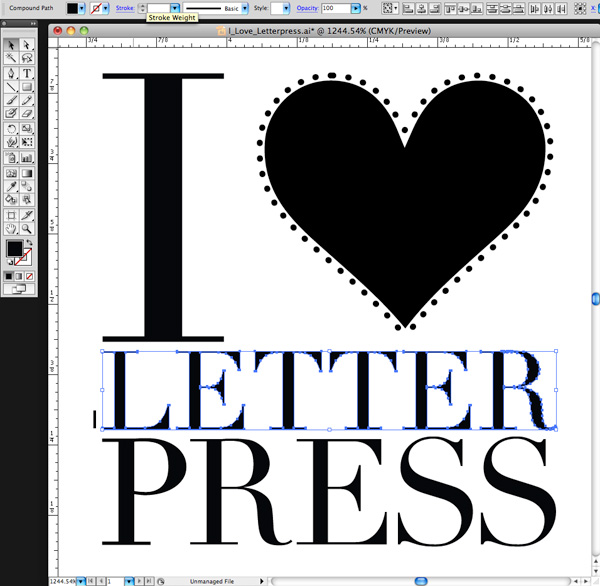
You need to first open your file in either Adobe Illustrator or InDesign. We’ll be using a small type sample in Adobe Illustrator to check to see if our lines are plate-friendly for a KF152 plate type. The KF152 plate type has a line thickness minimum of 0.35pt for lines and 1pt to 1.25 pt for dots. We can see that it looks like there are some thin lines in the serif of the Didot typeface… but will they hold?
First, click the Line Tool icon in the tool palette on the lefthand side of the screen in Adobe Illustrator to activate it. If you cannot find it, hover your mouse over the icon that looks like a line to see “Line Segment Tool ()” pop up in a yellow box .
Next, in the control panel up at the top, we’ll select the words “1 pt.” in the dropdown area next to the word “STROKE” with our mouse. You’ll be substituting the “1 pt” and replace it with “0.35pt”.

We’ll select the Zoom tool (Z) and move in because we’ll be doing some close up viewing in the area you are inspecting. Select the line segment with your mouse and move it so it is right next to the bottom part of the “L” in “Letter”. Draw a short line so it is parallel with the thin line you are checking on your art board. It doesn’t have to be very long but this little line segment will be our “ruler” to compare thicknesses.

At this close magnification, we see that our line segment set at 0.35pt is much thicker in comparison to the thinnest line in of the serif on the letter “L”. We will need to add a hairline stroke to boost our text’s thickness to correct this.

To add a stroke, using the selection black arrow tool (V), select all the characters in the word “LETTER.” In our Control panel at the top our screen we should see that the letters only have a fill and that we’d like to add a hairline stroke (about 0.15pt). Click the white area next to “STROKE” to activate the area so we can type in “0.15pt”. Immediately single-click the white area anywhere on the board. This will deactivate your selected text and add the hairline (0.15pt) stroke.

Zoom in again using the Zoom Tool around the line segment we created with the Line Tool and the letter “L”. We can now visually see that the serif on the “L” is as thick as the 0.35pt line. Success!
Delete your line segment and zoom back out. Continue around your artboard to visually check to see if other areas look “safe” as well.
For dots, such as the ones around the heart shape, we’ll need to set our Line Tool weight to “1pt” just to be on the safe side. We’ll repeat the same steps mentioned above to create the line, to zoom in, and visually compare the dots’ diameter against the 1pt line segment we just drew on our art board. Like the thinner lines on the “L”, we’ll need to correct this by adding a much thicker stroke of 0.3 pt to boost our dots’ diameter up to 1pt.
Using the Line Tool to check your work should be a “Must Do” test before submitting your files to your platemaking ticket. If anything appears too thin, you will need to correct it.
A few final instructions to help you be aware of potential trouble spots:
-When creating crop marks in your files – the program default setting is often 0.2 pt or 0.25 pt. Keep this in mind so you can make the necessary changes to your crop mark thickness when you place them.
-Thin lines that curve, particularly in wispy script or calligraphic fonts, are always suspect for being too thin. Give them the support they need to hold on the plate with hairline stroke (if needed).
Stay tuned, letterpress lovers — next we’ll solve the mystery of how to create multiple color files!
Related Blog Posts
Learn to Love Color Separations – A Boxcar Press Checklist
Did You Know That … 100% CMYK Black Is a Breeze?
Pingback: Reverse Type File Prep Techniques | Boxcar Press
Hi Boxcar!
Thanks for having such a helpful tutorial on how to check line and dot sizes!
In checking my file I found that creating two .35pt lines that intersect, like a + sign, made it super easy. I grouped the two lines and made them a contrasting color that I could move around the screen. It made checking swirled spots of script fonts a piece of cake.
Just thought I would share.
Hi there – I was just wondering – is there really no “automatic” way to detect objects being themselves too tiny/thin or containing parts which are too small to be printed correctly (or go below a certain threshold)? to do so with strokes is so easy, but once you outline or have a shape -> does it really turn into a nightmare of doing everything by hand as described above?
anyway – thanx for Your post!
Hello there Michael,
Unfortunately there is no “automatic” way to instantly check a file as not all file’s artwork is creating equal (as you’ve very sagely observed). We strongly advise that you double-check your design work manually to ensure that it is letterpress-plate friendly and to ensure a great plate. If you have further questions please contact us via info@boxcarpress.com and we’d be happy to help out!
How do we go about uploading handwritten text?
Thanks!
Hello there Ellen!
If you are submitted handwritten text or calligraphy, we ask that you create a TIF (file extension/format) in bitmap color mode for the best quality plate. Bitmap contains artwork that is pure black and pure white … which is what we’re looking for in a file. We have an excellent blog post tutorial here. Come check it out!