Papers, Papers, Papers

Modern letterpress is all about the feel of those tactile, luxurious papers and the bite into the paper. With these attributes in mind, how do you make the decision of cotton or bamboo or 1-ply versus 2-ply?

main-opt2

While we do not sell letterpress paper here at Boxcar Press, we do have some nifty tips to help navigate your way through the sea of paper possibilities for your next letterpress printing project.

The Basics

Most letterpress papers are uncoated paper stock (a paper with no gloss or shininess to it). Most papers come in ivory or a shade or two of white from a bright white to a natural white. A paper with a nice texture that aligns with your overall project’s aesthetic is a good choice.

Papers sold are categorized by the overall weight of a ream of paper (or 500 sheets of paper) -“lbs“ refers to standard American English pounds and “gsm“ refers to metric grams/square meters.

A traditional 1-ply paper is usually 110lb or 300 gsm. A traditional 2-ply paper is usually 220lb or 600gsm. In comparison, printer copy paper for a copier or at-home inkjet printer is usually 20lb or 54gsm.

Where to start?

Whether you are a newcomer to the letterpress printing & paper world or a seasoned printer who is looking for a new paper, we heartily recommend (if possible) that you purchase or obtain paper samples.  If you have a keen affection or interest in a certain paper company’s stock of papers, you will find most companies either sell paper swatch books for a reasonable price or, in certain cases, have free paper samples. We have compiled a list of papers for your musing and contemplation. (Note that these prices do not include shipping costs and are current pricing for the items themselves at the time of this post).

General directory of sample packs: visit the following sites for a wide variety of papers and envelopes.

  • LetterpressPapers.com – samples range from $2 — $8
  • Takach Paper Co – sample ring with most stocked papers $12
  • Legion Paper – samples range from $2 — $20
  • Staff Pick: Legion Paper’s Letterpress Selections is $8, and includes 22 different types of 3.5” x 5” paper samples, including Arturo, Colorplan, Rising Museum Board, Stardream, and Legion Bamboo, to name a few.

crane-lettra

What letterpress papers to use?

There are major factors that influence what paper to use for a certain project. Factors may include: budget, thickness of paper for impression depth ability, impression aesthetic, and overall aesthetic. Determine what your projects needs are and research your paper to fit those needs. If you can shop around for pricing… we heartily support it to banish away those barren budget blues.

If you are aiming for a softer impression, try a cotton rag paper like Crane’s Lettra. For a soft but tighter fiber paper, try a bamboo paper or something with less than 100% cotton content  (example: Cardenon papers have 20%-35% cotton content). Some might like the natural recycled content of a chipboard or kraftboard.

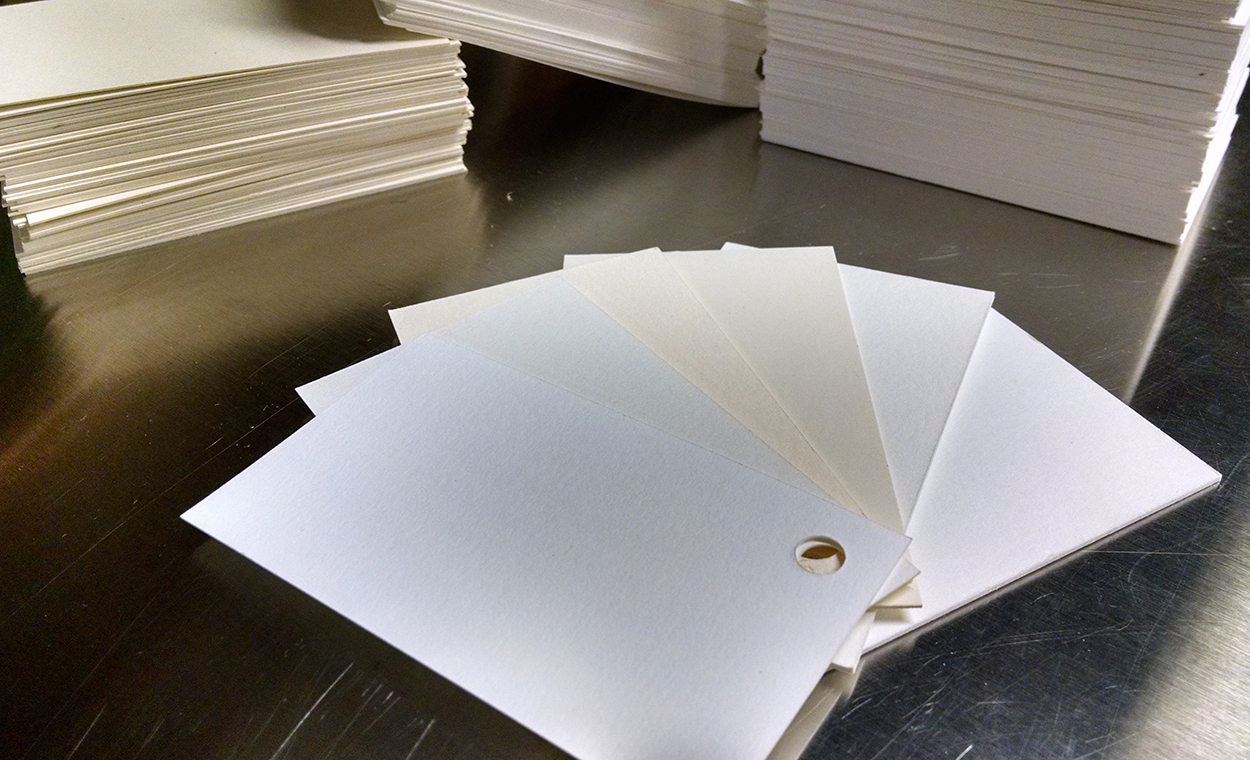
Don’t avoid handmade papers thinking they are out of the budget.  There are paper vendors who make beautiful papers in many colors that are favorably priced and will add a “wow” to your project. Handmade papers, which are a unique style of paper all on its own, will usually have a distinct, pronounced texture or feel to the paper where there are minute differences from sheet to sheet. Think of each sheet as “sisters” – similar look but unique all on its own. Deckled edges (or the feathery edges you see on the edge of the paper) are common with handmade papers, although there are papers that do not have the deckled edge. You can cut off the feathered edge if you wish. This uniqueness is often sought after for custom projects.

Embrace and explore all the options and special papers available to you.

Paper Types

Crane’s Lettra: “soft and luxurious to the touch, yet strong and stable on press, the distinct, extra bulky “letterpress” finish of 100% cotton is rare in machine-made paper.” Crane’s Lettra is a staple for our commercially printed projects here at Boxcar Press as well.

canaletto

Cordenon’s Canaletto and Wild: “Italian paper-making art dating back four centuries with a touch of cotton, creating strength and beauty, durability and class.”

  • Neenah Paper offers your first swatchbook for free, each additional copy is $14.95. 

fabriano-artistico

Fabiano Colored Paper and Fabiano Artistico White Rag: An Italian paper mill creates this luxurious soft, cotton-based paper that has a modified cold-pressed surface texture that provides an intriguing paper feel.

  • Available through the “Watercolor Paper Sampler” pack from Legion Paper for $12.
holyoke paper sample book

(photo courtesy of Holyokedirect.com)

Holyoke cotton papers: A soft paper cotton-based paper with a smooth feel and a good alternative to consider for wedding invitations and similar pieces.

Legion’s bamboo paper: This bamboo paper has a tighter fiber weave and is great for business cards.

  • Samples of Legion’s bamboo can be found through Legion Paper (pick up a swatchbook with paper and envelope samples for $5) and LetterpressPaper.com – paper and envelope samples start at $5.

Moab Entrada: A 100% cotton smooth fine art paper that is acid- and lignin-free paper.

  • Two sheets of 8.5″ x 11″ Entrada are included in Moab Paper’s sample box, which sells for $26.48 and includes a variety of other fine art papers. Legion Paper also sells a sampling of thirty 8.5″ x 11″ sheets of various Moab papers for $25.98.

mohawk-superfine

Mohawk Paper: Superfine is a beautiful paper with lush tactility, smooth texture surface and great for all-around projects. The Strathmore Pure Cotton line provides a crisp texture and beautiful wove finish.

  • Mohawk offers swatchbooks for all of their papers, and prices range from $4.99 – $12.99.

reichsavoy

Reich Savoy: “blends old world elegance with new world sophistication making it the perfect choice for a wide range of projects from greeting cards and invitations to hang tags and luxury packaging.”

revere-2

Revere: A luxe and super soft paper that is meant to be held and is perfect for wedding invitations or a card that begs to be touched.

  • A 2″ x 6″ matchbook sample of Revere paper is available through Legion Paper for $0.99.

Rives BFK: “100% cotton and no optical brightening agents, it is a bright white, smooth, soft and pliable sheet.”  

  • Samples of Rives BFK paper is included in Legion Paper’s Letterpress Selections pack for $12. 

Somerset: A soft-handling paper with a supple surface texture. Good for wedding invitations or business cards calling for a softer impression or feel.

  • A mill book containing thirty 5” x 5” sheets is available for $7.50 from Legion Paper.

Arturo papers: A mouldmade soft, luxurious paper that comes in a variety of colors with matched envelopes available.

Chipboard and Kraftboard: A thick, heavy weight of paper board that is great for hangtags and coasters.

  • French Paper offers a $5 sample pack that includes every color and weight from their Kraft-Tone line.

Where do I purchase letterpress paper?

Brick-and-mortar stores

  • A local fine arts supply store – you may have to special order papers if the store does not carry the papers on the shelf.
  • Michael’s – may carry small quantity packs or specific papers may be special-order items.
  • Utrecht – carries a variety of fine papers, including Rives BFK, Moab Entrada, and Lenox 100%.

Online stores

  • LetterpressPaper.com – a great variety of paper selected for letterpress printing with many different varieties in a multitude of colors.
  • Paper-Papers – another great online paper source with many papers in various sizes. We recommend their “Cotton Papers” for letterpress projects. 
  • Paperworks – offers letterpress paper options with matching envelopes, including several FSC-certified papers.
  • Hiromi Paper – specializes in Japanese papers, but is also a good source for Arturo and Fabriano papers, postcard weight paper stock, and deckle-edge papers.
  • Porridge Papers – nice papermakers who make a great variety of handmade paper.
  • Legion Paper – use Legion’s ultimate paper selector to help narrow down your many options. 
  • Crane – purchase Crane Lettra papers in a variety of weights and colors, with various envelope options to match.
  • Twin Rocker – offers handmade papers (check out their swatch set for samples). 
  • Botanical Paper Works – specializes in handmade papers that are embedded with wildflower, vegetable, or herb seeds that can be planted later on (they offer a seed paper swatchbook for $10). 
  • French Paper – produces over 100 stock colors in multiple weights and textures, including kraft papers.
  • Paper Mart – also offers chipboard or kraft papers. 

Looking for a new luxurious cotton stock paper to try out for your next project? We carry Flurry Paper in our online store here! Available in three colors, three weights as well as envelopes and cards!

We hope that this essentials list of paper energizes you to search out and try something new for your next project. As always, let us know in the comments section below how you fared and any suggestions to our list that helped you out. We’d love to hear from you!

L Letterpress Startup Costs

We’re in love with the fact that at-home do-it-yourself letterpress machines are giving access to the beautiful world of letterpress to those who are hands-on and are looking to stay budget-friendly for printing projects (hand-made wedding invites or business cards, anyone?). But what about the initial setup costs and the essential items needed to make the printing journey a fun and fruitful one?

L Letterpress startup materials including L Letterpress machine, paper, ink knife, ink strips, ink plates, speedball rubber brayer, ink can, and pantone formula guide.

Below is a list of the essentials (as well as general pricing) to help get you started. We’ve included options for a few select items where you can curb spending or splurge for luxe goods. (Note that these prices do not include shipping costs and are general estimates for the items themselves at the time of this blog post).

Keep in mind how big (or small) your budget will be for your printing projects as this will be a great way to reduce wallet woes and will help make sure you aren’t making multiple trips out to the store or online for more paper (or worse…. finding out you don’t have all your supplies at-the-ready. Eek!).

L Letterpress Machine with hinged platform.

The letterpress kit:

L Letterpress ($75 – $100) – highly recommended.

Die Cutting / Embossing Machine that is the platform used for the L Letterpress kit.

The Evolution Machine (from We Are Memory Keepers). Prices range from $70 – $150.

Other at-home machines that can be substituted – Fiskars Fuse KitSizzix Big Shot, and Cuttlebug. Prices range from $50 – $120. 

L Letterpress DIY letterpress printing photopolymer printing plate with inking roller bearer strips.L Letterpress DIY letterpress printing photopolymer printing plate with inking roller bearer strips.

Photopolymer printing plates Boxcar Press platemaking costs: up to 50 square inches of printed-area-only custom made printing plates (KF152 plate type): $35.50.

Inking roller bearer plate strips Inking roller bearer strips (from Boxcar Press): Free! Just request inking roller bearer strips in your custom-made plate-making order.

L Letterpress DIY invitations letterpress papers.

Paper:

Practice paper: uncoated papers, preferably in 80# cover or thicker. This is the paper you will experiment on as you learn to use your brayer and ink correctly. Suggestions are sketchbook paper, uncoated card stock, and bristol stock. Don’t use your more expensive project paper until you are confident in your inking.

Project paper: fine quality letterpress paper pricing will vary on what brand or type you purchase and the sheet size / quantity you need. Letterpress papers are uncoated and mostly or all tree-free (cotton, bamboo, and combinations).

We recommend the following paper mill brands: Crane’s Lettra, Mohawk Strathmore, Holyoke Cotton, Rives BFK Cotton, Reich Savoy Cotton, Legion Bamboo, Revere Cotton and Somerset Cotton. Find a paper that will fit within your paper budget allotment to satiate your printing project’s needs and always remember that ordering a little extra paper is a good suggestion for the inevitable “I goofed” moments.

Additional paper suggestions:  don’t overlook chipboard, kraft board or home-made paper options for a different look. 

Examples of pricing:

  • Cotton paper (example: Crane’s Lettra or Strathmore Pure Cotton):
  • Bamboo Paper (example: Legion Bamboo):
    • 8.5” x 11” 110lb paper
    • Prices range from $0.36 per sheet *+
    • (*letterpresspapers.com sells Legion Bamboo at $3.24 per sheet in packs of 25 sheets. You can cut down (9) nine 8.5” x 11” sheets from their 27.5 x 39.3 big sheet size)

Speedball Soft 6" Rubber Brayer.

Soft rubber inking brayer 6” Speedball Soft Rubber Brayer: $15.95

Ink:

Save: Caligo Safe Wash Oil-based ink tubes: 150ml tube ($14.30 – $23.99)

Save:  5 oz or 8 oz ink from Southern Inks:  $10 – $20

Splurge: Van Son Rubber-based inks via Boxcar Press ($34.65-$78.10)

Twp ink plates for L Letterpress DIY printing.

Ink knife Boxcar Press Ink Knife: $14.00

Inking plates use the glass from two Dollar Store picture frames for your inking plates: $2.00

Henry Gage Pins in use on L Letterpress machine.

Gage pins Henry Gage Pins: $12.00

Soft shop rags (for cleaning up your printing plates) Cut-up old soft t-shirts: Free!

Press wash or cleaning solvent:

Super Save:  Vegetable oil followed by baby wipes followed by a very thorough drying with a clean shop rag – $5 (not for your plates)

For cleaning everything:

Save: Odorless Mineral Spirits: $8 (1 quart container) (okay for cleaning everything including plates)

Splurge: California Press Wash: $38.75 (1 gallon container) (okay for cleaning everything including plates)

pantone-1

Pantone Formula Guide:

Save:  Coated Formula Guide – $65 (limited quantities from Boxcar Press)

Splurge: Pantone Solid Coated and Uncoated Formula Guide: $155.00

Backing/Packing board: use cereal boxes, which are made from a soft chipboard. Placing this behind your paper can increase your impression or bite into the paper. Free after breakfast.

Scissors Utility-style scissors: $1.00 – $3.00

Printing apron Boxcar Press Apron: $19.50

Budget-Friendly: ~$266.25

Splurge: ~$758.125

We hope that this essentials list has you energized for your next project and if you are looking for the handy tips and tricks to use your DIY letterpress machine, we heartily recommend checking out these “tell-all” blog posts from our archives:

As always, let us know in the comments section below how you fared and any suggestions to our list that helped you out. We’d love to hear from you!

At-Home L Letterpress Adventure Printing Tips

The infamously wise Sun Tzu once said “Victorious warriors win first and then go to war, while defeated warriors go to war first and then seek to win.” Old Mr. Sun is spot on and one our wonderful Boxcar Press customers, Pat Farley of Farley Designs, thinks so too as he rolled up his sleeves and put the advice to use. While tackling an invitation suite on the DIY style L Letterpress, Pat had such a excellent time working with the machine that he shared with us some of his at-home printing advice.

L Letterpress at-home printing tips and advice via Pat Farley of farleydesigns.com.

This was my first project using my NEW L Letterpress and I suggest that everyone reads the following tricks from my friends at Boxcar Press before ever attempting anything. It saved me a lot of headaches and money. Check them out. You won’t be disappointed.

L Letterpress Printing Techniques from Boxcar Press
The L Letterpress Revisited
What You Need to Print Well On Your L Letterpress Machine 

Helpful Items To Have On Hand Before You Start

  • 6″ soft brayer( A MUST )
  • A second plate to roll the ink on (I used a cheap glass plate off a picture frame from a  dollar store)
  • Custom KF152 plates from Boxcar Press (ask for extra strips, you will need them)
  • Vanson ink – I used oil based, it dries faster. Use rubber based ink if you are planning on leaving it overnight.
  • Ink knife/spackling knife (dollar store)
  • Paper… I used a thick, 100% Cotton, 220lbs stock (gives amazing depth and great texture)
  • Henry Gage Pins (2 packs of 12)
  • An old t-shirt or soft rage to wipe off the plates, press, and everything in between

And the Printing Adventure Begins

When I created the files for the plates I made sure to leave a 1/8 bleed on all sides. This is a must if you are using thick paper. It will prevent any indents from the plate when you pass it through the machine.

I also used the strips to make sure I rolled the ink on evenly. However, I was told to remove the strips before passing it throughout the machine, but with this project I did not. The reason for this is because I was making 30 invites and it would have taken me ages to remove and replace the strips after every pass. What I did instead was leaving a side free from any Henry Gage pins.

L Letterpress at-home printing tips using Henry Gage Pins.

After a pass I wiped the extra ink that was by the strip on the surface of the bed, I then slid the invite off and replaced it with a new blank invite… easy.

L Letterpress at-home printing tips using inking roller bearer strips from Boxcar Press.

I loved the whole process. Make sure you give yourself enough time so that you don’t feel rushed. It was very relaxing for me, even though I repeated the process 30 times. Every time I popped open the Letterpress to reveal the new invite I felt like it was my first time. There is a learning curve but that’s also the fun part. If you are planning on doing this just once I would stay away, but I’m planning on doing business cards and any other projects I can get my hands on, which makes the money spent well worth it.

L Letterpress at-home printing tips using a blind deboss as a "second" ink color.

Also, laying down a plastic sheet on your workspace is a great idea as the process can be messy and the sheet will help protect your work surface. Even a semi-durable plastic tablecloth will do the trick.

And always remember, less is more when it comes to ink.  It only took 1-2 teaspoons for 30 invites.

Boxcar Press Bonus Round Tips

We suggest, if you are using both inking roller bearer strips, to extend the plate strips about 1″ past each end of your plate so your brayer won’t stop on your design and possibly leave an ink blob.

If you’re looking to save a little bit on ink and time, try printing part of the design in a blind deboss (as Pat has used) and it can add a lot to your design without investing in a second ink.

Using 110 lb and thinner paper?  We have something around our shop that can add a little more packing behind your paper and get you a little bit deeper bite into your paper.  It is the plastic protective overlays that cover our plates before processing.  They are sturdy and resist impression.  While using the L Letterpress in our office, we have cut one sheet of this plastic the same size as our paper and placed it behind our paper in the Henry Gage pins.  It gave us that little extra thickness (.004″ to .005″)  to get the impression we all love.  It held up for a long time, too.  We got the idea because some of the printers in our print shop use it for packing.  Ask for a sheet or two on your next platemaking order if you are printing on the L Letterpress and experimenting.

L Letterpress at-home printing tips using acetate as packing and makes plates last longer.

And lastly, to extend your plates’ shelf life, make sure to keep your plates stored in a sealed ziploc bag after printing in a flat drawer.

Have a tip or two that you want to share? Leave your best advice below in our comments section. We’d love to hear from you about what works and what doesn’t!

The L Letterpress Revisited

It’s been a few years since the popular L Letterpress Machine by Lifestyle Crafts hit the market, and since then other diecutting machine manufacturers have followed up with their own versions. Our original November 2009 blog post about printing on the L Letterpress has been read and positively received, so now it’s time for some updates that we hope will help you get the best results you can. If you are new to this machine – don’t read ahead until you have gone back to our original L Letterpress tutorial and gotten caught up to speed.

 (1) Using the right brayer.
We recommended that you toss the ink roller that came with the machine and suggested some new, soft options. Here are a few more sources for soft brayers – particularly the Speedball brand: McClain’sDaniel Smith, and Amazon.

(2) Using the roller bearers from your KF152 plate order.
So, of course, you are ordering your custom letterpress plates from Boxcar Press.  If you are a do-it-yourself person who loves letterpress than you will want to put your own personal stamp on what you are printing with your own designs and text.  Here is what we recommend when you place your order so all is clear on your end and ours:

  • In the comments section of your platemaking order, write in capital letters – SEND STRIPS.  We will be trimming your plates down but let us know that you want strips, lots of them.  Keep them and use them on future printing jobs.

Roller bearers are really important, and if you’ve ever tried to ink without them, you likely wanted to tear your hair out.

(3) Tips to control how much ink you apply to your plates.
The manufacturer sent you a small plastic square slab – approximately 6″ square.  We’ll call this Slab 1. This was for squeezing your ink onto and rolling your brayer through.

STOP! Our suggestion is that you get another plastic or glass slab of greater size. A piece of glass from a picture frame works well. We will call this Slab 2. Two slabs will improve your inking tremendously.

Squeeze your ink onto the smaller plastic Slab 1. Or scoop out your ink from your 1 lb can – about 1 tablespoon.

L Letterpress printing tips from Boxcar Press

Use your Boxcar Press ink knife and work your ink so it’s a smooth and easy consistency.  Imagine making scrambled eggs and use that motion – turn over, pull through the ink, over and over.

L Letterpress printing tips from Boxcar Press

Now, take the ink knife and pull the end through your mixed ink so you have just an 1/8″ inch round roll of ink on the end of the ink knife. Spread this on your larger second Slab 2 by dabbing it in a line at least equal to the length of your brayer.  Now roll your brayer through this.

Really work the brayer back and forth until it’s consistently and evenly covered. Now roll the brayer over your polymer plates and run a sheet of paper through the machine. Look at your results up close. There shouldn’t be any feathery bleeds outside your impression on your paper.  If there is, you have too much ink.

(4) Removing excess ink
Go back to Slab 2 where you used your brayer.  Use your ink knife and scrap away some of the ink and return it to the first Slab 1 where you mixed.  Now lightly wipe some of the ink off your brayer with a cloth rag (old t-shirts are great for this).

L Letterpress printing tips from Boxcar Press

Wipe off your polymer plate gently, also with a soft cloth. Run your brayer through your ink on the second Slab 2 again and try another impression. You should be seeing less ink.

Use Slab 2 for your brayer only.  As needed, add more ink as in tiny amounts from the ink on Slab 1.  This will help you control your inking and prevent over-inking.  You will be amazed how little ink is needed on your polymer plates for a good inking.

(5) So many ink choices
L Letterpress sends an oil based tube of black ink with the machine.  They also have more colors available in craft stores. These inks are fine, although you really can’t re-use any leftover ink so don’t over squeeze too much ink out of the tube.  Also, they are a little more challenging if you want to try mixing your inks for more colors.

Other suggestions include Van Son Rubber Based inks in 1 lb cans from Boxcar. They come in Pantone colors and you can feel more confident about mixing some colors together if you have a Pantone Uncoated Formula Guide. However, they are only in 1 lb cans and the cost can go quickly from $13 a can to $30 a can for each color. If you are planning for long term, this is a good choice as you can mix your colors and save them for printing another time.

One other suggested ink is available in tubes and colors – it’s an oil based ink called Caligo Safe Wash Ink. They are easily washed up with soap and water. One note of caution though – which takes us to the next step – CLEAN UP.

(6) After Printing, Clean UP.
Don’t ever use water for cleaning up your plates! Do not use water based inks and don’t use water to clean up the inks from the plates. You can use a soft cloth rag to wipe off the ink off your plates.  If you inked correctly, it’s just on the surface of your plates and should wipe off easily.

L Letterpress printing tips from Boxcar Press

L Letterpress has developed some wipes that you can buy – use them only to clean up the L Letterpress equipment and the slabs you used to mix and spread your ink.  Keep your plates from water and moisture or they will soften and deteriorate.

If you want a professional press wash – we suggest VARN California Wash. The smallest size available is 1 gallon; however, it’s a good investment if you expect many years with your L Letterpress.

(7) When you like thicker paper
Your L Letterpress comes with a 1 ply or 100 lb paper.  But if you’ve fallen in love with a thicker stock like museum board or something that is 220 lb or greater thickness, you’ll need a little bit more of prep to get great results.  You can use this paper in your machine and with our polymer plates, but there will need to be some planning when you prepare your files for platemaking.

First, let me explain some of the wonderful things about photopolymer plates. They are easy to cut with
scissors and translucent which makes it nice to see your press bed grid through them. So you can take a bunch of images and text and gang them all up onto one plate leaving just 1/2″ between them to safely cut them apart. Then, you can place your pieces on your L Letterpress press bed exactly where you want them and they will stick with their adhesive back. This all works fine with 100 lb paper, but if you try this with thicker paper, the edges of your plates may also impress into your paper — not what you’re looking for.  So here is where the planning takes place. You will have to design your polymer plate to be slightly larger than your final finished paper size, which means paying a little bit more in platemaking costs for that extra space, but it’s worth it when you see your impression on the double thick paper.

So, when you send in your design, include crop marks on your outer edges so we give you all the plate material border you will need.  If you use precut paper, plan your plate size to be just larger than your paper.  If you are using paper that you will print and cut later, your plate only needs to be larger than your “live area”, that is, the impression from the edge of the plate can push into the area that will be cut off later.

(8) Odds and ends for better printing.
Remember that your paper always has two sides, so while you are working on press setup (makeready) getting everything lined up and perfecting your inking, etc. just hold on to your paper goofs.  Either turn them over and use the back side or just use it for the next time you are setting up in a different color.  Here at Boxcar Press, we use some of our paper sheets multiple times while we get everything just the way we want it.

L Letterpress printing tips from Boxcar Press

  • Invest in Henry Gage Pins – these small, repositionable “tabs” are handy and will do a great job holding your paper in place.
  • Or try this other suggestion for holding your paper in position: take a sheet of the paper you are printing on and trim one sheet down into an “L” shape. Put removable double-sided tape on the back of it and set it aside for one minute. Place the paper you are printing on in position on your press bed.  Take your L shape and with the edges forming the inside of the “L”, move it up against your paper so it is tight against two corners of your paper. Adhere it to your press bed. Now you can always slide your paper against your “L” and have it in position before you close the cover of the machine. This works best with one color printing and smaller printed pieces.

L Letterpress printing tips from Boxcar Press

  • The plastic grid on your L Letterpress machine base has a white paper backing behind it.   If you are getting a little movement and sponginess in your grid base, a little hard packing could help. Your grid can lift out of the bed and you can either replace that white sheet with a thicker sheet or put more sheets on top of it.  Whenever you lift this clear gridded piece, make sure it locks back into place.  And as mentioned in our last post, you may have to tape this press bed at the corners to keep it immobile. Try experimenting by adding more or fewer sheets.

L Letterpress printing tips from Boxcar Press

  • Last but not least, don’t get discouraged.  There is a learning curve here.

And before you decide you want to print your wedding invites on the L Letterpress, start with a smaller project first for practicing.  Try holiday cards, thank you notes, or something that you don’t have all your emotions invested in while you are learning to use this machine.  It will make it much easier to keep up with the experimenting if you don’t have a deadline and a huge investment in paper for your first time printing.

Ready to get started with some L Letterpress projects? Be sure to check out our offerings and visit Papercrave next week to enter for even more project ideas and a chance to win your own set of L Letterpress plates!

L Letterpress Printing Results

A while back, we reviewed the L Letterpress and provided some printing tricks and tips for achieving good quality prints with the L Letterpress and our KF152 photopolymer plates. Amy Graham recently put our tips to the test, ordered a set of plates and with a little and trial and error, printed her own letterpress wedding invitations. They look great! Amy shares, “The results are impressive, using your suggestions.  I achieved the best results using minimal ink and cleaning the plates, roller and inking block about every six prints.”

And check out her invitations –
letterpress-l-boxcar-photopolymer-plates-letterpress-wedding-invitations
Great work, Amy, and thanks for sharing! You can check out Amy’s design work at avail & company.

L Letterpress Printing Techniques from Boxcar Press

The L Letterpress can produce nice printing. No, really, it’s possible. Note: I didn’t say “easy.”

When I first saw the QuickKutz L Letterpress earlier this year I was troubled (as were many of the other professional letterpress printers I knew). It seemed like it would cheapen and denigrate our 550 year old craft and confuse people who are used to high quality letterpress printing. If you comb the internet, you might still be able to find some of my irate comments on blogs denouncing the machine.

But rather than writing the machine off, I’ve recently tried to come to terms with the machine. Whether I like it or not lots of people will be buying this press and hoping to have fun printing. (They’ll probably have a lot more fun than many of us professionals making a living by printing!) Some of the new printers will hope to sell quality printing made from it. It’s really in everyone’s best interest to make sure these new additions to our tiny letterpress community have the best materials and techniques at hand…so that they make letterpress look as good as possible. I don’t want letterpress to have a bad name!

My hope is that by sharing some time-tested letterpress techniques (that aren’t in the manual), I can help L Letterpress printers from getting discouraged. And without help, I think the press can be very discouraging. Eventually, my hope is that these new printers will use the L Letterpress as a stepping stone to a more substantial press, say a 13×18 Heidelberg Windmill, and that they will help preserve the craft and equipment for future generations to cherish.

After spending a few days tinkering with my own L Letterpress, I’m convinced that quality printing is possible on this machine, but it’s not going to happen “out of the box.” It’s not going to be very easy, either, but with enough patience and effort it can be done. Anyone who wants to make nice prints on this press is going to need to make five changes right off the bat. These often reflect techniques that letterpress printers have used for over 500 years, but somehow didn’t seem important to the L Letterpress manufacturer. The press itself is fine. Don’t tell anyone with a Kelsey that I said this, but for single-color printing it’s probably going to give you better results than an old cast iron Kelsey press, if you use it right! You just have to learn how to “mod” it to print well:

1) Throw away the supplied ink roller and buy yourself one that will work.

Why? This is the most important thing you can do to improve your printing on the L Letterpress. As with a big cast iron press, you will never get quality printing without quality rollers…and the manufacturer has not shipped a quality roller. The manufacturer’s ink roller was too hard for letterpress printing. It wasn’t even round, and had “dry spots” when I rolled out ink on an ink slab.

I didn’t even try to pull a print with the supplied roller because it was so obviously problematic. Fortunately I had a big printmaking brayer that’s used in hand printing woodblocks laying around the shop. (You don’t need one that’s nearly so big, this roller is definitely overkill. My point is that you need a soft roller that’s round and wide. )

How to do this? Purchase a printmaking brayer. You can get these for under $10 from your local art store, but I’ll recommend a few that are a little more “up-market” so that you can be assured your roller will work.

Here’s my top choice, if you have the money:

B4802 6.5” x 1.75” Japanese Soft Rubber Brayer $59.75

And then there’s this (along with a lot of similar rollers) which will get the job done:

54129 Speedball 6”x1.25” Soft Rubber Brayer #66 $11.70

(This second brayer is also available at many art stores around the world. The key is the word soft.)

You’ll see why I’m suggesting such a wide (6 inch) roller in my third tip. Also, you’ll probably want an ink knife (shown in the background of the photo above) from a hardware store—check the paint section. This should only cost you a couple bucks. I’ll post shortly with some more specifics on how to ink more consistently. Start here, though!

2) Throw away the supplied plates and make yourselves custom KF152 photopolymer plates.

Why? With just two impressions on the L Letterpress, we had shattered the plastic plates the manufacturer had supplied. A quick Google search showed that we were not alone. Clearly, the plates that ship with the press are made from a material that is not suited to the pressure involved in letterpress printing. Thankfully, we have been making custom photopolymer plates for years that do withstand the pressure of letterpress printing. Our plates are resilient and bounce back after each impression. They won’t shatter if you handle them correctly (keep them out of light when unused and sealed in the ziplock bag provided).

How to do this? Order letterpress plates from us! Our plates are designed to handle the stresses of letterpress printing. Just request the KF152 plate material from our online order form. Our plates come with adhesive backing already on the plate and with a letterpress-printed proof to show what the plate will print like when you start—and when you finish—your printing! You’ll receive them sealed in a bag, so all you have to do is remove them, peel, and stick.

Please note that every plate we made is custom, and we don’t have a catalog of stock plates. We just ask that you send us a PDF or a file suitable for graphic design (AI, EPS, etc.) and we’ll ship you back a plate of what you see on the screen. Also, read over our tips for file submission, which has detailed instructions on preparing custom artwork for letterpress. Real quickly: make sure everything is 100% black, line art, crisp. Feel free to contact us with any questions or concerns you might have about sending us custom artwork for your L Letterpress!


The KF152 is the same thickness as the plates supplied with the L Letterpress:

3) Use roller bearers to ink your plate consistently.

Why? You’re hand inking on an L Letterpress. Inking in letterpress is very touchy, so slight deviations in the pressure or the angle of the roller are going to be visible on the printing. This problem dates back to the handpresss era of letterpress, when rollers were first invented in the 19th century. The solution always has been to put roller bearers to support the roller alongside the part that you want to ink. This will be easier to show with a photograph (again, ignore the massive roller, which is overkill):

You can see that two thin strips of plate material—which are the exact same thickness as the plate—are supporting the ink roller on either side of the plate. This keeps the roller parallel thereby keeping it from exerting too much pressure on the plate. You’ll know you need to do this if your printing appears splotchy, bloated, or isn’t crisp; it will probably never be crisp without roller bearers unless you are superhuman!

How to do this? There’s no additional cost—how about that? Prior to shipping your plate, we have a border around the plate material that would make perfect roller bearers. We usually cut this off prior to shipping the plate out because most people don’t ink by hand. You can simply request that the plate is not trimmed down when you place an order, which will give you strips of material which you can cut down to place alongside your printing plate.


This is our KF152 plate material, available for order via our Platemaking service

Ink up with the roller bearers perpendicular to the direction you’re rolling the roller. When you’re done inking for each print, remove the bearers and set them aside to use on the next print. It’ll add a few seconds to each print but it will improve your printing considerably!


Make sure to peel off the inked-up bearers when you go to pull your print (you don’t actually want these to go through the press). You can put them back down when you’re ready to ink up your next print.

4) Throw away the sponge foam for positioning the paper and use paper “gauge pins” instead.

Why? There are several things keeping you from printing in good “register” on the L Letterpress. The biggest problem is easily solved with a few pieces of paper and double stick tape. The manufacturer instructs you to position your paper with pieces of adhesive foam that stick down to the press bed. One look at that idea and I said, “no way!”

First of all, the foam pieces are not very re-positionable if I want to move them to align the printing. And secondly, the foam is very squishy so I can never be sure where the paper will rest. No letterpress printer in their right mind would use foam to hold their paper in position! We (printers) are accustomed to much more accurate placement of the paper because we have to print multiple colors in register on top of each other. If you’re planning on multiple colors printed on your piece, listen up! While it’s not a traditional solution, people have been making paper “gauge pins” (this is the name of the pins that hold the paper) for ages as a way to hold the paper in a tight squeeze.

How to do this? I used a few pieces of the paper supplied by the manufacturer to make my gauge pins. First I cut six ¼ inch by ½ inch strips.

Then I used double-stick tape to adhere three of the tabs down the press bed where I wanted the paper to be. Finally, I adhered a thin strip on top of these tabs to hold the paper down and in place. The paper we print on will slip under these top strips and bump (securely) up against the bottom tabs. Since the paper is much thinner than the printing plate, you won’t see any indentation where the top strips overlap your piece of paper after squeezing them in the press. If you need to re-position the gauge pins, they peel up nicely and you can move them around to square up your plate to the sheet you’re printing on.

Note: I used our Boxcar film adhesive for the double stick tape, which we sell as a way to mount printing plates. Since this is a re-positionable double stick tape, it fit the bill for this application as well.

lk-l-letterpress-plate

In this photo, you can see a comparison of our KF152 plate (top) with the cupped plastic plate that ships with the machine (bottom). You can also see how the paper gauge pins are holding the paper in position.

5) Tape the press bed down to keep it from moving around.

Why? After a few impressions I noticed that the press bed itself was getting warped. At this point, I also realized that the press bed doesn’t fit perfectly into the machine, it actually has some slop in it. This means that the paper will not be registered to the plate every time you pull a print. To keep this from happening, tape down the press bed at the corners to keep it from moving around.

How to do this? Scotch tape! Letterpress printers are very fond of this supply. Make sure you always have some on hand in your L Letterpress print shop.

Note: I still noticed slop in the registration of the machine, because the hinge that the plate sits on also is pretty sloppy. I can’t figure out a quick or cheap way to improve this, so you’ll just want to be mindful of this looseness if you’re planning on printing multiple colors on top of each other in tight register. Always try to position the panel that flaps down over the plate in the same spot relative to the press bed.

Printing on this machine is still going to take a lot of practice. How much ink do you put on the plate? How do you get multiple plates positioned correctly? I’ll post some more ideas to help you out with your printing in some upcoming blog posts. But for now, I just wanted to point out quick, simple ways to make good printing possible. It’s my opinion that the L Letterpress printing press can actually print well—if start by following these five tips when you start using it, and keep at it long enough. There is going to be a bit of a learning curve, but I hope these tips will at least get you started in the right direction.

I hope this is helpful! If you’ve just bought an L Letterpress, welcome to the wonderful letterpress community! I think you’ll find you’re in good company. It’s a very fun craft to pursue and I hope that these techniques will help you get off to the right start. Let us know if you have any questions or concerns via the comments here and we’ll try to help you out as best as possible!

Here’s a nice print we made for Paper Crave. Her blog post got me started on this project. Thanks Kristen!