L Letterpress Startup Costs

We’re in love with the fact that at-home do-it-yourself letterpress machines are giving access to the beautiful world of letterpress to those who are hands-on and are looking to stay budget-friendly for printing projects (hand-made wedding invites or business cards, anyone?). But what about the initial setup costs and the essential items needed to make the printing journey a fun and fruitful one?

L Letterpress startup materials including L Letterpress machine, paper, ink knife, ink strips, ink plates, speedball rubber brayer, ink can, and pantone formula guide.

Below is a list of the essentials (as well as general pricing) to help get you started. We’ve included options for a few select items where you can curb spending or splurge for luxe goods. (Note that these prices do not include shipping costs and are general estimates for the items themselves at the time of this blog post).

Keep in mind how big (or small) your budget will be for your printing projects as this will be a great way to reduce wallet woes and will help make sure you aren’t making multiple trips out to the store or online for more paper (or worse…. finding out you don’t have all your supplies at-the-ready. Eek!).

L Letterpress Machine with hinged platform.

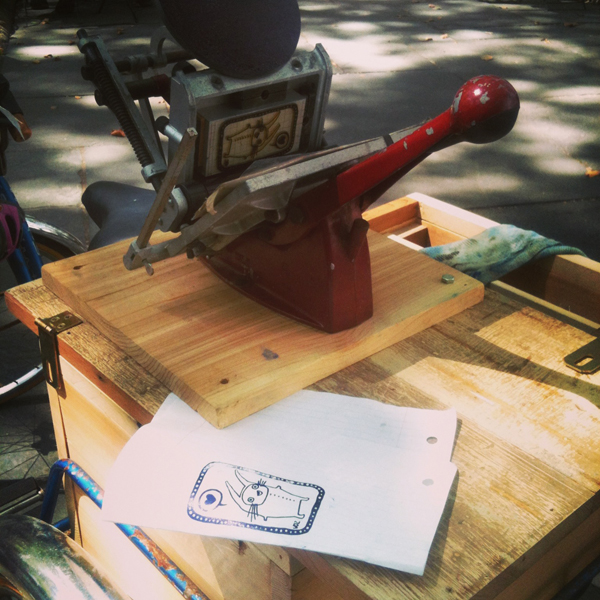
The letterpress kit:

L Letterpress ($75 – $100) – highly recommended.

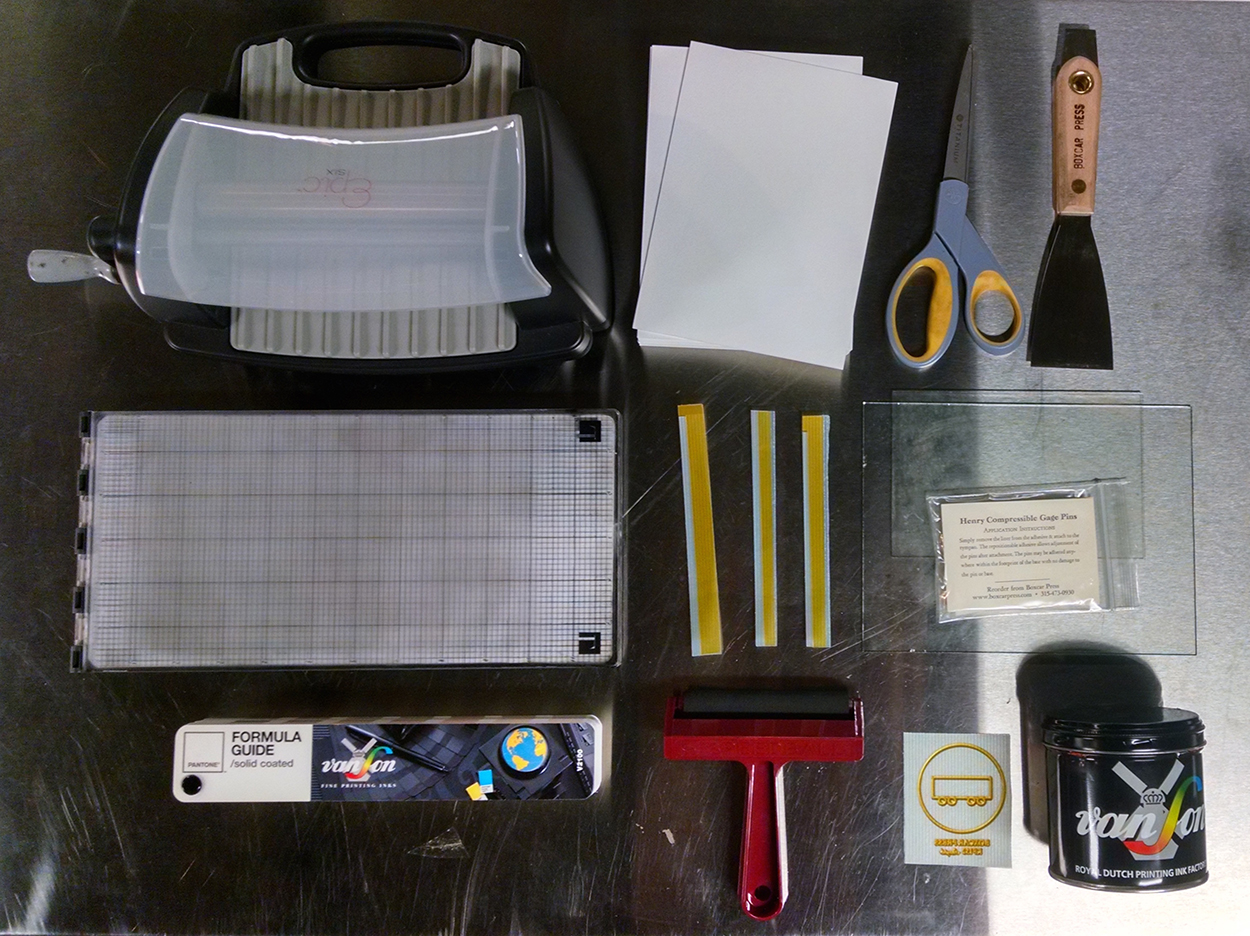
Die Cutting / Embossing Machine that is the platform used for the L Letterpress kit.

The Evolution Machine (from We Are Memory Keepers). Prices range from $70 – $150.

Other at-home machines that can be substituted – Fiskars Fuse KitSizzix Big Shot, and Cuttlebug. Prices range from $50 – $120. 

L Letterpress DIY letterpress printing photopolymer printing plate with inking roller bearer strips.L Letterpress DIY letterpress printing photopolymer printing plate with inking roller bearer strips.

Photopolymer printing plates Boxcar Press platemaking costs: up to 50 square inches of printed-area-only custom made printing plates (KF152 plate type): $35.50.

Inking roller bearer plate strips Inking roller bearer strips (from Boxcar Press): Free! Just request inking roller bearer strips in your custom-made plate-making order.
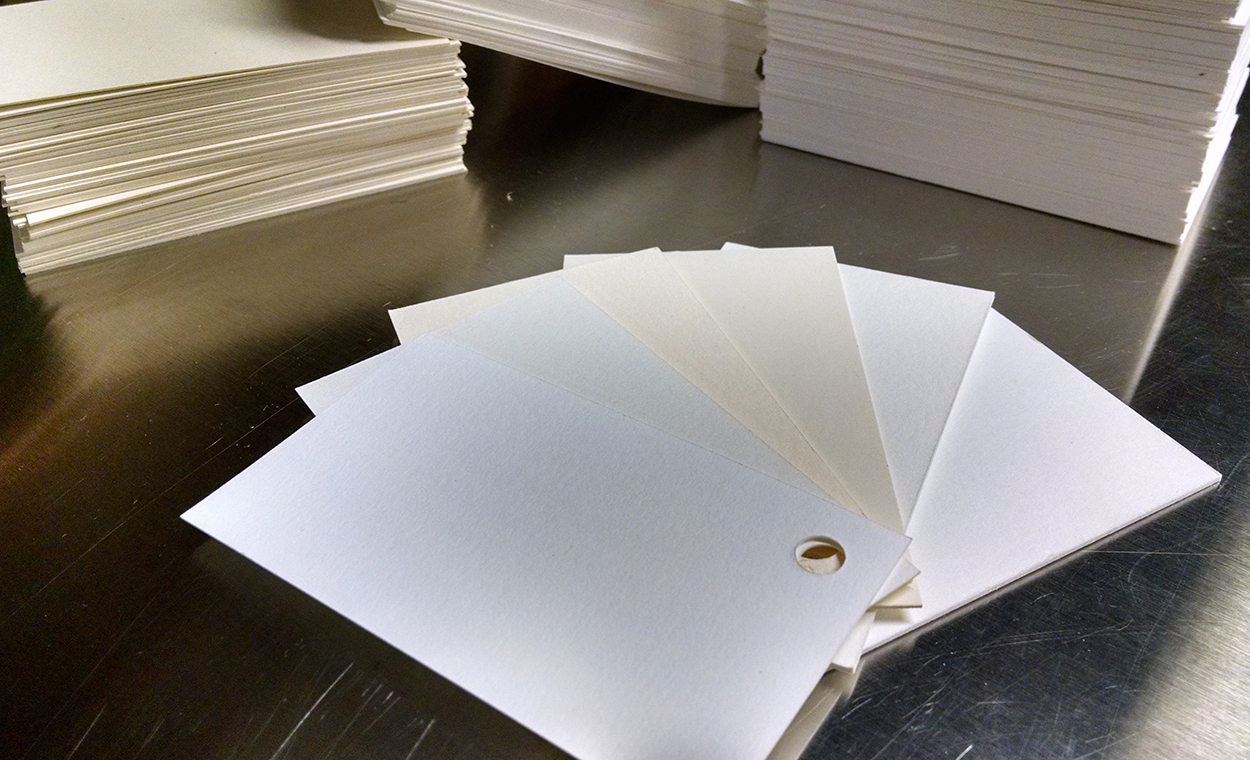
L Letterpress DIY invitations letterpress papers.

Paper:

Practice paper: uncoated papers, preferably in 80# cover or thicker. This is the paper you will experiment on as you learn to use your brayer and ink correctly. Suggestions are sketchbook paper, uncoated card stock, and bristol stock. Don’t use your more expensive project paper until you are confident in your inking.

Project paper: fine quality letterpress paper pricing will vary on what brand or type you purchase and the sheet size / quantity you need. Letterpress papers are uncoated and mostly or all tree-free (cotton, bamboo, and combinations).

We recommend the following paper mill brands: Crane’s Lettra, Mohawk Strathmore, Holyoke Cotton, Rives BFK Cotton, Reich Savoy Cotton, Legion Bamboo, Revere Cotton and Somerset Cotton. Find a paper that will fit within your paper budget allotment to satiate your printing project’s needs and always remember that ordering a little extra paper is a good suggestion for the inevitable “I goofed” moments.

Additional paper suggestions:  don’t overlook chipboard, kraft board or home-made paper options for a different look. 

Examples of pricing:

  • Cotton paper (example: Crane’s Lettra or Strathmore Pure Cotton):
  • Bamboo Paper (example: Legion Bamboo):
    • 8.5” x 11” 110lb paper
    • Prices range from $0.36 per sheet *+
    • (*letterpresspapers.com sells Legion Bamboo at $3.24 per sheet in packs of 25 sheets. You can cut down (9) nine 8.5” x 11” sheets from their 27.5 x 39.3 big sheet size)

Speedball Soft 6" Rubber Brayer.

Soft rubber inking brayer 6” Speedball Soft Rubber Brayer: $15.95

Ink:

Save: Caligo Safe Wash Oil-based ink tubes: 150ml tube ($14.30 – $23.99)

Save:  5 oz or 8 oz ink from Southern Inks:  $10 – $20

Splurge: Van Son Rubber-based inks via Boxcar Press ($34.65-$78.10)

Twp ink plates for L Letterpress DIY printing.

Ink knife Boxcar Press Ink Knife: $14.00

Inking plates use the glass from two Dollar Store picture frames for your inking plates: $2.00

Henry Gage Pins in use on L Letterpress machine.

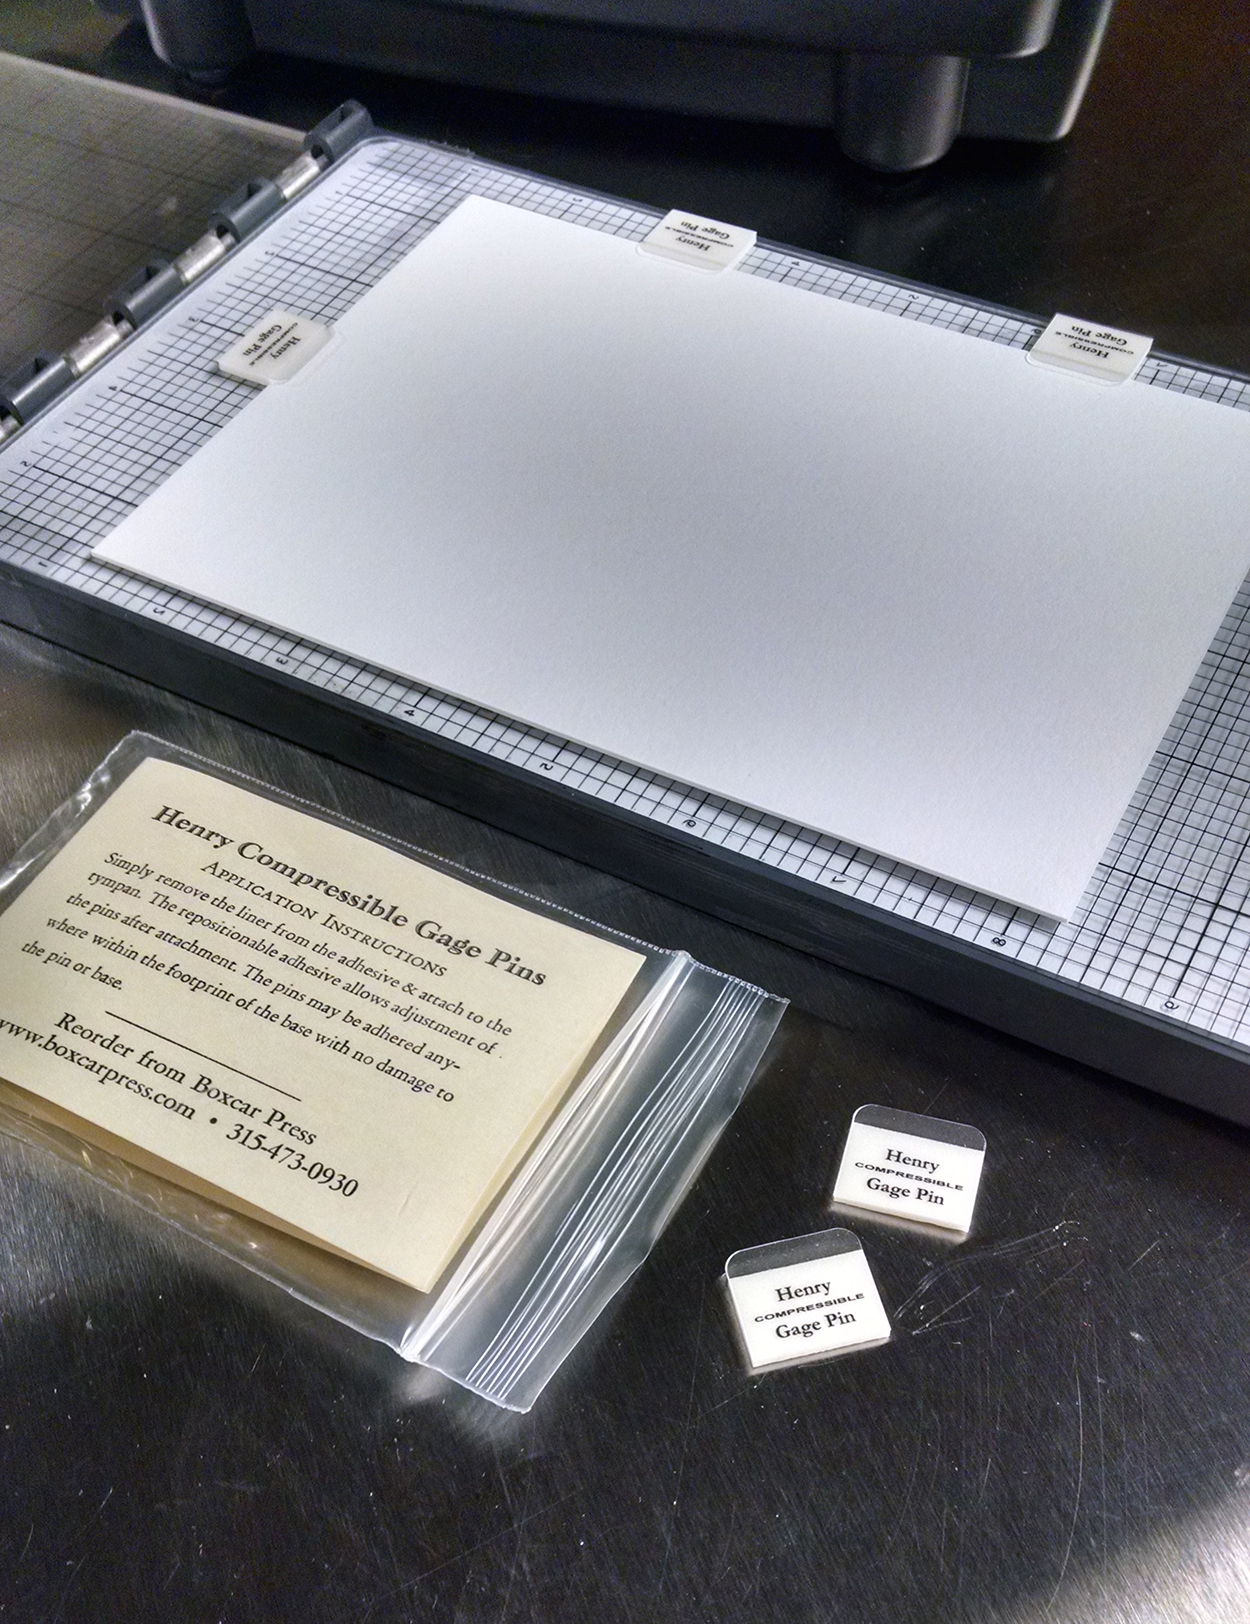
Gage pins Henry Gage Pins: $12.00

Soft shop rags (for cleaning up your printing plates) Cut-up old soft t-shirts: Free!

Press wash or cleaning solvent:

Super Save:  Vegetable oil followed by baby wipes followed by a very thorough drying with a clean shop rag – $5 (not for your plates)

For cleaning everything:

Save: Odorless Mineral Spirits: $8 (1 quart container) (okay for cleaning everything including plates)

Splurge: California Press Wash: $38.75 (1 gallon container) (okay for cleaning everything including plates)

pantone-1

Pantone Formula Guide:

Save:  Coated Formula Guide – $65 (limited quantities from Boxcar Press)

Splurge: Pantone Solid Coated and Uncoated Formula Guide: $155.00

Backing/Packing board: use cereal boxes, which are made from a soft chipboard. Placing this behind your paper can increase your impression or bite into the paper. Free after breakfast.

Scissors Utility-style scissors: $1.00 – $3.00

Printing apron Boxcar Press Apron: $19.50

Budget-Friendly: ~$266.25

Splurge: ~$758.125

We hope that this essentials list has you energized for your next project and if you are looking for the handy tips and tricks to use your DIY letterpress machine, we heartily recommend checking out these “tell-all” blog posts from our archives:

As always, let us know in the comments section below how you fared and any suggestions to our list that helped you out. We’d love to hear from you!

The Stouffer Gauge: A Platemaking Pal

Whether you are processing photopolymer plates by hand in a DIY set-up or creating photopolymer plates with an industrial platemaking unit, the Stouffer 21-step Gauge is a commonly referred-to item and an invaluable tool to have in your platemaking arsenal.  The gauge will help you figure out the exposure times needed for your processing set-up and allow you to make calibrated, quality plates time and time again.

What is a Stouffer Gauge?

The Gauge itself is a small strip of reusable film negative that has numbers ranging from 1 to 21 corresponding to small blocks (or wedges) of tones ranging from light grey to a deep dark grey/black. The numbers are clear on the film allowing full light to pass through the film.

Like a normal piece of film, the Gauge had a dull side (emulsion) and shiny side (non-emulsion). For the gauge that we sell, the dull side (emulsion) shows the numbers in a wrong-reading orientation. The shiny side (non-emulsion) shows the number in a right-reading orientation.

When making plates, the dull side (emulsion) should face down and touch the plate.

How to Use The Stouffer Gauge

You’ll treat the gauge as a normal positive or negative film and process a small test plate. We recommend that you have a pad of paper & pen handy to record your test results and settings so that you can keep track of what times worked and which ones didn’t. If changing variables, change them one at at time and record your findings. This will keep your test (and results) organized and you can go back to previous tests if you have to backtrack.

recording-results

Before starting, make sure that your bulbs are at 100% and the correct type (UVA bulbs in the 360nm-400nm range – if using black light bulbs – confirm the range). If using the sun as a light source, you’ll need to choose a sunny day, preferably with no cloud coverage. Recommended timeframes are between 11 am – 3pm when the sun’s rays are at their strongest and highest in the sky.

Your goal is to achieve the manufacturer’s recommended Stouffer Scale range for that particular plate.

Place the Stouffer Gauge (emulsion side down) on a small square or rectangle scrap of unexposed photopolymer.

applygaugetounexposedsheet

If available, use the manufacturer’s recommended processing times as your starting point. If you need help with determining a good start time, contact us as we’d be more than happy to help out!

Expose per instructions for Main Exposure. You should see a faint outline of the stouffer scale when you hold the plate up and at an angle. Follow with Wash-out for the instructed time. If you are uncertain of the time for washout – check the plate at intervals to see if the edges of the exposure are clean and the plate doesn’t feel slippery or slimy. After rinsing the plate and sponging off extra moisture, you can check your Stouffer reading.

How to Read the Stouffer Gauge

To determine your exposure reading, read the lowest number of solid relief visible next to the clear exposed section of the Stouffer Gauge.

For example, the plate sample seen below has a recommended 16 on the gauge. The photo illustrates a good representation of the 16 wedge. The number (and corresponding wedge) is completely visible (e.g. not fattened, blotchy and not thinned out).

KF95 correctly exposed Stouffer Gauge test strip

Use the Correction Table (as marked on the back of the envelope that the Stouffer Gauge comes in) to increase or decrease your exposure if you need to.

exposure-correction-table-chart

Example: Using 40 watt UVA bulbs and aiming for a 16 on the Stouffer Gauge:

First trial’s main exposure time: 100 seconds resulted in a solid 15 (with the additional observed results of a blobby 16). A 15 is considered “underexposed” and too low.

Since we’re aiming for a solid 16, we’ll need to go up a step. Using the Exposure Correction Table, to go up a step (increase step guide by…) we need to take our original exposure (100 seconds) and multiply this by 1.4. The next recommended exposure time is then 140 seconds.

Example: Using a single Nu-Arc UVA bulb and aiming for a 16 on the Stouffer Gauge:

First trial’s main exposure time: 600 seconds resulted in a solid 17 (with blobby edges around the top of the 17). A 17 is considered “overexposed” and the exposure time is too high/much.

As we’re aiming for a solid 16, we’ll need to go down a step. Using the Exposure Correction Table, to down a step (decrease step guide by…) we need to take our original exposure (600 seconds) and multiply this by 0.7. The next recommended exposure time is then 420 seconds.

Troubleshooting

Why are my numbers wrong reading when I’m looking at the fully processed plate?

The film strip was incorrectly applied (it was flipped) when placed on the unexposed plate. For the 21-Step Stouffer Gauge, the emulsion side should be face down and be touch the emulsion side of the unexposed photopolymer. If looking down at your set-up, you should be able to see the number and text in a right-reading format.

My target number is blobby or washed out What’s happening?

If your wash-out and dry times are correct, then you are underexposing your film. But you are almost there to your ideal exposure time. This means that the photopolymer hasn’t been hardened up enough to be able to hold on the plate when your plate is being washed and dried. Try boosting up your exposure time by 1/2 a step. This is where keeping track of your test times will be important. You are narrowing in on the time.

underexposed

All of my number and tones are completely hardened up and I can’t see anything at all. What gives?

If your wash-out and dry times are correct, then you are overexposing your film by a bit. This means that all of the photopolymer has hardened up beyond what you need and is running into the risk of being over-exposed and flaking off. Try shortening your exposure time.

overexposed

I’m recording a really, really long exposure time ( about 10 minutes + ). What’s going on?

A likely suspect is that something that is affecting your light source. Common issues are:

  • Bulbs are low wattage (e.g. 15watt): A low bulb emitting a low wattage of light will take much longer to harden the plate as compared to a higher wattage bulb (e.g. 40watt). Some platemaking units were not designed to hold higher wattage bulbs. Also consult your platemakers recommended bulb specifications to avoid malfunctions.
  • Bulbs are not outputting at full capacity: Bulbs should be changed if they fall below 70% output.  Longer and increased exposure times from your optimal time are a sign of diminishing output.  We suggest changing them out for new bulbs as this will give you the most accurate results (Boxcar Press can provide you with new light bulbs). You will need to run a new stouffer test every time you replace your light bulbs.
  • Bulbs are too far from your plates or there are not enough of them or close enough together. Bulbs work best at 1.5” – 3” max away from your plate. Multiple bulbs next to each other give the best results for good plates as the light comes from both the sides and top to create strong relief on the plate. Your exposure unit may need some re-configuration.
  • Using the sun: the sun’s rays will not be uniform in strength or duration as ozone, potential cloud coverages, and other spatial interferences will make the light emission vary in intensity. As powerful an energy source the sun is… it fluctuates and will take a lot longer to expose a plate properly as compared to an industrial exposure unit with calibrated bulbs. But it’s free and plentiful and a long exposure time may be what it takes.  This is where your Stouffer scale reading will guide you.

I’m using a Nu-Arc. Any tips?

The Nu-Arc unit measures in light units and typically only has one bulb that is farther away from the plate.  Times for exposure will be longer because of this light source.   You will have to rely heavily on your Stouffer Gauge for pinpointing your time.  If you have a large model, you may not be able to make a plate as large as the glass frame.  The exposure times at the edges of the machine may be different than your center.  A stouffer test at the center and corners will help determine that.

For more helpful tips on the DIY platemaking process and set-up, letterpresscommons.com has a plethora of information to check out here.

Melissa Livingston: Falling For Letterpress

Melissa Livingston of Livingston Press is located in the sunny city of Oakton, Virginia. On this warm fall day, she shared with us a small peek at her printing world and the wonderful printing community that inspires her daily—from running letterpress workshops, printing mentors (and family), and the itch to get back on press.

Melissa Livingston cheerily prints on a Chandler & Price Oldstyle in her letterpress shop in Oakton, Virginia.

INSPIRED BEGINNINGS As a small child I fell in love with letters while watching them dance across the big screen the first time I saw the movie 101 Dalmatians. The opening credits were revolutionary at the time. The spots on the dogs morphed into words; it was art to me. Because of my love of letter forms, color and paper, I studied commercial art in college and then worked as a book and calendar designer.

Melissa Livingston's gorgeous letterpress business cards for Livingston Letterpress

A RETURN TO THE PRINTING ARTS After taking a long sabbatical to raise my 5 wonderful children, I decided I wanted to get back into design. By that time everything in the design world had changed from waxed columns of type placed by hand on the art board to being completed on a computer screen. I missed the hands-on experience, so one day on a bit of a whim I decided to buy a 6×10 Kelsey Excelsior Victor tabletop press that came with a Boxcar Base, despite not actually knowing anything about how to print.

Melissa Livingston prints on a Chandler & Price Oldstyle in Virginia.

PRINTING MENTORS After an on-line search I discovered Alan Runsfeldt at Excelsior Press Museum Print Shop in Frenchtown, New Jersey and took the little press to him to learn how it worked. Alan became a mentor and a friend. I purchased my first drawer of type from a basement in Bethesda, Maryland and with the patient guidance of Rebecca at Boxcar Press, learned how to submit a file to create a polymer plate. I was printing! I printed my niece’s wedding invitations, Christmas cards and lots of other projects. I set up a little designated printing space in my basement and loved creating on that little press.

melissa-livingston-letterpress-invitation-suites

One day the little press broke and seeing my disappointment, my husband searched on eBay for a press. He came across a 10×15 Chandler & Price Oldstyle not far from our home. A dear friend helped us move the press into our garage and through YouTube videos and the kindness of other artists in the field (including Alan who taught me how to properly oil my machine), I continued to learn the craft of letterpress printing.

Melissa Livingston prints gorgeous letterpress pieces in Virginia, USA.

THE CREATIVE FLOW My passion is really the hands on aspect of the craft. I prefer a machine powered by foot treadle. I have also collected quite an array of wooden and lead type and I enjoy the problem-solving aspect of setting type. I stock only primary colors of ink and mix all my colors by hand. I have also added a Potter Press for poster making, which does not have an inking mechanism, so all inking is done with a brayer.

Hand-set type locked-up in a chase by Melissa Livingston.

I do some design work with Illustrator, but prefer to leave the computer-related tasks to others. I work with a wonderful designer, Holly Osborn, whose work you can find on my website. It has also been a joy to collaborate with my daughter Megan as she has designed a few wedding suites.

Melissa Livingston prints gorgeous letterpress pieces in Virginia, USA.

VERY VIVACIOUS IN VIRGINIA Livingston Letterpress began with the Chandler & Price in a corner of our garage. In the cold winter I would use a space heater and a candle under the ink disk to keep it warm enough to move the ink. In September of 2014 I moved into a real studio we added onto our home. The studio is a sacred, beautiful space to me; a physical reminder that dreams really do come true! I have a stunning composing table that found its way to me through the kindness of a jewelry artist who had inherited it from a printer friend. I have cases of type that sat for decades in basements and now have new life as letters are inked and pressed to the paper to print once again. I am connected to my tools as I have cleaned and scrubbed and made them functional again. It is an amazing feeling to look around the room and be surrounded by love; love for the craft, love for the kindness of others who have taught me or passed along tips or equipment, and the love of a family that supports this passion of mine.

PRESS HISTORY 6×10 Kelsey Excelsior Victor tabletop press, 10×15 Chandler & Price Oldstyle

BOXCAR’S ROLE Boxcar Press has been a wonderful resource to me. I use a 5×7 Base, a 9×12 Base and also very small bases that allow me to mix polymer plates with handset type. I love the flexibility that platemaking allows a letterpress printer. I recently ordered plates in Korean, Arabic and Russian!

I think the thing that impresses me most about Boxcar is the kindness of the staff, especially their patience as they have walked me through how to confirm my artwork is 100% black.

Melissa Livingston prints gorgeous letterpress pieces in Virginia, USA.

PRINTING FEATS I am so grateful for the opportunities that have come my way through letterpress printing. I treasure the connections I have made with people who have come to print and I love seeing their reaction as they create a treasure. I am inspired by the words people choose to turn into art. I was thrilled to get to print the menus and booklet covers and hand-stitch the bindings of the booklets for the 2015 Kinfolk Dinner in Washington, DC, but my favorite projects have been to print wedding suites for my oldest son and daughter.

Big round of thanks out to Melissa for the fun happenings at Livingston Press. Keep up the amazing work!

One Last Dance For Photopolymer Plates: Ink Stamp Pads

Here at Boxcar Press we’re always looking for new ways to give printing supplies “one last dance” before recycling or dismissing items into the wastebasket. One of our clever and resourceful platemaking customers, Meredith Pinson-Creasey of Purple Dog Press shares with us an experimental & last-time use for her custom-ordered photopolymer plates: using ink stamp pads to apply ink to the plates. Meredith weighs in on the pros and cons of using ink stamp pads for printing (and with some rather nice results).

Helpful note: please do remember that our custom-made photopolymer plates work best with letterpress printing inks (such as rubber-based or oil-based inks) which are rolled on to the surface of the plate.  Many other art inks are water-based and since our plates are water-wash out, using these products can degrade the quality of plates. Please use caution and good judgement if experimenting with water-based ink stamp products.

THE EXPERIMENTAL PROJECT I have been experimenting with some of my old polymer plates, trying to get my logo to print on the cotton twill fabric tape and boxes I use to wrap my letterpress cards for gifting. You guys may have already tried this and I may not be sharing new info, but I’ve had great luck.

My 82 year old mother continues to be the most fearless artist and crafter I know. And her father could repair or make just about anything. It is their “eat first, ask questions later” attitudes that inspire me. As a sports, landscape, and baby photographer, and an amateur letterpress printer with a 1940’s 10 x 15 Kluge, I wanted the packaging for my photo/letterpress cards to be personalized with both my logo and the recipient’s name, or a greeting. The most economical route was to purchase blank ribbon, boxes, and bags to customize as needed. I have printed my own packaging using silkscreen and linoleum blocks, but wanted something faster with less set up time. Having dozens of rubber stamps made was too expensive. So I decided to experiment with some of my retired polymer plates from Boxcar Press.

Using photopolymer plates experimentally with ink stamp pads for a final use.

INK PAD TIPS Working with dye or solvent ink pads produced the crispest image, due in large part to the firm surface of the pad. Pigment inks have a foam pad which can cause the ink to go down into the recessed portions of the polymer plate producing a blurred image. A brayer may also be used to transfer the ink from the pad to the polymer plate to provide even coverage and less mess.

Using polymer plates as a stamp works best when attached to a block of wood or a clear stamping block to ensure only the image or text comes in contact with the fabric. The wood block I used has a slick finish designed to release the temporary stamp easily. Three brands of ink pads worked well for me: Ranger Ink; Hero Arts; and StazOn. Ranger Ink’s “Dye Ink Pad” and “Archival Ink” in all colors I tried worked well. Hero Arts makes terrific “Neon Dye” Ink colors. StazOn’s “Solvent Ink Pad” worked equally well. These inks are waterproof, permanent, acid-free. and the pads are refillable. My guess is that most brands of dye or solvent ink would produce great results.

Using photopolymer plates experimentally with ink stamp pads for a final use.

MATERIALS TO TRY (AND ONES TO AVOID) A few of the materials I’ve stamped with polymer plates include: birch wood tags, twill ribbon tape, glassine food bags, kraft gift boxes, and paper. Although pleased with all the results, the glassine takes FOREVER to dry and the wood tends to bleed sometimes. The bleed may be the result of over inking or applying too much pressure to the stamp because some of the images did not bleed. Kraft paper enhanced the grunge look of one of the fonts. Ink wipes off easily easily with a cloth but will stain the recessed portion of the plate.

(Boxcar’s note: One important thing to note about polymer plates versus rubber stamps which can affect your results and determine which materials are best to stamp on. A polymer plate is a hard surface on a thin substrate. In contrast, a rubber stamp is soft, pliable and cushiony. These properties will work for or against you when you are stamping and experimenting will be key).

THE RESULTS Text of various sizes and weights, and line drawings as thin as .75pt printed well. Because the inks are translucent, this alternative use of polymer plates will not produce a silkscreen type effect.  My faux postage cancellation polymer plates worked great and the uneven application of ink makes it look even more authentic. Expect to see the fabric beneath graphics containing large areas of solid polymer. For best results, I recommend using plates no larger than about 4 x 6 inches, or about the size of your hand.

Using photopolymer plates experimentally with ink stamp pads for a final use.

I love it when my tools can do double duty and this is much more economical than having dozens of custom rubber stamps made. Now if I could get my Kluge to churn butter or something, maybe my husband wouldn’t grumble about the space it requires.

WHAT’S NEXT No longer limited to someone else’s rubber stamp designs, I am looking forward to putting some of my own quotes and graphics in polymer. When I gang up those plates for my Kluge, I’ll be squeezing in another stamp idea. While this alternative use of polymer plates may not appeal to a commercial print shop, I do recommend the idea to anyone looking to complete their branding with a personal handmade touch.

THE FINE PRINT So here’s the fine print: polymer plates degrade with water. Rubber stamp inks are water based. Polymer plates don’t really play well with rubber stamp ink and will degrade over time. I think I’ll go through quite a bit of ribbon before that happens, but I’ll keep my stamping plates separate from my printing plates.

A huge appreciative round of thanks goes out Meredith of Purple Dog Press for her excellent advice and tips!

Letterpress Shop Tips: Shoe Caddy Organizer

We all know what its like to come into the shop looking for a specific tool and just can’t seem to find that one tool we’re looking for. A thrifty, clever, and fun letterpress organization tip on how to keep track of your favorite letterpress printing tools is to use an over-the-door or closet-style caddy with clear pockets. This ingenious way to store your items is quick & easy to set-up, and you can hang it up on a wall or tuck it away discretely wherever you choose. Once you’re done, the only thing you’ll be looking for is more projects to tackle!

Letterpress Organization Tips: Shoe Caddy Organizer

Lend an Ear to a Type On The Cob 2015

Gallery

This gallery contains 24 photos.

On June 10th, Harold Kyle (president of Boxcar Press), Carrie Valenzuela (a Boxcar printer) and I started on a pilgrimage to the town of Mt. Pleasant, Iowa, to immerse ourselves in the 2015 Type On The Cob conference. This Ladies of Letterpress conference is a … Continue reading

Speaking In (Type) Faces with the VABC Kickstarter Project

We’d love to see projects blending metal type and photopolymer plates come out of the newest Virginia Arts of the Book Center Kickstarter project. The project aims to creatively display the largest public collection of moveable type in Virginia. VABC is currently the home for more the 325 cases of moveable type, but printers and artists interested in using the type lack a basic resource to see these printed letter forms at work. VABC’s Kickstarter project will become a unique specimen book, as well as a creative resource for  letterpress printers. So help bring more wonderful letterpress into the world – support the project today!

McFadden-Whitman-VABC-kickstarter

Have Press, Will Travel

Meet Erin Fae, a self-proclaimed dreamer and printer. Last year, she dreamed of putting a new spin on letterpress. With visions of a traveling tabletop press and a new set of wheels, the Press Cycle project began. Erin explains how her idea took off with the help of others who shared her slightly unique vision.

Erin Fae of the Press Cycle

In 2013, I bought an 8×5 Adana on Trade Me from a woman in Christchurch, New Zealand. She was so excited that the press would help teach people printing at Alphabet City (the community art space I used to run) that she offered me a bonus press for free: an Adana 5×3. As soon as the small press came into our lives, I knew this gift presented an opportunity to be able to share letterpress printing with even more people than those who wandered into our studio.

I was returning to my beloved home of New York City for the summer of 2014. I knew I wanted to run a portable print project that would take letterpress printing outdoors and into various communities. I wanted to expose as many people to letterpress printing as possible and find a way for people who had never heard about letterpress to try it out.

The dream came to fruition with the help of Press Cycle Kickstarter and over a hundred backers.

I called the project The Press Cycle: Letterpress on Three Wheels. Running the Kickstarter meant I was able to purchase a vintage Schwinn Tri-Wheeler adult tricycle and outfit it with a custom box (built by the super talented folks over at Nightwood in Brooklyn that converted the tricycle into the mini studio). I had originally thought that the project would use magnesium dies for printing…and had started an order when I got a pretty magic phone message.

Letterpress printing by The Press Cycle The Press Cycle in NYC

When Boxcar told me that they wanted to donate a base and a page of plates, I was beyond thrilled. By nature, I am every shade of enthusiastic: I had a solo dance party in my borrowed Brooklyn apartment. This wasn’t just because the donation helped the project immensely, but because the Press Cycle is all about collaboration. I wanted every stage of the project to be about collaboration and community, and teaming up with Boxcar meant this was evermore true.

The Press Cycle on tour

The project wrapped up in September. How did The Press Cycle go on the slightly more inky streets of New York? I think it went marvelously. I said from the beginning that even if one person learned about letterpress, all the work would be worth it. By the end of the Summer, not one person, but hundreds of people in different Brooklyn and Manhattan neighbourhoods got to try out letterpress printing. We even took the press to the Greenpoint branch of the Brooklyn Public Library for their Greenpoint Handskills workshop.

I love teaching printing and one of my favorite things in the world is watching people pull their first print. Even if they’ve watched someone else do it, even when they know what is going to happen, doing it themselves is always a wonder. One woman told me that she needed something to make her day and that the Press Cycle did it. An older man in Brooklyn told me about how he printed on a hobby press in high school. Young children were especially amazed at the instant nature of printing, that they could pull one lever and make an image—no waiting for something to come out of a machine; they had the power to do the work.

Erin Fae of the Press Cycle

I handed out pamphlets to anyone who printed since most people didn’t have time to hang out and chat. I wanted everyone who encountered the Press Cycle to know that they were helping keep letterpress printing alive and are part of a long lineage of printers, even with just that short encounter. All printers matter. I hope that some of the folks who tried letterpress for the first time went on to learn more about printing. Who knows?

Letterpress printing samples from The Press Cycle

Maybe someone will take a class, maybe someone will one day have their own press.

It wasn’t all roses. Before I put up a giant laminated sign that said “FREE (Yes, really)” it was sometimes hard to lure people into printing since New Yorkers were suspicious that I was selling something. Also, I was somewhat limited by being a human. I didn’t have the power to wheel the 100+ pounds of Press Cycle as often as I would have liked, and needed to give my body time to rest and recharge.

Letterpress printing with The Press Cycle

What was always amazing was the community that came together around this project. I collaborated with various artists to make the images for the plates; Boxcar’s amazing donation; the enthusiasm of letterpress printers online and off; and the amazing backers on Kickstarter. People coming together around learning and creativity is always humbling and wonderful. I feel grateful that I was able to lead a project that gave so many people a peek into the world of printing and how letterpress works.

A Taste of the Letterpress Edible Project

Roxy Columbus of Italy’s Pirouette Press has been gathering the seeds of letterpress community to sow a whole new way we printers connect with each other via the extraordinary Letterpress Edible project. The project focuses on bringing together the international printing community via collecting local seeds from printers, delivering them via letterpress packaging, and growing the seeds in different environments/countries.

Come check out the project’s Facebook page for more information on how to get involved!

Letterpress Edible Project by Pirouette Press

Photo courtesy of Pirouette Press

Twelve Little Books All In A Row

Small on size, big on letterpress love is the cheerful theme surrounding the Virginia Arts of the Book Center’s newest Kickstarter project, which aims to complete 12 finely crafted, hand-made artist’s books. And you can help bring more letterpress into the world by supporting the project!

Check out the Miniature Book Project Kickstarter project and pledge today.