Here at Boxcar Press we’re always looking for new ways to give printing supplies “one last dance” before recycling or dismissing items into the wastebasket. One of our clever and resourceful platemaking customers, Meredith Pinson-Creasey of Purple Dog Press shares with us an experimental & last-time use for her custom-ordered photopolymer plates: using ink stamp pads to apply ink to the plates. Meredith weighs in on the pros and cons of using ink stamp pads for printing (and with some rather nice results).
Helpful note: please do remember that our custom-made photopolymer plates work best with letterpress printing inks (such as rubber-based or oil-based inks) which are rolled on to the surface of the plate. Many other art inks are water-based and since our plates are water-wash out, using these products can degrade the quality of plates. Please use caution and good judgement if experimenting with water-based ink stamp products.
THE EXPERIMENTAL PROJECT I have been experimenting with some of my old polymer plates, trying to get my logo to print on the cotton twill fabric tape and boxes I use to wrap my letterpress cards for gifting. You guys may have already tried this and I may not be sharing new info, but I’ve had great luck.
My 82 year old mother continues to be the most fearless artist and crafter I know. And her father could repair or make just about anything. It is their “eat first, ask questions later” attitudes that inspire me. As a sports, landscape, and baby photographer, and an amateur letterpress printer with a 1940’s 10 x 15 Kluge, I wanted the packaging for my photo/letterpress cards to be personalized with both my logo and the recipient’s name, or a greeting. The most economical route was to purchase blank ribbon, boxes, and bags to customize as needed. I have printed my own packaging using silkscreen and linoleum blocks, but wanted something faster with less set up time. Having dozens of rubber stamps made was too expensive. So I decided to experiment with some of my retired polymer plates from Boxcar Press.

INK PAD TIPS Working with dye or solvent ink pads produced the crispest image, due in large part to the firm surface of the pad. Pigment inks have a foam pad which can cause the ink to go down into the recessed portions of the polymer plate producing a blurred image. A brayer may also be used to transfer the ink from the pad to the polymer plate to provide even coverage and less mess.
Using polymer plates as a stamp works best when attached to a block of wood or a clear stamping block to ensure only the image or text comes in contact with the fabric. The wood block I used has a slick finish designed to release the temporary stamp easily. Three brands of ink pads worked well for me: Ranger Ink; Hero Arts; and StazOn. Ranger Ink’s “Dye Ink Pad” and “Archival Ink” in all colors I tried worked well. Hero Arts makes terrific “Neon Dye” Ink colors. StazOn’s “Solvent Ink Pad” worked equally well. These inks are waterproof, permanent, acid-free. and the pads are refillable. My guess is that most brands of dye or solvent ink would produce great results.

MATERIALS TO TRY (AND ONES TO AVOID) A few of the materials I’ve stamped with polymer plates include: birch wood tags, twill ribbon tape, glassine food bags, kraft gift boxes, and paper. Although pleased with all the results, the glassine takes FOREVER to dry and the wood tends to bleed sometimes. The bleed may be the result of over inking or applying too much pressure to the stamp because some of the images did not bleed. Kraft paper enhanced the grunge look of one of the fonts. Ink wipes off easily easily with a cloth but will stain the recessed portion of the plate.
(Boxcar’s note: One important thing to note about polymer plates versus rubber stamps which can affect your results and determine which materials are best to stamp on. A polymer plate is a hard surface on a thin substrate. In contrast, a rubber stamp is soft, pliable and cushiony. These properties will work for or against you when you are stamping and experimenting will be key).
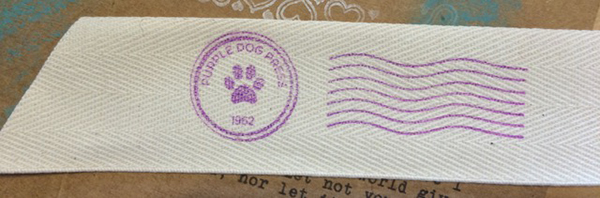
THE RESULTS Text of various sizes and weights, and line drawings as thin as .75pt printed well. Because the inks are translucent, this alternative use of polymer plates will not produce a silkscreen type effect. My faux postage cancellation polymer plates worked great and the uneven application of ink makes it look even more authentic. Expect to see the fabric beneath graphics containing large areas of solid polymer. For best results, I recommend using plates no larger than about 4 x 6 inches, or about the size of your hand.
I love it when my tools can do double duty and this is much more economical than having dozens of custom rubber stamps made. Now if I could get my Kluge to churn butter or something, maybe my husband wouldn’t grumble about the space it requires.
WHAT’S NEXT No longer limited to someone else’s rubber stamp designs, I am looking forward to putting some of my own quotes and graphics in polymer. When I gang up those plates for my Kluge, I’ll be squeezing in another stamp idea. While this alternative use of polymer plates may not appeal to a commercial print shop, I do recommend the idea to anyone looking to complete their branding with a personal handmade touch.
THE FINE PRINT So here’s the fine print: polymer plates degrade with water. Rubber stamp inks are water based. Polymer plates don’t really play well with rubber stamp ink and will degrade over time. I think I’ll go through quite a bit of ribbon before that happens, but I’ll keep my stamping plates separate from my printing plates.
A huge appreciative round of thanks goes out Meredith of Purple Dog Press for her excellent advice and tips!