Printing Ace: A Look at Albertine Press

Shelley Barandes, the printer behind Albertine Press, is inspired by architecture and fine custom letterpress printing. It’s no surprise as both trades support the meticulous nature of crafting complex and carefully devised works through attentive planning and design. And like architecture’s founding core values: beauty, durability, and utility—Shelley’s letterpress printing has it in aces.Beautiful popping color on Albertine Press cards

THINK INK Professionally, I am a trained printmaker who spent five years post college working in architecture in Paris and New York before coming back to printmaking, and then letterpress, where I stayed for the past nine years. I’m also a mom to two apprentice printers (4-year-old and 9-month-old girls), both of whom have grown up in the studio. I take the little one with me every day to the studio where she serves as mascot and favorite distraction.

Letterpress pieces from Albertine Press and Shelley Barandes

FIT TO PRINT I have a printmaking background but was turned on to the Center for Book Arts in New York City where I took my first class in hand typesetting. That was the beginning of the end of my architecture career as I started printing more and more, taking on custom jobs and started Albertine Press.

BEAUTY IN THE BAY STATE Our studio is located in an industrial building in Somerville, Massachusetts which also houses two (yes, two) chocolate companies. Our neighbors down the hall (EH Chocolatier) routinely bring us over trays (yes, trays) of “mistakes” which we happily consume.

THE PRINTING PROCESS I design our wholesale line of greeting cards and note sets as well as much of our custom printing. Drawing from my architecture background, many of our designs feature cityscapes, which I’m particularly drawn towards. For a new city sketch I’ll do a lot of research to pinpoint iconic scenes, buildings and elements of a particular place and start sketching from there. My style of line drawing translates well to letterpress, so aside from cleaning up the images a bit, they’re ready to use for printing.

Albertine Press and Shelley Barandes' Kesley press and printing helpers

FULL TIME FUN The studio is a full time business, which was always the goal. In addition to me (and I’m behind the desk more often than behind the press these days) Albertine Press has four full time production folks who oversee the custom printing and the greeting card line, as well as two interns.

PRINTING FEATS I’m proud that our work has been recognized both locally and nationally in the press as well as for some awards. I’m also really excited to see that several of my former interns and employees have gone on to start letterpress companies of their own.

PRESS HISTORY A Kelsey 5″x8″ that I found at a flea market. The Vandercook arrived not too long thereafter so it was really just used for letterpress classes. I’m waiting for my daughter to be old enough to start using it.

Detailed letterpress pieces of Albertine Press

BOXCAR’S ROLE All of our plates are Boxcar plates and I have printed exclusively with the Boxcar base / plate system from the beginning. The fast turnaround and super customer service and attention to detail have made it a real joy to have Boxcar as our partner. At times I look at the volume of plates we create and think about getting a platemaker, but then I think about how well you guys do it and I am just so happy to let you do what you do best, and you really do.

WHAT’S NEXT I could fill a book with my future plans, many of which I have to put on hold while I juggle the business and the girls. That said, I’m excited about the new designs planned for release in the new year – more city sketches, of course, but also some more organic designs, like fruits and vegetables.

Big round of thanks out to Shelley for letting us take a sneak peek around Albertine Press!

The L Letterpress Revisited

It’s been a few years since the popular L Letterpress Machine by Lifestyle Crafts hit the market, and since then other diecutting machine manufacturers have followed up with their own versions. Our original November 2009 blog post about printing on the L Letterpress has been read and positively received, so now it’s time for some updates that we hope will help you get the best results you can. If you are new to this machine – don’t read ahead until you have gone back to our original L Letterpress tutorial and gotten caught up to speed.

 (1) Using the right brayer.
We recommended that you toss the ink roller that came with the machine and suggested some new, soft options. Here are a few more sources for soft brayers – particularly the Speedball brand: McClain’sDaniel Smith, and Amazon.

(2) Using the roller bearers from your KF152 plate order.
So, of course, you are ordering your custom letterpress plates from Boxcar Press.  If you are a do-it-yourself person who loves letterpress than you will want to put your own personal stamp on what you are printing with your own designs and text.  Here is what we recommend when you place your order so all is clear on your end and ours:

  • In the comments section of your platemaking order, write in capital letters – SEND STRIPS.  We will be trimming your plates down but let us know that you want strips, lots of them.  Keep them and use them on future printing jobs.

Roller bearers are really important, and if you’ve ever tried to ink without them, you likely wanted to tear your hair out.

(3) Tips to control how much ink you apply to your plates.
The manufacturer sent you a small plastic square slab – approximately 6″ square.  We’ll call this Slab 1. This was for squeezing your ink onto and rolling your brayer through.

STOP! Our suggestion is that you get another plastic or glass slab of greater size. A piece of glass from a picture frame works well. We will call this Slab 2. Two slabs will improve your inking tremendously.

Squeeze your ink onto the smaller plastic Slab 1. Or scoop out your ink from your 1 lb can – about 1 tablespoon.

L Letterpress printing tips from Boxcar Press

Use your Boxcar Press ink knife and work your ink so it’s a smooth and easy consistency.  Imagine making scrambled eggs and use that motion – turn over, pull through the ink, over and over.

L Letterpress printing tips from Boxcar Press

Now, take the ink knife and pull the end through your mixed ink so you have just an 1/8″ inch round roll of ink on the end of the ink knife. Spread this on your larger second Slab 2 by dabbing it in a line at least equal to the length of your brayer.  Now roll your brayer through this.

Really work the brayer back and forth until it’s consistently and evenly covered. Now roll the brayer over your polymer plates and run a sheet of paper through the machine. Look at your results up close. There shouldn’t be any feathery bleeds outside your impression on your paper.  If there is, you have too much ink.

(4) Removing excess ink
Go back to Slab 2 where you used your brayer.  Use your ink knife and scrap away some of the ink and return it to the first Slab 1 where you mixed.  Now lightly wipe some of the ink off your brayer with a cloth rag (old t-shirts are great for this).

L Letterpress printing tips from Boxcar Press

Wipe off your polymer plate gently, also with a soft cloth. Run your brayer through your ink on the second Slab 2 again and try another impression. You should be seeing less ink.

Use Slab 2 for your brayer only.  As needed, add more ink as in tiny amounts from the ink on Slab 1.  This will help you control your inking and prevent over-inking.  You will be amazed how little ink is needed on your polymer plates for a good inking.

(5) So many ink choices
L Letterpress sends an oil based tube of black ink with the machine.  They also have more colors available in craft stores. These inks are fine, although you really can’t re-use any leftover ink so don’t over squeeze too much ink out of the tube.  Also, they are a little more challenging if you want to try mixing your inks for more colors.

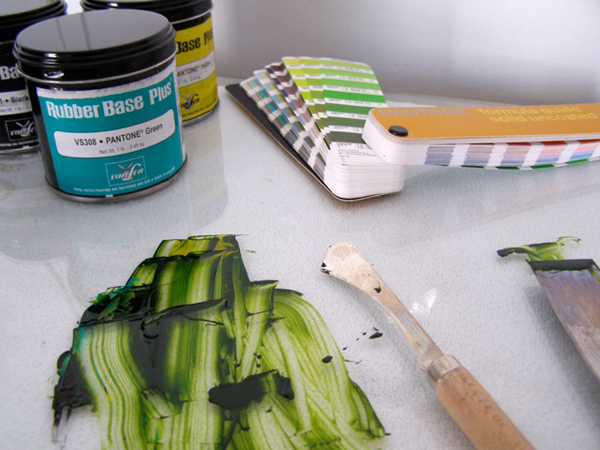
Other suggestions include Van Son Rubber Based inks in 1 lb cans from Boxcar. They come in Pantone colors and you can feel more confident about mixing some colors together if you have a Pantone Uncoated Formula Guide. However, they are only in 1 lb cans and the cost can go quickly from $13 a can to $30 a can for each color. If you are planning for long term, this is a good choice as you can mix your colors and save them for printing another time.

One other suggested ink is available in tubes and colors – it’s an oil based ink called Caligo Safe Wash Ink. They are easily washed up with soap and water. One note of caution though – which takes us to the next step – CLEAN UP.

(6) After Printing, Clean UP.
Don’t ever use water for cleaning up your plates! Do not use water based inks and don’t use water to clean up the inks from the plates. You can use a soft cloth rag to wipe off the ink off your plates.  If you inked correctly, it’s just on the surface of your plates and should wipe off easily.

L Letterpress printing tips from Boxcar Press

L Letterpress has developed some wipes that you can buy – use them only to clean up the L Letterpress equipment and the slabs you used to mix and spread your ink.  Keep your plates from water and moisture or they will soften and deteriorate.

If you want a professional press wash – we suggest VARN California Wash. The smallest size available is 1 gallon; however, it’s a good investment if you expect many years with your L Letterpress.

(7) When you like thicker paper
Your L Letterpress comes with a 1 ply or 100 lb paper.  But if you’ve fallen in love with a thicker stock like museum board or something that is 220 lb or greater thickness, you’ll need a little bit more of prep to get great results.  You can use this paper in your machine and with our polymer plates, but there will need to be some planning when you prepare your files for platemaking.

First, let me explain some of the wonderful things about photopolymer plates. They are easy to cut with
scissors and translucent which makes it nice to see your press bed grid through them. So you can take a bunch of images and text and gang them all up onto one plate leaving just 1/2″ between them to safely cut them apart. Then, you can place your pieces on your L Letterpress press bed exactly where you want them and they will stick with their adhesive back. This all works fine with 100 lb paper, but if you try this with thicker paper, the edges of your plates may also impress into your paper — not what you’re looking for.  So here is where the planning takes place. You will have to design your polymer plate to be slightly larger than your final finished paper size, which means paying a little bit more in platemaking costs for that extra space, but it’s worth it when you see your impression on the double thick paper.

So, when you send in your design, include crop marks on your outer edges so we give you all the plate material border you will need.  If you use precut paper, plan your plate size to be just larger than your paper.  If you are using paper that you will print and cut later, your plate only needs to be larger than your “live area”, that is, the impression from the edge of the plate can push into the area that will be cut off later.

(8) Odds and ends for better printing.
Remember that your paper always has two sides, so while you are working on press setup (makeready) getting everything lined up and perfecting your inking, etc. just hold on to your paper goofs.  Either turn them over and use the back side or just use it for the next time you are setting up in a different color.  Here at Boxcar Press, we use some of our paper sheets multiple times while we get everything just the way we want it.

L Letterpress printing tips from Boxcar Press

  • Invest in Henry Gage Pins – these small, repositionable “tabs” are handy and will do a great job holding your paper in place.
  • Or try this other suggestion for holding your paper in position: take a sheet of the paper you are printing on and trim one sheet down into an “L” shape. Put removable double-sided tape on the back of it and set it aside for one minute. Place the paper you are printing on in position on your press bed.  Take your L shape and with the edges forming the inside of the “L”, move it up against your paper so it is tight against two corners of your paper. Adhere it to your press bed. Now you can always slide your paper against your “L” and have it in position before you close the cover of the machine. This works best with one color printing and smaller printed pieces.

L Letterpress printing tips from Boxcar Press

  • The plastic grid on your L Letterpress machine base has a white paper backing behind it.   If you are getting a little movement and sponginess in your grid base, a little hard packing could help. Your grid can lift out of the bed and you can either replace that white sheet with a thicker sheet or put more sheets on top of it.  Whenever you lift this clear gridded piece, make sure it locks back into place.  And as mentioned in our last post, you may have to tape this press bed at the corners to keep it immobile. Try experimenting by adding more or fewer sheets.

L Letterpress printing tips from Boxcar Press

  • Last but not least, don’t get discouraged.  There is a learning curve here.

And before you decide you want to print your wedding invites on the L Letterpress, start with a smaller project first for practicing.  Try holiday cards, thank you notes, or something that you don’t have all your emotions invested in while you are learning to use this machine.  It will make it much easier to keep up with the experimenting if you don’t have a deadline and a huge investment in paper for your first time printing.

Ready to get started with some L Letterpress projects? Be sure to check out our offerings and visit Papercrave next week to enter for even more project ideas and a chance to win your own set of L Letterpress plates!

Printing Powers of Presse Dufour

To come full circle as a letterpress printer is a feat that is by no means easy, but it satisfies that creative itch deep down. Karen Dufour, of Presse Dufour, is a printing maven who has connected and entwined progress, adaptability, and design consciousness as showcased in her astounding command over the letterpress art. We sat down with Karen in between ink runs to find that over the years, letterpress will find a way.

Karen DuFour of Presse Dufour prepares a lettepress plate on her Vandercook.

CRESCENT CITY CREATIVE  I am from New Orleans, Louisiana and I have a degree in Visual Art and Graphic Design from Southeastern Louisiana University in Hammond, LA. I consider myself a very happy wife, mom, and artist. During my career I’ve worked in Hammond and New Orleans, and in London, England for many years. My husband and I eventually settled back here in New Orleans, only to be forced to relocate a few days after Hurricane Katrina. And after seven years in Austin, we’re back home again! Presse Dufour is run within Bayou St. John, one of my favorite neighborhoods in the Crescent City. We are thrilled to be back home and watch the progress our city has made in so many positive ways since the flood.

IN LOVE WITH LETTERPRESS  I’m a graphic designer by trade. My career has come full circle, really. In college, my first design job was working in a 2-color print shop. I loved burning film, collating, designing and taking in the smell of ink and the sounds of the presses. Over the years, I designed wedding invitations and other paper goods for friends and family. I always loved working with my hands best.

A serendipitous introduction to letterpress happened when I was looking to print our daughter’s birth announcement, which was letterpress printed. I researched the art of letterpress for nearly a year, took a workshop, and found my press. From then on, I’m self-taught, like most other letterpress printers I would imagine.

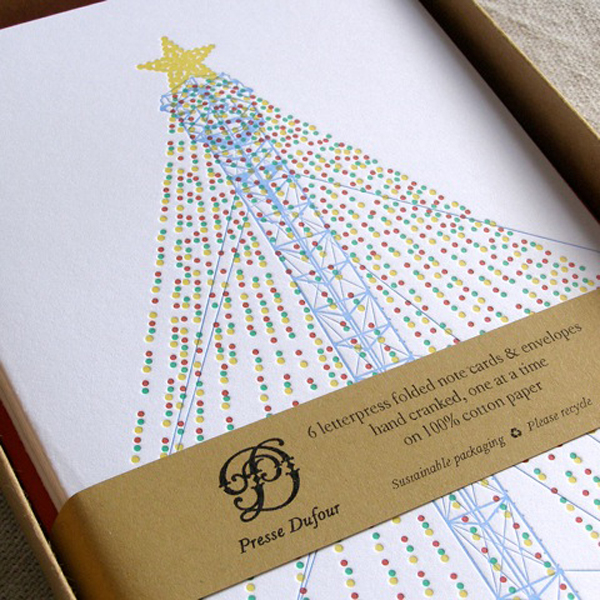
Presse Dufour letterpress cards and stationery featuring plant life and bridges.

Lettepress cards on a Vandercook.

DOWN ON THE BAYOU  My shop is inside our 110-year-old “shotgun” style Victorian home…in the living room! When you walk through our front door, my press is the first thing you see. I have an amazing drafting desk, which was custom made from reclaimed wood, and a table to mix my ink. It’s very pared down, as I don’t have a lot of room. I love printing from my home though, in the neighborhood which gives me so much inspiration.

PRINTING MENTORS  My first introduction to letterpress was through Bethany with Thistleberry Press, who printed our birth announcements. Meredith with Punch Press runs workshops in Austin, Texas, where I was able to create my first print. There are many printers who have offered me countless advice, like Casey with Inky Lips, and Barbara with Lunada Bay. Thank you so much!

Oh, and recently I was fortunate enough to have Paul Moxon pay a visit to my studio to instruct me on how to keep my press in top shape and how to make a few repairs.

Green Ink and Pantone colors on display at Presse Dufour.Whimsical piles of Valentine's cards created by Presse Dufour.

THE CREATIVE PROCESS I am both a designer & printer, and I find that most of my final designs start out as my first idea. I’ll have an idea, and then have a long think about it over days, weeks, or months. I think about my design ideas almost all day…when I’m walking around the bayou, driving, etc. Once I feel strong enough about the design I move forward. Some designs are hand drawn with ink, and some start out digitally. I prefer to hand draw my designs.

FULL TIME FUN It seems that I run Presse Dufour full time, but realistically it’s a part-time business. My first priority is raising our daughter and making our home a happy place. I’ve managed to balance my day pretty well at this point. Presse Dufour has been official since 2010.

Detailed music sheets letterpressed deftly by Presse Dufour.

LETTERPRESS VIBES  In the short time that I’ve been printing I feel proud to have such positive feedback from my customers. Making my customers happy is most important to me. Whether or not my goods sell, I am most happy during the process of creating artwork, using my hands, or printing on my press. When my goods are selling well, it makes my job even more fun.

PRESS HISTORY The one and only press I have is my 1965 Vandercoook SP15 proof press.

BOXCAR’S ROLE I have used Boxcar exclusively for platemaking. You all make it easy and efficient, and your customer service always exceeds my expectations.

PRINTING FEATS I have a few. I laser print some designs on transparencies to help guide my plates with tight registration and multi-colors. I lay these on top of my base and slip the plates underneath. Also, I discovered that baby wipes clean ink off my inking surface better than any rag. I use them constantly to keep my hands ink-free while printing.

Folded note cards fresh from Presse Dufour.

LETTERPRESS COMMUNITY I’ve been blessed to be a part of a very exciting creative project that I’ve been working on diligently for the past month. I’ve partnered with MESA Production Company, here in New Orleans, to design and sell note cards and limited-edition prints related to 33 VARIATIONS, a 5-time Tony Award Nominated play written by Moisés Kaufman. The story is about a modern-day music scholar driven to solve one of classical music’s enduring riddles – the mystery behind Beethoven’s Diabelli Variations. A story about familial love, romantic desire, and artistic obsession, this extraordinary play examines what it means to lose the things that define us, and what we end up gaining in their stead. The play will run here in New Orleans September 11-29 at The Contemporary Arts Center.

My Etsy shop will carry the note cards and prints throughout the month of September and proceeds from those sales will go to benefit The ALS Association Louisiana-Mississippi Chapter and Team Gleason in helping to create a world without ALS!  Details and tickets for 33 VARIATIONS can be found here.

Vandercook letterpress press handle and Presse Dufour printed goodies.

WHAT’S NEXT  I have many designs in the works that express my love of the Gulf South. Watch this space!

A heaping round of thanks out to Karen Dufour for letting us get the skinny on Presse Dufour!

Twelve Little Books All In A Row

Small on size, big on letterpress love is the cheerful theme surrounding the Virginia Arts of the Book Center’s newest Kickstarter project, which aims to complete 12 finely crafted, hand-made artist’s books. And you can help bring more letterpress into the world by supporting the project!

Check out the Miniature Book Project Kickstarter project and pledge today.

Of & Type and Men

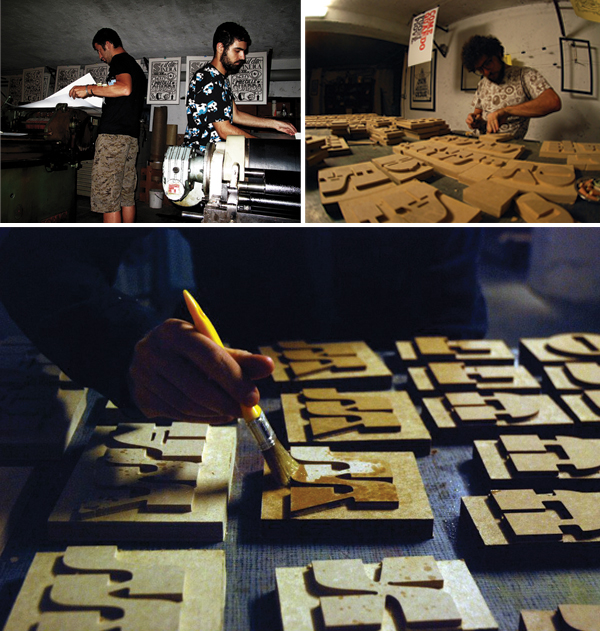
Trekking northwestward from the the sprawling Milan palazzos rests the quiet & serene city of Varese, Italy, surrounded by rolling fields of the awe-inspiring Italian countryside. Taking a closer look into the city, you’ll find the vibrant camaraderie that flows from the & Type print shop. Claudio, Gabriele, and Simone, the founders of & Type, opened their doors for us, letting in the passionate and experimental energy that engulfs their letterpress and printing abode. & Type is a letterpress print shop based in Varese, Italy

THE PRESSES We have four machines: 2 presses made by Saroglia (from Torino, Italy) 70×100 cm and 40×60 cm, 1 small manual press 23×32 cm, and 1 Nebiolo Ideale “a battuta” (as we say in Italian for “beat”), but this last one doesn’t work.

SIZE OF PRINT SHOP 70 square meters… almost 750 square feet.

TYPE OF SHOP We are just a laboratory, but often it is enjoyed with friends, interested people, or guests that join us for different purposes like projects, workshops, or just for type love sharing.

THE LOCATION Near the Liberty train station (in Varese, Italy).

FAVORITE THING ABOUT THE SHOP Our machines, wood type, typography, lettering books, and our friendship. We are surrounded by several posters, books, and music that are good sources of ideas. Last month, a beautiful puppy arrived, which is such great company!

NUMBER OF PRINTERS IN SPACE We have three printers. We don’t share the place with other people, but anyone is admitted to print with us or just to come enjoy with us. We prefer to be considered as only one mind because & Type is the mixing of the knowledge about letterforms of all of us.

MOST VALUABLE SHOP TOOL Pencil & hands.

FAVORITE INK Well, we always take time to figure out what color is most suitable for our purposes. We like to use typographic ink penetration, or rapid drying, that helps us to see details in our linocut matrix. Currently we enjoy finding and trying particular colors like metallic, fluorescent and glowing ones.  In our country, it is not easy to find all the colors we want; some of them are prohibited because of their chemical compositions.

SOLVENT OF CHOICE White spirit (turpentine), self-cleaning mechanisms, old towels and of course elbow grease. If you have some good cotton sheets, it’s not hard work.

PLATE AND BASE OF CHOICE We mostly use furniture linoleum used by gauges, but we also like to work with wood, MDF and different kinds of rubber. If it comes up that we find some interesting texture materials, we love to try it.

OIL OF CHOICE For gearboxes: synthetic oil; for the lubrication of open parts: UV-40 or oil for sewing machines.

WHAT TYPE OF RAG DO YOU CLEAN UP YOUR PRESSES WITH Towels, sheets, pants, T-shirts, shirts – everything that otherwise should be in rubbish.

FLOORING MATERIAL Industrial concrete flooring.

FLOOR PLAN TIPS Work in an illuminated space.

PIED TYPE None.

ORGANIZATION ADVICE Clean up after printing and have a relaxation area with some comfortable chairs.

PRINTING ADVICE To center the matrix, we used to draw the matrixes’ shapes on the print area with transparent paper, so we would know where to put every different color for posters. Custom engraving, friendly puppy mascot, and hand-crafted printed pieces of & Type of Italy.

Free Summertime Graphic Vector Set

The sun shining, the beaches overflowing, and the yummy smell of barbecue season lets us know that summer is (finally!) in full swing, printing aficionados! Catch a memory with our free summer themed vector set. which includes beautifully ornate borders, a fun summertime text set, and a pair of beached-themed shells for your letterpress designs. All are free for use and in both EPS and PDF format.

July 2013 Free Vector Art contains shells, ornate border, and fun summertime sayings.Summer Fun letterpress cardSummer time text letterpress printed with purple ink.