Thomas Carlyle, a satirical Scottish writer, is quoted as saying that Man is a tool-using animal. And what self-respecting print shop or studio isn’t filled with many necessary and important tools? We asked a handful of talented letterpress printers to tell us about the most valuable tool in their print shop, and we got some great answers to share with you (including tips and secrets for geting the most out of these handy tools). As always, we hope to hear about the tool you can’t live without in your shop, so be sure to add your advice in the comments section below!
Mary Mashburn and Steve St. Angelo (Shop Boy) – Typecast Press
There are so many terrific tools that we’ve been given or purchased while building our business — and letterpress knowledge — that we had to think pretty hard about which is the most useful. Then it hit us at the same instant: Alignmate! (If you don’t have one yet, it’s a thin, see-through, gridded, somewhat-expensive-for-what-it-is and easy-to-lose-in-stacks-of-paper piece of plastic that makes checking the straightness of image to paper so simple, aligning addresses on envelopes such a snap, that you won’t be able to function without it).
But we figured everybody would say that, right? Not that they or we would be wrong. But it got us to thinking about tools at our printshop that have made the almighty Alignmate even better. Mary and Steve — alias Shop Boy — have very different roles at Typecast Press (she the registration, he the repetition) so it should be no surprise that we have a strong difference of opinion here.
Mary went with the loupe. A photographer friend bequeathed to Typecast Press not just any loupe but an adjustable black metal Fuji 4x job that the company had once given away as a promo. It’s overkill. Any loupe will do for magnifying the precision of the Alignmate. By pressing the loupe directly against the Alignmate, Mary can see all the way to straightness heaven. Side to side, centered. Top to bottom, ditto. Stray dots cannot hide. Of course, even without the Alignmate, the loupe is a wonder for looking at ink density (“Get me 30ccs of mag carb, STAT!”) and consistency across the printing area, or for evidence that the rollers are too high or low. And checking those things again. And again. And again.
Steve’s running joke is that Mary looks for reasons to stop the presses; he looks for reasons to keep them going. She insists her tweakiness is the real time saver. Fair enough.
But as his most important tool, Steve votes for those little double-stick foam scrapbooker squares — Uhu is our brand. These dumb little things let you print funky-sized envelopes or pre-cut coasters on the C&P in a hurry, using a Boxcar base and a polymer plate, without the fear of a nicked base and smashed metal gauge pins. Say Mary’s letterpress class from the Maryland Institute College of Art has stopped by for a tutorial on the C&P. They work exclusively on Vandercooks at MICA. About 15 students. Each has a polymer plate the size of a 4-inch round coaster. And we’ve got 90 minutes or so in which to get each kid the experience of creating 25 samples of his or her printed design. No sweat. Pick a dependable spot on the platen. Peel one side of two little squares (it’d be three squares set like gauge pins for a rectangle) and stick them to the tympan, an inch or two apart and angled in just a hair. Tape the impression side of the polymer plate to the coaster and set the coaster between the squares. Press together. Bang. You should be pretty darn close to registered. (“Alignmate!”) The squares pull up and then re-stick for micro-adjustments if necessary. Done. And … next!

Ray Nichols – Lead Graffiti
I didn’t want to go with the obvious, such as one of our two micrometer composing sticks, but I wanted to get outside of the normal a bit. Hmmm. A roller height gauge is critical. Our electronic micrometer for measuring paper thicknesses and wood type height. Our killer old Boston pencil sharpener which puts a seriously long, tapering point to pencils. But overall I would pick Scotch tape. We use it to build up type (and once you get it right you can just leave it on) or woodcuts. We also use it a lot on the mylar on our Vandercooks to build up specific area a bit such as the names on a wedding invitation to give it a bit of extra punch. One small trick that is good if you have enough room around it is to double back one end (not under an area you are printing) so that you can easily grab it to pull it up after printing. We’ll often print right on the mylar, stick a piece of tape to the printed image we want to add impression and then pull it back up so we can see the exact printing area, and then cut the tape out in the right shape. This way you have a nice image to align against. Also we will often use an Xacto knife blade barely stuck to one or both sides to help us get it into position.

Mike Dacey – Repeat Press
After much thought I’d have to say the most valuable tool in my shop right now is my cutter, a Challenge 305 with power back and digital readout. It allows me to order and cut large parent sheets in bulk, which saves a huge amount of time and money. After printing, I can trim down orders with the precision and consistency that my clients demand. The cutter cost more than I paid for any of my presses but I’d buy it again in a heartbeat – I really can’t imagine running my shop without it. I don’t have many secrets for this one, it’s a pretty straightforward piece of equipment. Get some extra knives, keep them sharp, and you’re good to go!

Gerald Lange – Bieler Press
What I have to proffer is not the most valuable tool (in terms of expense) but it is one I rely upon and trust daily, and it has a personal history that I value. It is the lowly roller height setting gauge. I had always admired the long handled gauges used on production platen presses and when a friend of mine offered to make a dead on accurate gauge for me at Jet Propulsion Laboratories, what could I say but yes. They had made a bed plate for me a while before and it was dead on (I think they thought it was going to Mars or something).
Well, he tested the other gauges I had, historic and present, and said that they were not, um, in anyway .918 (he was a bit of a stickler) so off we went, hand-polished to .91800+/-. Somehow we ended up with about four or five dozen of these before he got sick and tired of the hand-polishing thing. I kept a couple and we sold the rest.
At any rate, I like to call it my magic gauge. Everything seems just so right when I use it. And that is just so, so reassuring on press.
Specifications on it are: Gauge is 15-3/8 inches long. Shaft is 5/16 of an inch in diameter. Mirror-polished head is precisely ground to .91800+/-. Head is beveled and measures 3/4 of an inch wide. Weight is 7-1/4 ounces. Knurled tail. Made of 303 high-grade stainless steel. Highly resistant to corrosion. Non magnetic.

Ben Levitz – Studio on Fire
Here are a couple things we use every project, every press:
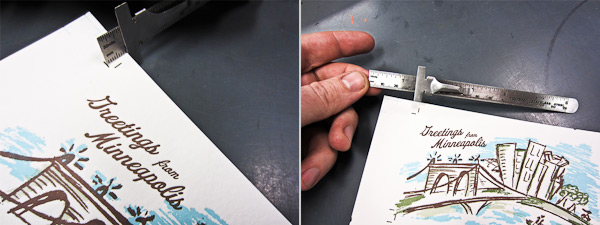
Digital Thickness Gauge – Don’t guess at your packing. These are critical for knowing what you are placing in the press for packing to quickly and accurately achieve the desired impression. Ours cost about $70 from Amazon.
Depth Ruler – These little $2 rulers have a little sliding clip perfect for comparing the distance from crop to edge of sheet. Perfect for quick comparison side to side and head to tail of sheet to squaring things ups. Crooked printing sucks to correct later on the cutter.

Graham Moss – Incline Press
Back in the day there was a printing supply company in the UK called Cornerstone, and by the 1960s they were the bee’s knees when it came to ordering sundries for serious letterpress work.
They pretty much supplied all the goods you might need, excluding presses and type. They made sets of three narrow rollers with a uniform handle so you could pull two colour proofs with a single line of 10pt type in a second colour; type cabinets with cases that were made of ultra lightweight metal with plastic liners, that ran on nylon rollers and had a safety mechanism so it was impossible to pull the case too far out and drop it; their aluminium furniture was widely used, top quality page cord the like of which we won’t see again, and the make-up galley with a spring lever that told you how many points under or over your page was, another item still in use around here.
But of all their sundries the one I prize most is the type high measuring gauge. The 10 inch square steel base is engineered flat, and connected to one side is a five inch curving arm bringing a dial gauge to a spot over the centre. This has a spring loaded contact point so that a block, be it polymer, zinc, mag, or wood engraving, placed beneath it, gives the exact height, the dial showing .918 centred at zero, and one thou increments up to twenty five thou above or below type high each side of it.
I rely on it, and every block I prepare for printing passes under the gauge before going in the chase. Old blocks, purchased with all sorts of paper packing on the back, can be cleaned and rebuilt, checked and made ready for use with little trouble. Likewise wood type, notoriously various, saving a lot of effort by checking each letter for wear before setting and pulling a first proof. Eventually every piece in the shop will have been corrected through using the gauge, but that will take a while!
My biggest saving was with a book illustrated with ten original wood engravings – all were supposed to be machined to type high by a reputable supplier. One though was twelve thou over, and considering how much work goes into creating one wood engraving, I was delighted not to crush it!

Fred Hagstrom – Carleton College
I recently asked a student how large something was and the reply was “seven and three lines.” So my most essential tool is the ruler, and I am dismayed by the growing number of people–smart, well educated people–that don’t know how to read a ruler. When I do bookbinding with groups I ask them to measure 3/8 of an inch for the spine gap. I have to quickly look around the room. Some will have 3/16, some even 3/4 but they will have 3 somethings. It is not that they are dumb, it is just that they have never made anything before, so there is a huge gap in the physical and mental skills of how things are made. For instance, body mechanics. I can show someone how to cut something, or how to print something, but I can no longer assume a basic physical understanding of how to complete a task. I end up talking about how to stand, how to push down on something etc. That is something I did not have to do years ago. I have found my print tools spread around the building, mangled when used to do something inappropriate like opening a paint can. There is little reverence or appreciation for tools because they are not understood.
Learning these skills is not just a mundane thing. There is an intellectual dimension to knowing how to do things. Too many folks in education see this as devoid of intellectual content. Some highly intelligent people lack the basic ability to complete a task. They would be liberated in an intellectual sense if they had a better understanding of work. And the digital world has only increased this problem. I hope to increase people’s enjoyment of the process, and decrease their fascination with the results-only approach. I had a poor academic preparation, but I had a huge advantage in life experience from doing manual labor. I knew how to learn because I knew how to work.

So tell us – what’s the handiest tool in your print shop? Add your comments below!


