For this roundtable discussion, we invited a handful of talented letterpress printers to let us in on their best (and some quite startling) inking techniques to share with you. As always, we hope to hear you dish about the inking secrets that make your press runs smooth, so be sure to add your advice in the comments section below!
Sarah Almond – Shed Letterpress
As a largely commercial shop, a lot of our printing caters to the whims of whichever talented, awesome designer we’re currently working with. I’d be remiss if I said I hadn’t noticed some trends in design, though, that are very specifically related to proper inking and getting the most out of the press.

As requests for floods and knockouts have become more popular, I’ve had to adjust the way that I think about the inking process. In my work as an apprentice, I spent the majority of my time printing wedding invitations and focusing on type clarity and sharpness. Knockouts and floods present a different sort of challenge, however, since one is simultaneously trying to get great coverage and pull a clear, tight print.
The first step for me is to add the rider roller to my Heidelberg 10×15. Though the roller is traditionally used to prevent ghosting (and is spectacularly good at doing so), I’ve tinkered with it enough to discover that it’s also a great way to get a little more ink on the rollers. What is key with the rider roller is to adjust its pressure against the other two—you really want it to just lay against them. Once I’ve tightened down the screws, I run the press, uninked, a couple of times through to make sure that it’s spinning freely but not too loose.
Another step I’ve stumbled upon is to add a little bit of tack reducer to the ink to make sure it is being distributed evenly and smoothly (I use Van Son 2162). Once I’ve mixed my Pantone, I add just a bit so that the ink is slightly less tacky than usual (side note: this isn’t always the best idea for darker colors, but I frequently warn clients that a dark flood will more than likely not be even). I then ink the distributor roller towards the back of the press with tiny dots of color, building up slowly until I feel that I’ve reached the maximum amount that the rollers will hold. Visually, I can usually tell when I’ve gone too far; the rollers will take on a “glazed” appearance, and then it’s time to wash the press down and start over.
It’s rare to get a great flood from one impression alone. Frequently I have to skip feed the press to get the consistency that I like. This can present a problem, however, as double feeding darkens the Pantone. When I know that I’m going to need to run something through the press twice, I will add a bit of transparent white to the mixed ink in an effort to maintain the color. I’ve also found that, when skip feeding, it’s better to err on the side of underinking and then build up very, very slowly.
Last but not least, I’ve found that the lighter Pantones with large amounts of transparent white can take on an almost mealy effect. The color tends to tighten up towards the end of a short run, but it can be frustrating to wait it out. A great way to prevent this, which I learned from Tim Chapman at Press New York, is to add a small percentage of plain white ink in the place of the transparent white. I never use more than, say, 20% of the total amount (for example, if the mix is five parts transparent white to one part black, I’ll use one part white, four parts transparent white, and one part black), and I haven’t noticed that it affects the appearance of the Pantone.
All this being said, however, the real key is to just play around with your press until you find a way that works best for you, and communicate the limitations of the press to your clients. I always like to let designers know that a letterpress flood isn’t going to look like an offset flood, and it’s helpful to have some examples around the shop so that they know what to expect. I’ve attached a couple of my own here.
Ben Sargent
Of the elements of making ready for a letterpress job–gauge, impression, inking–that pesky inking is generally the only one that requires the printer’s attention all through the press run. While gauge and impression can ideally be adjusted, set and then left alone, the ink is being used up a little bit with every impression, so the pressman needs to keep a bright lookout to make sure the ink appears on the page with proper and consistent density and color.

The right ink is a good place to start, and in our shop we have always depended on good old rubber-based ink, which is easy to work with, consistent in color and consistency, and comes in Pantone colors which make custom color mixing a relative breeze.
To ink up the press (and we’re talking here about a 108-year-old C&P job press; certainly many people have presses with more sophisticated inking systems), always start light and work up to the right amount of ink (even though it might wind up being a lot!) . A good smear the width of your ink knife across the ink table is a good start. And if you go too far, of course, there are high-tech ways of taking ink off the table, such as carefully letting the rollers run over a sheet of newsprint draped across the ink table (followed by five or six impressions to even up the remaining ink.)
As in just about every element of the printer’s work, patience can be your best friend, and ink management is no exception. As you run the job, check the ink impression frequently, and have the patience to add ink as often as necessary, even if it’s after only a few impressions. Occasionally, as well, the inking characteristics of a job may demand “skip-feeding,” or taking an impression only on every other rotation of the press. This may be required particularly with a form that has both broad areas of heavy inking and other elements that are more delicate, or it may be necessary with a form that has a bleed onto the tympan sheet, where you will want both hands to remove the printed piece without smearing. Again, sometimes patient printing takes time.
Adding ink initially, of course, is best done without the form in the press, but in mid-run it is certainly possible to add ink without stopping the press (removing the chase can potentially make minuscule changes in the gauge), if done carefully. Put just a small dab on the top right corner of the ink table (being alert, of course, to keeping the ink knife away from the rollers), and smear it leftward around the edge in as thin a film as possible. Let the ink even out for seven or eight impressions, and you’re ready to continue feeding.
The other essential element in inking, of course, is the proper care and feeding of rollers. Good composition rollers should give you a long life of reliable service, but they do need replacing every once in a while (see what your supplier or fellow printers think in terms of how often). Never leave rollers on the ink table, of course, and if they’re off the press, they should ideally be stored vertically, somewhere where they won’t be unduly affected by temperature extremes or ultraviolet light.
Many inking problems may be traced to roller height on the press, up to and including those dramatic moments when part of a form just disappears, even though the type or plates are still clearly making an impression. Different presses have different systems for adjusting roller height, but a type-high roller gauge is an excellent investment for being sure the rollers are properly just kissing the form, and for making adjustments if they’re not.
Keeping consistent inking through a job can sometimes be a time-consuming exercise, but having the impression look just right in strength and color is well worth it! Hope these ideas help!
Matt Robinson – Studio Four Three
While I believe ink (both mixing and application) is incredibly important when it comes to letterpress (or any print media for that matter), I think the discussion of ink should begin with a discussion of color.
As I am sure a majority of the Boxcar Press community is aware, color is very important, but depending on who you ask, the individual’s perception of color can vary from one person to the next, which makes mixing “green” or “red” ink a sort of an arbitrary guessing game if you don’t have a good reference to go off of. There are several factors that determine our perception of color: gender, the cones and rods in our eyes, ambient/natural, or artificial light, a person’s age, surrounding objects, and even the time of day can all change the way we see colors. Knowing there are so many variables that can and will change the way we perceive color, it becomes imperative to have a standardized way of calibrating the correct color.
One of the biggest issues I run into with clients (and in the grand scheme of life, it’s by no means is it truly an issue) is trying to explain how the color they are viewing on their desktop printer or their computer monitor might not be the same color I’m using in the design and seeing on my computer. All of those previously-mentioned variables now come into play in a practical way, and it helps streamline my job if I ask the client to mail me a fabric swatch, a paint chip, or pick out their color using on of my ever-so-trusty Pantone swatch books.
I rely on my Pantone books to help myself and our client pick out the correct color, which essentially removes the ambiguity of what they see and perceive on their computer monitor. Once the color swatches have been picked out, the designs have been approved, and Boxcar has produced the photopolymer plates we use to press, the next step is to mix the inks.
Mixing inks was initially an intimidating task but is made fairly easy by my trusty scale, Pantone formula guide, and a few different putty knives. While most printers I know have their “proprietary secrets” that they won’t divulge to anyone, a little trick that was taught to me by a friend (a fellow printer) is to mix inks on a piece of glass that’s elevated by some rubber sticky pads. Underneath the glass, simply slide a piece of the paper you will be printing on and use that paper to help gauge the color as you’re mixing. My favorite ink is Van Son Rubber, which is generally transparent so the color of the paper changes the perception of the color of ink when its applied.
Learning the hard way, when applying ink to the ink plate, start with a little and work your way up…its easier to add ink than it is to clean the press and start over. If there is heavy inking on the plate, its always possible to adjust the rail height by adding rail tape or painter’s tape (I use a combination of both of them) to elevate the trucks, which move the rollers off of the artwork just enough to reduce the amount of ink that’s applied each pass.
Bridget Elmer – The Southern Letterpress
At The Southern Letterpress, we are big fans of the rainbow roll. Printing a multi-color gradient can be particularly challenging when you’re aiming for a consistent edition and printing on a press with an oscillating roller. My first rainbow roll edition was for my own wedding invitations, which my husband and I co-designed in the spirit of vintage, handset Lucha Libre posters.

Once our complicated lock-up was ready to be printed, we quickly discovered that it was difficult to maintain consistency with the rainbow roll and that the colors quickly began to blend and become increasingly muddy at the center of the rollers as we printed. Hmmm…

Let the troubleshooting begin!
We did some research on Briar Press and the Ladies of Letterpress forum, both of which offer incredibly helpful resources and advice from fellow printers. At the time, my studio was located at 7 Ton Letterpress Collective in Asheville, NC, so I picked the brains of my incredibly capable 7 Ton colleagues as well! With all of this shared knowledge in hand, we cleaned the press and started over, following a few simple rules for a more successful and consistent rainbow roll. At Blogxcar’s request, we’re happy to share them with you!
1) Turn off the motor as soon as your ink is sufficiently distributed on the rollers. This minimizes oscillation and blending, which will occur only as you travel down the bed of the press and back. Of course, you’ll need to turn the motor back on when adding ink, but again, switch that motor off as soon as initial distribution is complete.
2) When adding ink, add more of the lighter color in your gradient. Keep adding consistent amounts of ink along the inking roller, but extend the coverage of the lighter color further along the roller.
3) If you’re planning to print with more than two colors, we suggest placing your lightest color in the center of the rollers. If you’re printing three colors, you can easily add only that lightest color to the center of your rollers when re-inking.
4) Don’t be afraid to clean the press in the middle of your edition and begin again with fresh ink. Once the ink begins to get muddy, there is only so much you can do to bring it back to it’s original rainbow glory! It may seem like a pain, but it can save you a lot of frustration in the end.


After the wedding invitations were in the mail, we just couldn’t get enough of the beautiful gradients that the rainbow roll creates. The experiments continue at my studio in St Petersburg, FL, and at our storefront shop in Northport, AL! Many thanks to Boxcar Press for the invitation to share what we’ve learned at The Southern Letterpress.
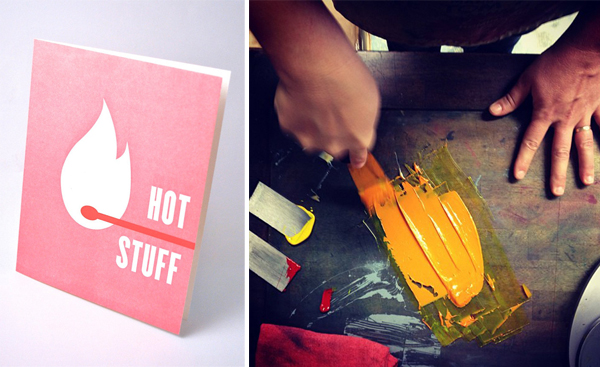
Eric Woods – The Firecracker Press
Some inking tips [are]: VanSon Dutch Fireball (PMS 185), straight out of the can, always looks pink unless mixed with another, darker tone. We usually mix in a little black… we call it Firecracker Red. Opaque white, when printed on chipboard, will change color while drying. We print a proof, let it sit for a minute or two, then pull a fresh proof and compare the two. The difference in tone is sometimes very dramatic. We’re still looking for a good white.
When we first started out we had trouble with ink offset as we stacked finished prints. We thought the ink was too wet and devised elaborate drying systems (I think we even tried microwaving each print) with clothes lines all over the studio. It was time consuming. An old-timer pointed out that we were over-inking everything. Ink was getting onto the shoulder of our type or woodcut, collecting as a microscopic halo around everything, and transferring onto the printed sheet. When we stacked the prints, after running them through the press, the ink halo was offsetting on the back of the previous print. Messy and unprofessional and not the fault of the ink after all!
Ke Francis – Hoopsnake Press & Flying Horse Press
One of the interesting things about Boxcar Press is the variety of artists and printers who use their services. I would assume that each of these clients has a different perception of the “correct application of ink to matrix” depending on their demands. Generally speaking, the aim of most printers is to consistently duplicate an image in multiple. If a machine, even a simple machine, is used in the process then cleanliness, neatness, and attention to detail are part of the successful mindset. There are printing and inking benchmarks for the industry and a conservative approach to inking is a must with sophisticated presses. We probably all agree on this point and maybe we will agree on the following characteristics of ink:
The first thing to remember about ink is that it does not respect your shop’s “Immigration Policy”. It will migrate at will. The minute you pull the tape from the top of the can it is on it’s mischievous way. If you enter the print shop with a nice sports jacket, stand in the middle of the room, and don’t touch anything, in about four minutes it will be on your jacket.
If you place the correct amount of ink (you think it is the correct amount) on your platen or distribution rollers and let it run for a while to “even-out” and then pull a proof you will often discover there is too much ink on your rollers. How did the extra ink get there? The same way it got on your sports jacket.
Ink, if left to it’s own devices, will turn a civil gathering of the medium into a riotous mob that will “black the eyes of your Es’ and turn your pristine type into “sloppy rag-a-muffins”. Over-inking a complex press means that the machine has to be shut down and ink cleaned off to get a fresh start. This is the case even with Vandercooks and platen presses and especially true of vacuum fed machines like the Klugy and the Red Ball. So the lesson to be learned about inking these presses is to apply the ink to the distribution system very slowly until the correct amount is reached.
Do everything you can to thwart ink’s natural inclination to gather, preach revolution, and cause problems. If you do not have anal retentive tendencies (lots of printers do and that is of great benefit) then you need to button the top button on your shirt,.put on your cleanest apron, put a clean rag in your back pocket, and get out your loupe. If Nurse Rachet from “One Flew Over the Cuckoo’s Nest” is in the alley taking a break and a smoke then invite her in, give her some of those head-banded magnifiers and sit her down next to you to help keep the ink under control. Promise her anything (booze, counseling, cigarettes, snuff, Red Bull, etc.) to look carefully at the proofs while you slowly add ink until the type is crisp and black. Then print away until the type starts to lighten and then add a little ink. If there are artists in the room (including your alter ego) then this is a good time to chide and cajole them and point out how little they really know or understand. This will help your attitude immensely. Quote Michel Focault or some other contemporary French critic…One little quote will do…or better yet quote a few stanzas of Emily Dickinson to show them that you are REALLY sensitive, but also capable of doing the REAL work while they must live their little desperate lives with only their concepts for support…I promise this will help keep the ink under control [laughs].
We know you must have a really good inking tip or two that you can share, so tell yours in the comments section below! We’d love to hear how you get your print runs to go smoothly!
Pingback: Think Ink on Blogxcar // The Southern Letterpress