When prepping a file for platemaking (or any printing job), you may find yourself deciding between crop marks and registration marks. Not sure which one to use? We’ve put together some scenarios where you might find these tools helpful — but first, we’ll start with some definitions and distinctions between the two.
Crop Marks Or Trim Marks:
Crop marks — also called trim marks — thin lines placed at the corners of your artwork that indicate where to trim your finished project. If your paper is larger than your final cutting size, it is helpful and sometimes crucial to include them. Crop marks help the person cutting to know precisely where to cut your piece.
When might it be important to have paper that is larger than your final size rather than a pre-cut size? For presses that grip the paper, using a larger sheet and making a finish cut allows you the paper edge or space to grip and guide the paper while printing, and provides space for you to use a guide pin (which may leave a mark on the paper).

Crop marks become crucial if you are printing a bleed (which is a design that runs to the edge of the finished piece). A design with a bleed is one where the artwork extends a minimum of 1/8″ past the edge of the finished design. Extending your artwork past that point prevents a blank or unprinted area from showing up along the edges of your design.
Crop marks are added during the design stage of a project, and are an option in most design software. We’ll share tips for adding them below.
Registration Marks:
Registration marks are used when you have a piece that will have multiple applications during production. This could mean two or more letterpress ink colors, die cutting, foil stamping, or embossing. Registration marks are important for precision and placement.

A piece that is mis-registered (as shown above) will show elements that may be side by side when they should have been on top of each other. There are many different forms of registration marks, but the most common are the “crosshairs” or “target” style marks, color bars and even using the lines of crop marks.

These marks will eventually be trimmed off the final piece, and registration marks should also have crop marks added, too. Registration marks will appear on each plate that you make, and they should be aligned to overlap perfectly.
Creating Crop Marks
When creating crop marks in Adobe Illustrator there are two ways to make them:
Option One
Create crop marks in Adobe Illustrator by drawing a box using the rectangle tool (M) with no stroke or fill color the same size and position as the final trim. Using the direct selection arrow (the white arrow tool), click on the box. In your color window, turn off the stroke by clicking the red diagonal line (none).

Now click EFFECT > CROP MARKS (for all versions of Adobe Illustrator). You may also use OBJECT > CREATE TRIM MARKS (this is only available for Adobe CS6 and above). Lines will appear on each corner of the box.
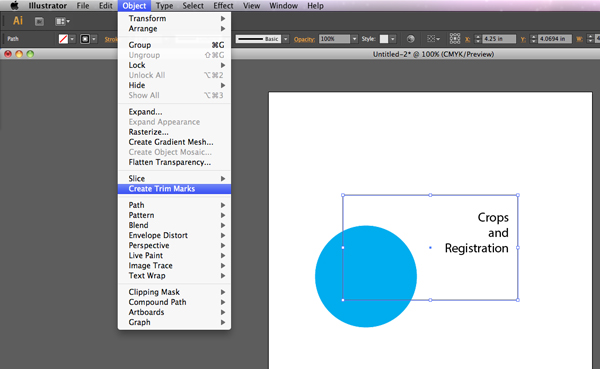
With the box still selected, click OBJECT > EXPAND APPEARANCE. You can now modify your crop marks, if needed.


Option Two
Set your art board in Adobe Illustrator to the final piece size. You can set this when you click FILE > NEW and put your measurements in under length and width. If your art board is already open, select FILE > DOCUMENT SETUP > EDIT ARTBOARDS and resize if needed.
Once you are done creating the file, you can save it as a press quality PDF by going to FILE > SAVE AS > ADOBE PDF (file format).
A window will open – choose Press Quality PDF from the Adobe Presets dropdown at the top. On the left, select MARKS AND BLEEDS and click trim marks. You can also set your registration marks by clicking on the Registration Marks box. NOTE: The default trim mark thickness may be less the the required minimum line thickness for your plate type, so adjust this to be higher, if needed.

In most printing jobs, registration marks and crop marks should always be in Registration Black. That means they will show up on every color plate and will not affected by spot colors or other special markings added in design.
Feel free to contact our prepress team if you’re not sure if you need crop marks for your next plate order. They do add additional space and cost to your platemaking ticket, but may save you time and money in the long run.